BW/BW2 Trainer ID & Secret ID Manip
Overview
To be able to RNG manipulate for Shinies, you need to know both your Trainer ID (TID) and Secret ID (SID). The TID you can simply view on the back of your Trainer Card, but the SID is hidden away and not visible to the player in any way.
Unlike prior games from Generations 3 and 4, in Gen 5 you can no longer find out your Secret ID from a randomly encountered shiny, though there has been a new method discovered recently. With this new method, you can find your SID using either your starter Pokémon (with several specific conditions needing to be true about the starter and savefile), or with one of the guaranteed shinies you can get in BW2. A guide for that will follow in the future.
This means that, for now, the only ways of figuring out your SID are
to either hack to view your SID using programs such as PKHeX, or to
reset your game and RNG manipulate a TID/SID pair at the start of
a new game, which is what this guide will teach you.
Should you already have an older save file on your game that you are not
willing to delete, do not have access to hacks and still wish to RNG
manipulate for shinies in Gen 5, you can use the program Entralinked by
Kuroppoi.
Follow the Setup Guide, tuck in a Pokémon you caught on your save file
and you'll be able to view its SID in the user interface of the program.
In the past in Generations 3 and 4 there was something called „PID/IV correlation", which meant that you could not just get any IV+nature spread shiny on any random TID/SID, but you only had at most 1 or 2 spreads with 5 or 6 perfect IVs that you could get as shinies on Stationary, Gift or Wild encounters, if any such good ones at all. There you had to RNG manip a TID/SID at the start of your adventure if you wanted e.g. a 6IV shiny Dialga. In Gen 5, this is no longer the case and every single TID/SID combination can get every possible IV+nature spread as a shiny.
There's 3 cases in which you should still RNG manip a specific TID/SID pair though to save yourself from wasting a lot of time and that is for the Starter or Roamer in BW1 and for the Starter in BW2. This is only relevant if you want any of those 3 to have 5 or 6 perfect IVs AND be shiny. If you just care for the IVs or just care for Shininess for the three mentioned cases, but not both combined, there's no point in preparing for it now. Instead you will want to do TID/SID RNG just to get a specific ID number like e.g. your favorite number. Most older guides just had you execute this RNG without going for anything specific and then just take the first TID/SID pair that PokeFinder tells you you supposedly hit, but that often lead to people being unable to get shinies later, as the TID/SID presented by the program were not what they actually hit. Going for a specific number ensures that once you do get it, you can be confident it's the correct one.
Recommended setup
Hardware requirements
-
A Generation 5 Pokémon game and a DS Console you have calibrated for Gen 5 RNG Manipulation (if you have not calibrated it yet, go to the Calibration guide)
-
a Windows 10/11 PC, MacOS Ventura/Sonoma/Sequoia, Ubuntu 22.04/24.04 or QT 6.8 or newer
In-Game requirements
- Do not have a save file on your game. To delete an old save file press Up+Select+B at the title screen and follow the instructions on screen.
Tools used
-
PokéFinder version 4.3.1 or newer
Pro tip: You can change the language of PokeFinder under "Tools" -> "Settings" to fit your game's language. This will change the names of the Pokémon, locations, Characteristics and Natures to be that of the game's language, which may be helpful later. For some languages, UI elements are also translated (e.g. in German and Italian), but not for all (e.g. Japanese and Korean don't have full UI translation).
-
For Windows: EonTimer 3.0.0-rc.6-calibration-fix
-
For Mac & Linux: EonTimer 3.0.0-rc.4
-
There is also a web version of EonTimer. The UI is different than what this guide uses though, so you'll have to make that adjustment yourself if you wish to use this web version instead of the downloadable app.
Video example
- N/A
The Guide
Pick your game version
Whilst the process isn't all that different between BW1 and BW2, there's enough smaller differences that warrant having them be in 2 separate tabs. Select the Game version you're playing:
If you're playing BW1, select the BW1 Tab and if you're playing BW2, select the BW2 Tab. I will be using my German copy of Black 1 and my English copy of Black 2 for this guide.
Setup
As alluded to earlier, in the cases of the Starter and Roamer in BW1, you may want to prepare for those now. If you simply want a shiny (possibly with a specific nature) of either of the two or just want them to have perfect IVs and a beneficial nature but without being shiny, there's no use in preparing for that now, as it'll be fairly easy to get later on anyways. If you, however, do want 5/6 perfect IVs AND for it to be shiny, you should prepare for that to save yourself many hours of time later.
This is important for the Starter, as that early on in the game you lack Chatot which are the primary tool used to advance the RNG forward relatively quickly and consistently, and instead you only have the very slow saving the game as a way to advance. So to not have to save the game 500 times wasting 2 hours of your time, you should prepare a target Seed that has 5/6 perfect IVs on IV Advance 0 with an early PID Advance that has the nature you desire which you can then turn shiny.
Note: Difference between PIDrng Advances and IV Advances
Generation 5 uses 2 completely separate RNG algorithms derived from the Initial
Seed to each decide some of the random things that happen in the game:
The first of the two, commonly referred to as the PIDrng, controls
the "regular" Advances. These Advances decide a wild Pokémons encounter
slot (so which species of the on a Route available ones you'll battle when
walking through grass), its Nature, ability, gender, PID (which decides shininess)
and whether it's holding an item or not.
This PIDrng algorithm is also used by several other things in the game to
determine their random patterns, which also means it is advanced whenever
those need to perform a randomized action. Notably this includes
the movement of randomly moving NPCs, Rain/Snow/Hail/Sandstorm
patterns, the game deciding whether you should trigger a wild encounter
when walking throu'gh Tall Grass (/Caveground/Surfing on water etc.), what
position the clock's needle should start in when saving the game and
how high of a pitch a custom recorded Chatter should have each time you
view the summary of a Chatot (among many other more minor things).
The second RNG algorithm, commonly referred to as the IVrng, is used for far fewer things however. It mainly controls what IVs (and with that the Hidden Power type and base power, since that's fully dependent on IVs) a Pokémon you encounter will have. It also controls the friendship step counter, which activates every 128 steps and has a 50/50 chance to increase each party member's friendship by 1, whether a Pokémon gets Pokerus after a battle and ALL the randomized actions inside a battle, including whether a Focus Blast hits or misses or whether a Flamethrower gets a burn on the opposing Pokémon. Due to it controlling all random actions in battles, it was made to advance at 60 Advances per second for each Pokémon active on the field to make it harder to manipulate the luck in battles.
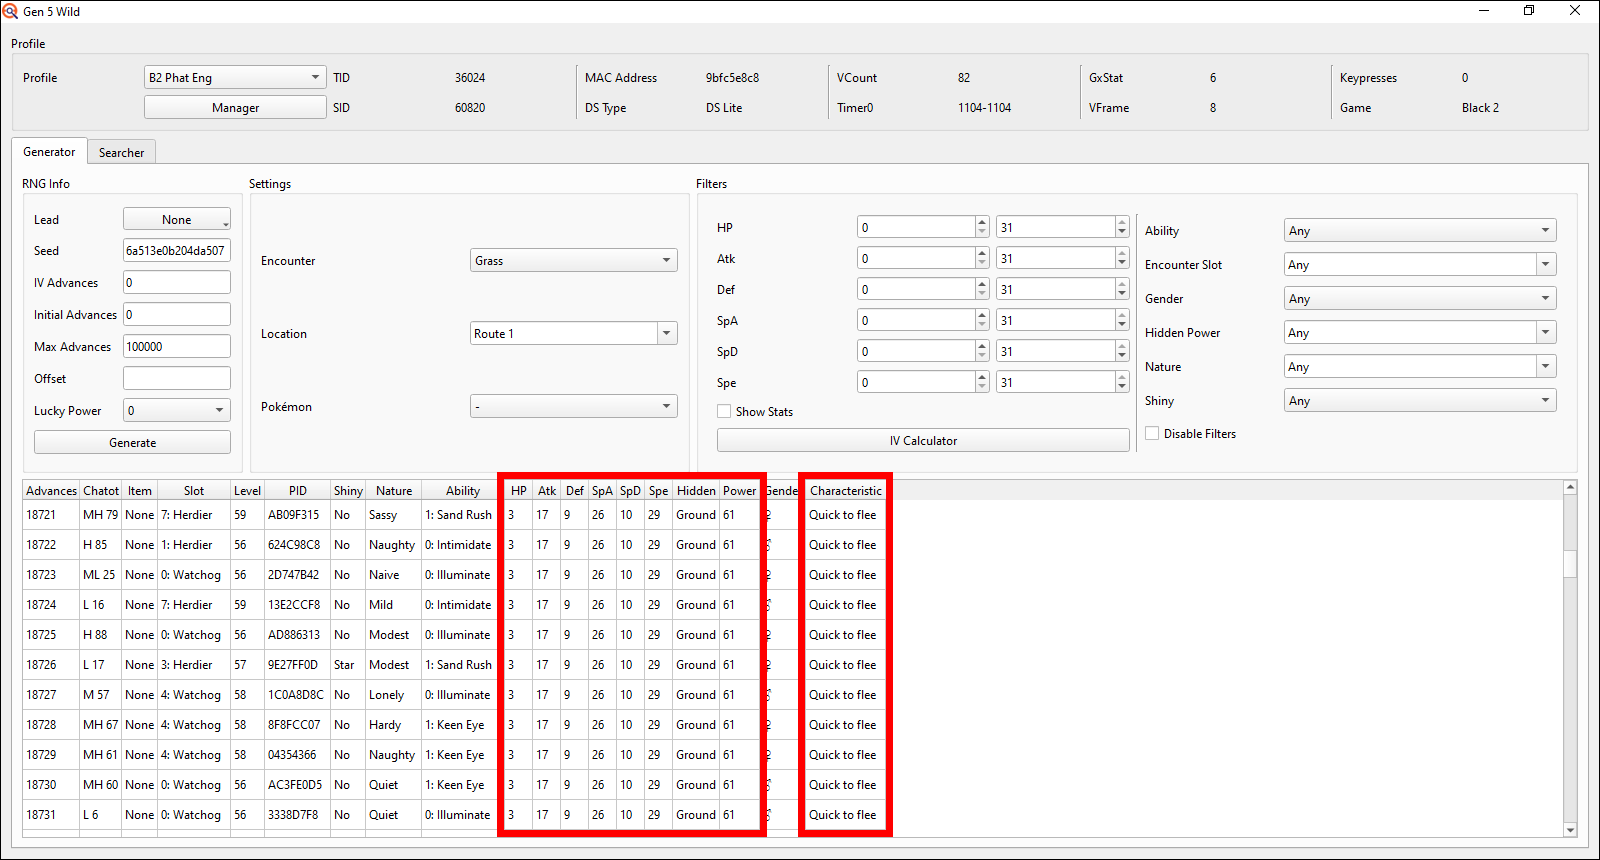
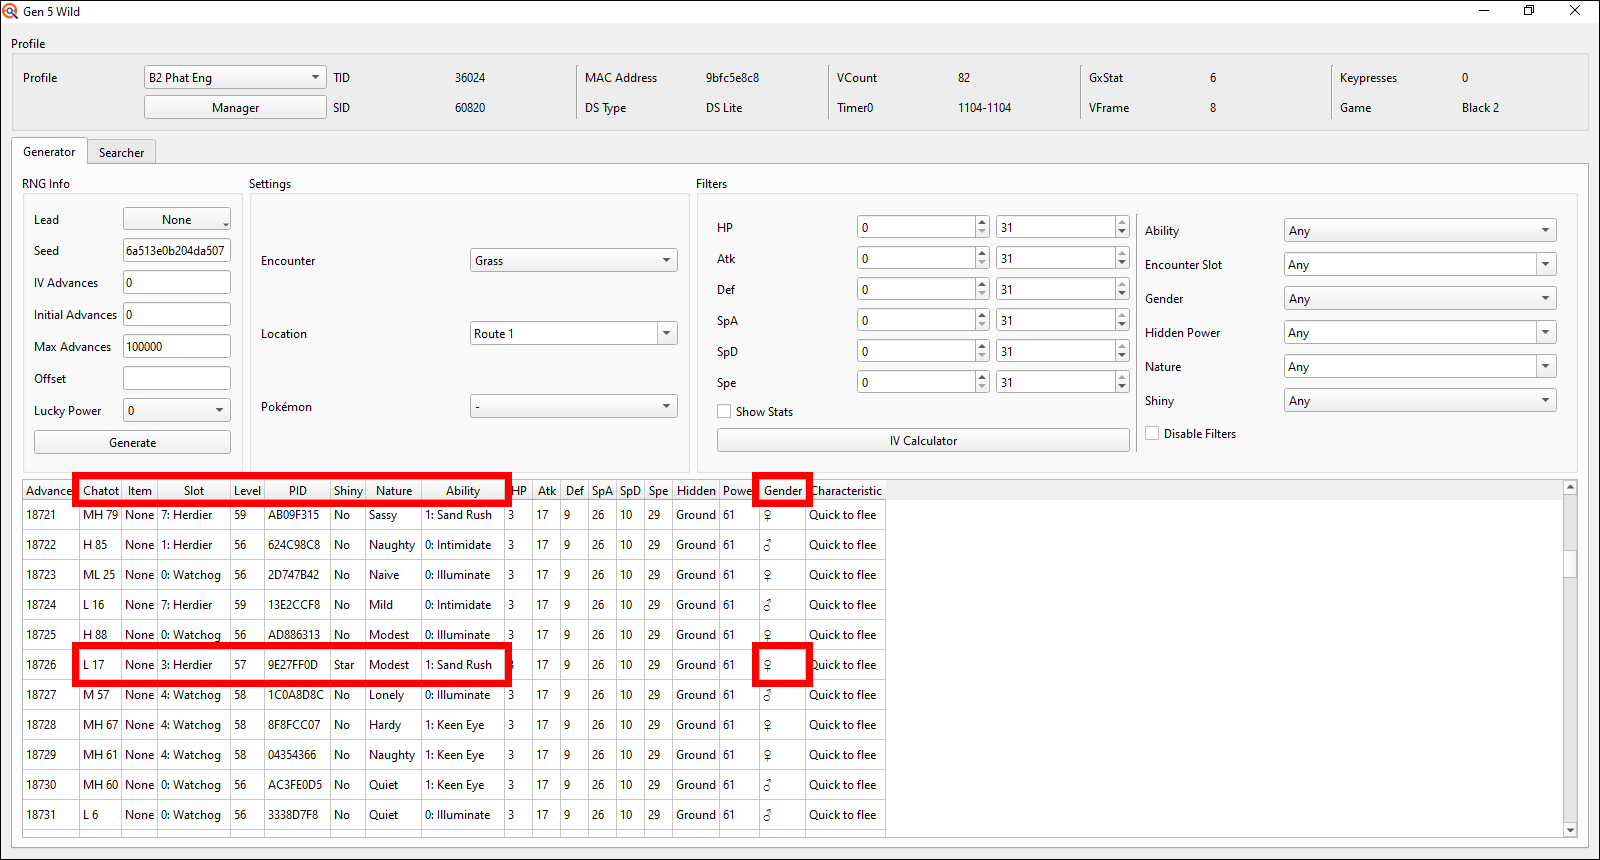
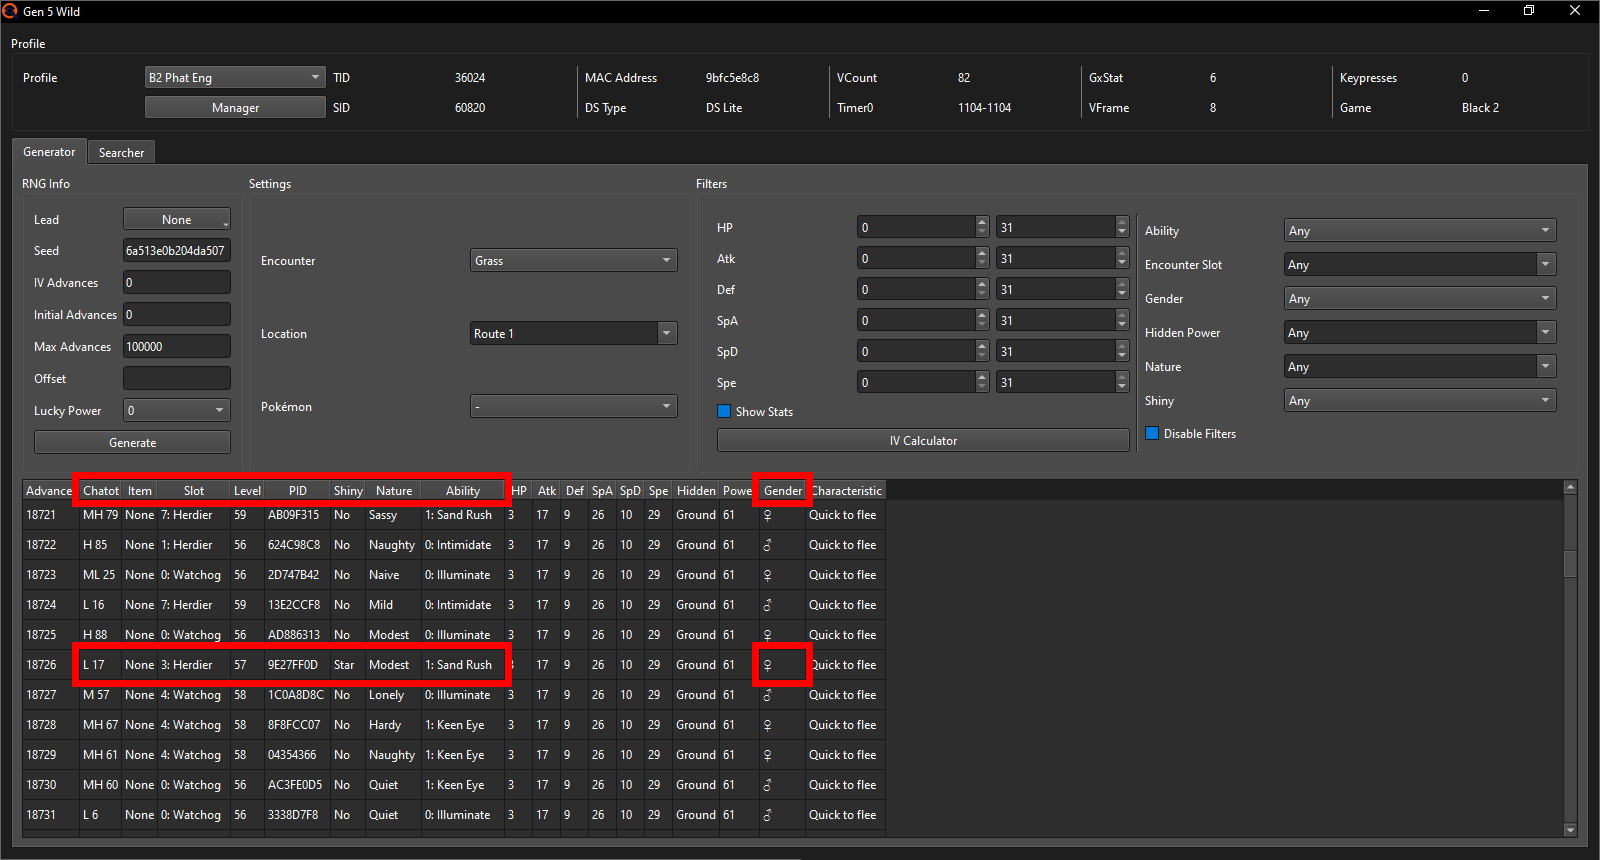
The two RNG algorithms being separate also means that, whilst one of the two can move by hundreds or even thousands of Advances, the other can remain at the exact same Advance throughout it all, which is why in these pictures you see the parts controlled by the PIDrng changing with each Advance, whilst the parts controlled by the IVrng remain the exact same. Due to the lack of good and reliable tools for advancing the IVrng, you will later see us always searching for an IVrng Advance of 0 and only ever adjusting the PIDrng Advances since those can easily be advanced via e.g. Chatot.
As a side note, the C-Gear is a bit of an odd case here, as it Advances both the PIDrng AND the IVrng whenever it's active. Make sure to always deactivate it when prompted upon loading your save file whilst doing RNG Manipulation.
How to actually RNG manipulate the Starter later I will not explain here but in a specific Starter RNG guide. As for the Roamer you'll also want to prepare for a 5/6 IV shiny now, as it's the single most annoyingly inconsistent RNG in all of Gen 5 due to both the random interference from NPCs on Route 7 and the storm cutscene itself advancing the RNG by wildly varying amounts. Going for less than 5/6 perfect IVs will also actually make this more difficult for reasons I will not explain here; so you must choose between getting a 5/6 IV and getting one with fully random IVs. Due to the scope of the preparations needed for the Roamer, I will not explain how to prepare for it at all in this guide to not bloat it with a lot of extra information, but rather give Roamer ID preparation its own guide here.
You can only prepare for one of the two, the Starter or the Roamer, on your save file, so choose wisely. To find out how to prepare for getting a 5/6 IV shiny Starter, check out the following note.
Note: Getting a 5/6 IV shiny Starter
Before we continue, we'll want to import an IV Cache into our Profile to significantly speed up the target Seed search.
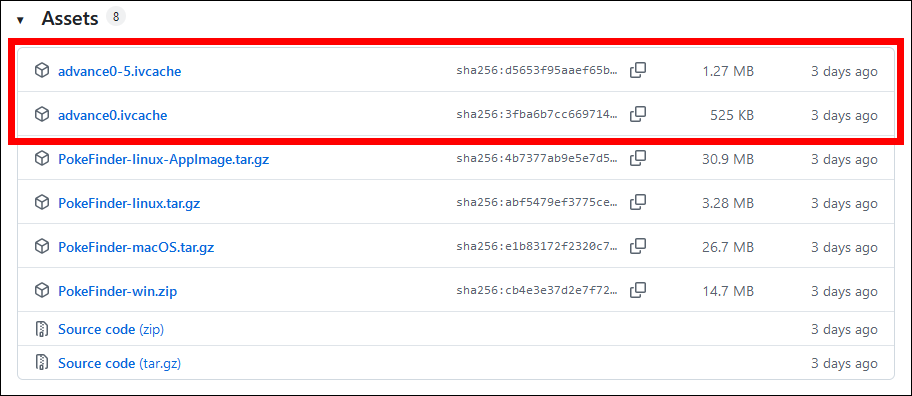
For this we need to download the IV Cache first. You can get it from the Assets on PokeFinder's GitHub page. I'll pick the 0-5 IV Advance Cache so I'll have more options if I want to do some advanced IV advancement methods in the future (not discussed in this guide). It also costs less than 1 MB space more than the one with only IV Advance 0, so I don't see a point in ever choosing the Advance 0 file. I recommend you save it in the PokeFinder folder so you can easily find it again later. Should you accidentally delete the file you can always just redownload it.
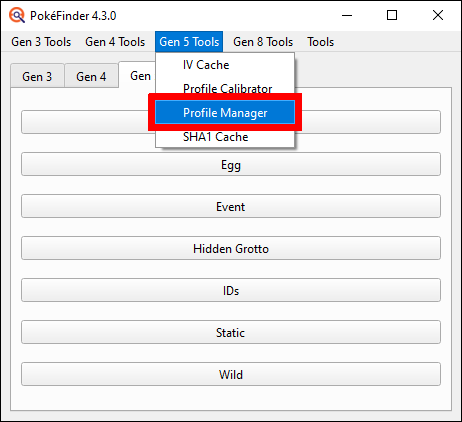
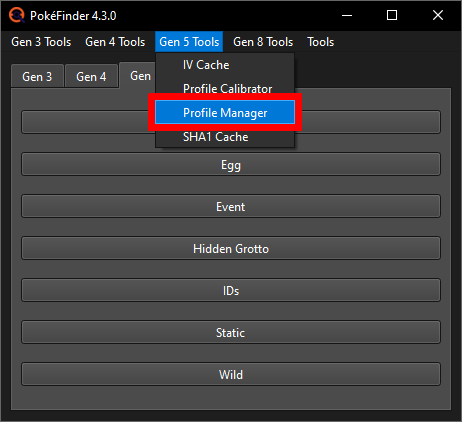
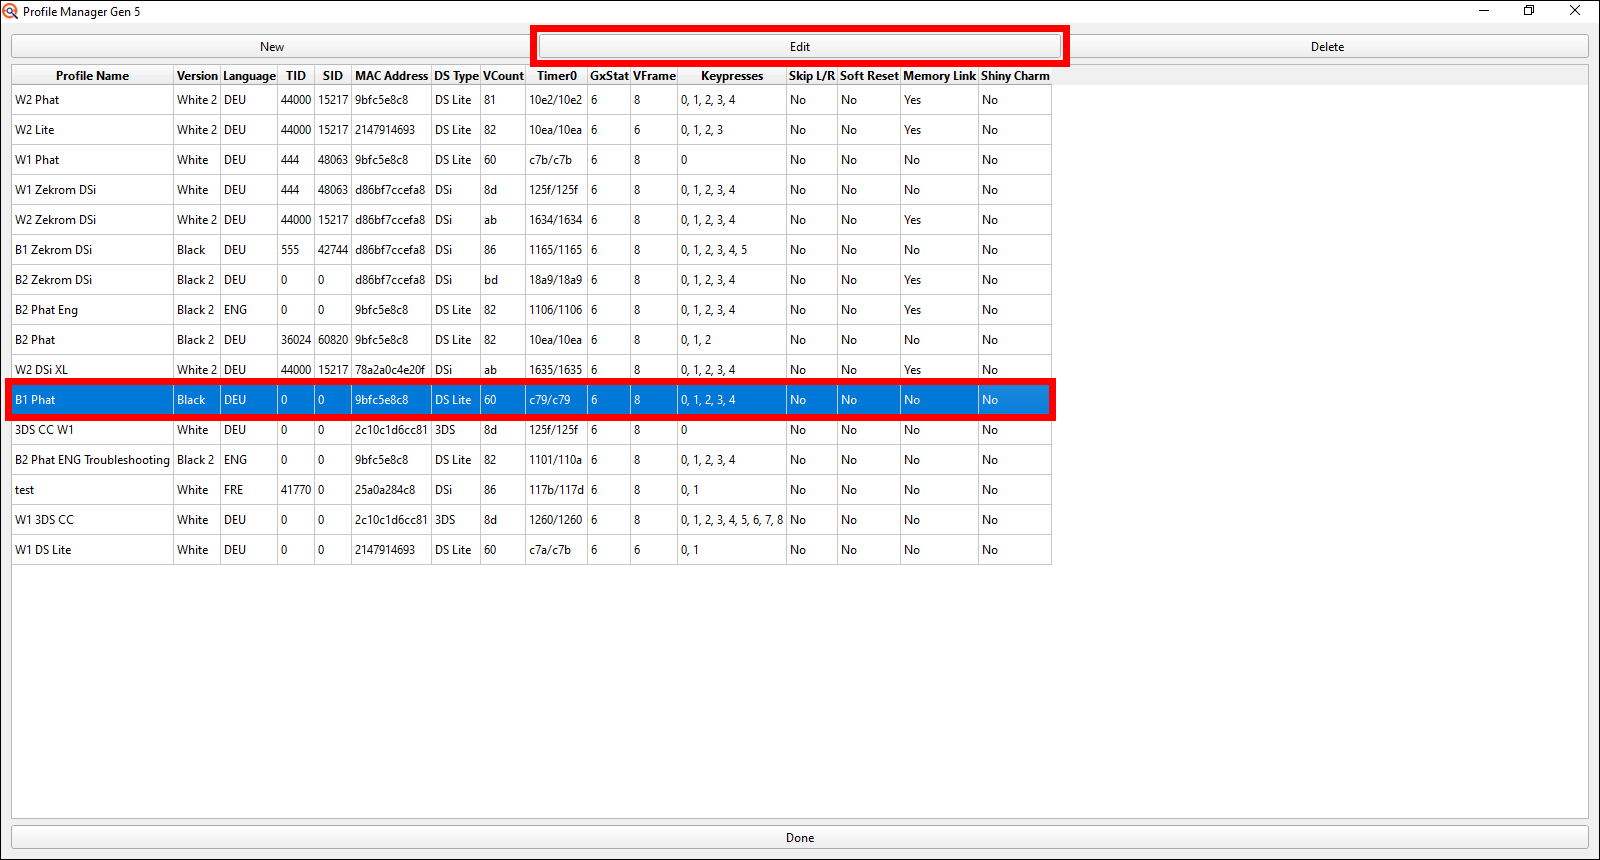
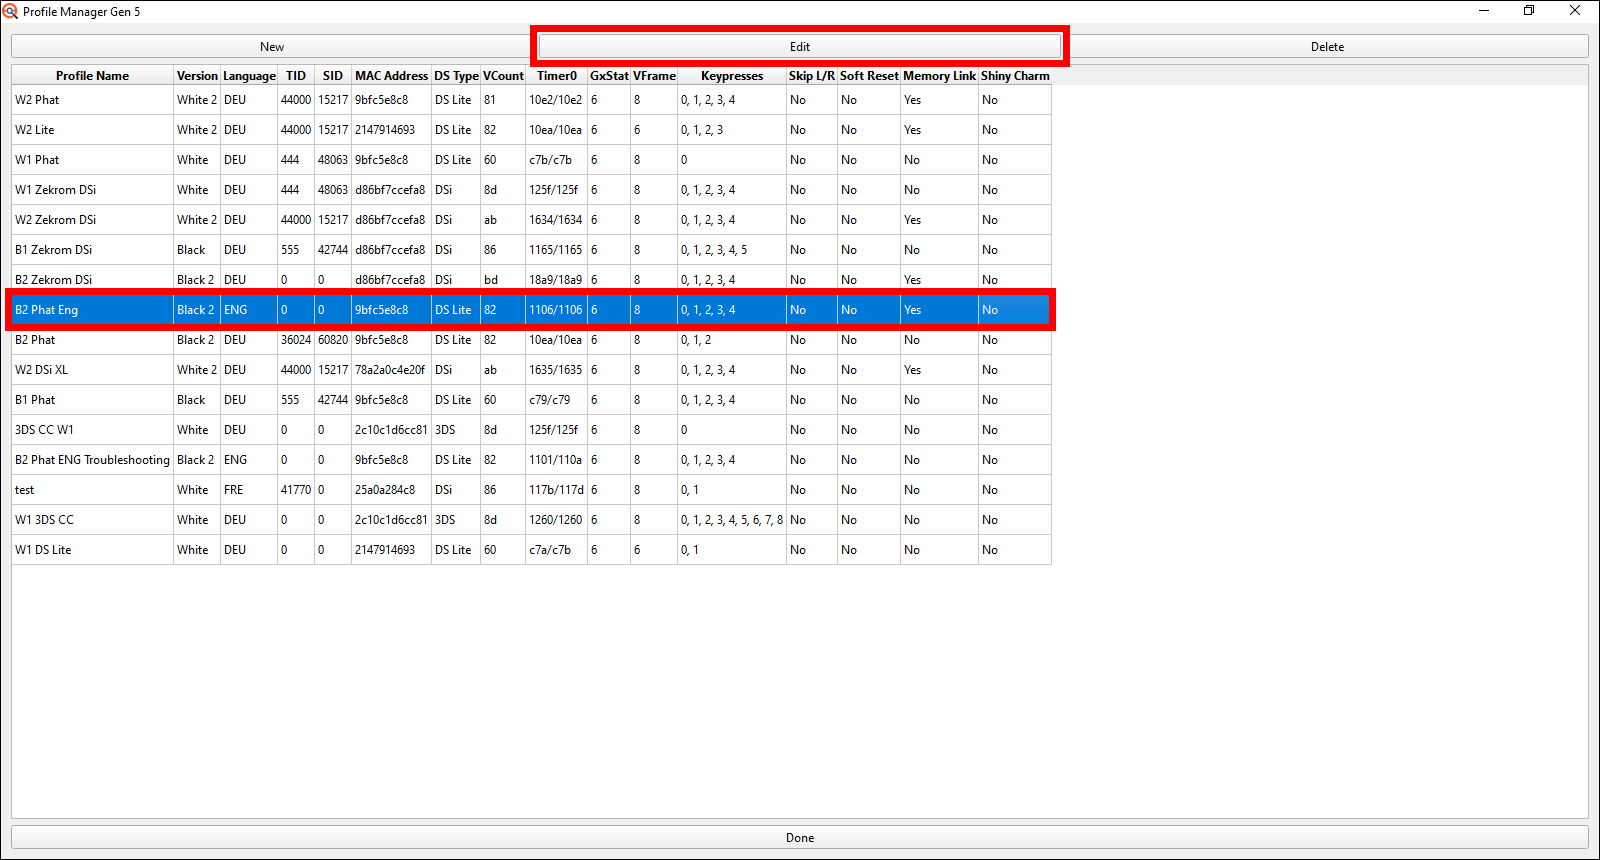
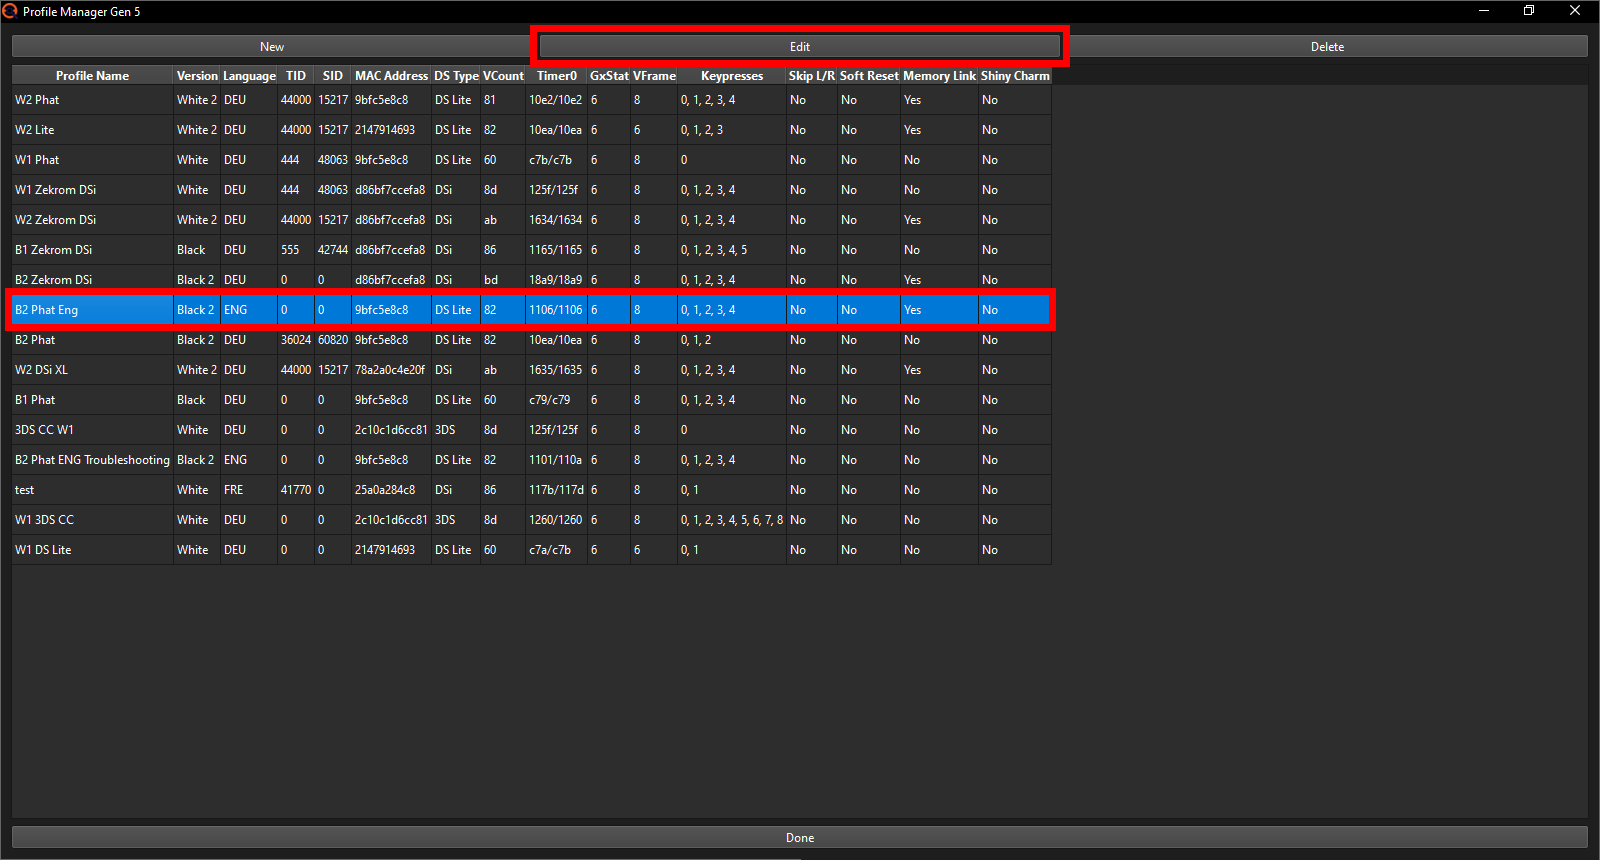
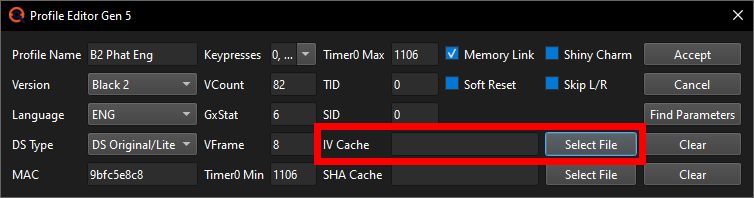
In the main window of PokeFinder go to Gen 5 Tools at the top, open the Profile Manager and once there, select the Profile of the game you wish to do this RNG in and click the edit button at the top.
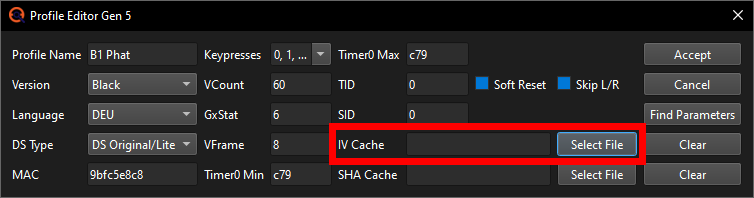
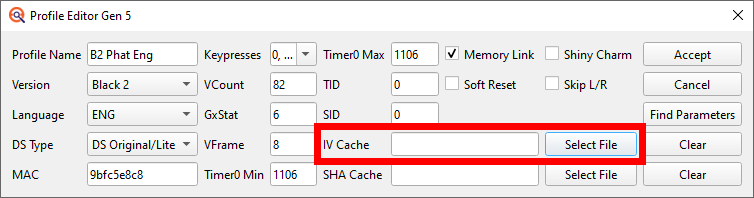
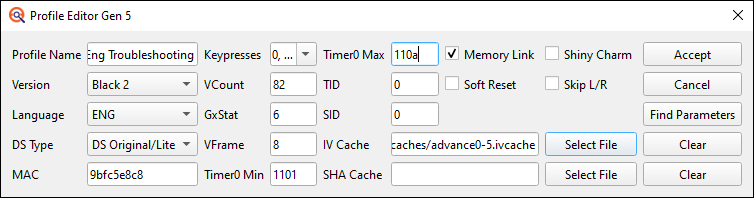
A smaller Profile Editor window will pop up with 2 empty fields in the bottom right labeled IV Cache and SHA Cache. Click on the Select File button next to the IV Cache and PokeFinder will open your file explorer in the folder you saved PokeFinder in.
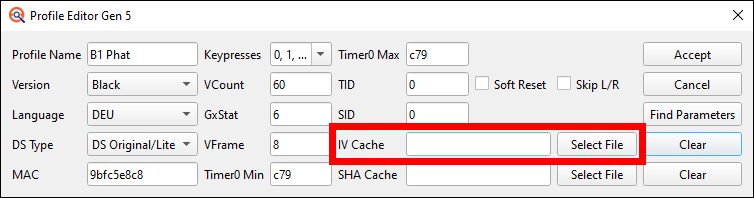
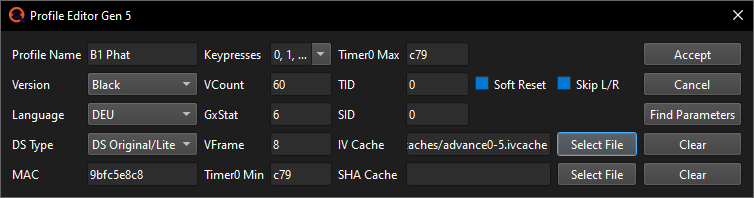
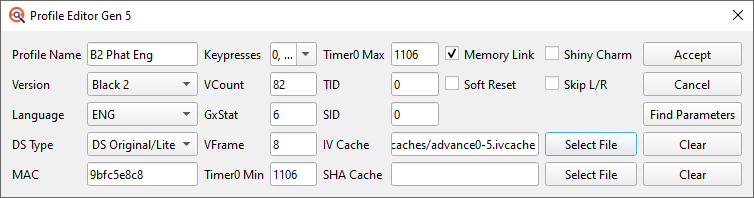
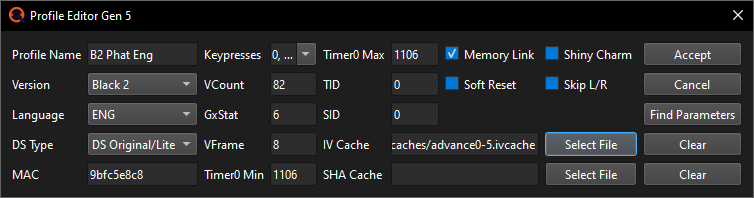
Here select the IV Cache file you downloaded earlier. The SHA Cache you can ignore for now. It's primarily useful for wild RNG when you're going for highly specific targets and cuts down the search time even further.

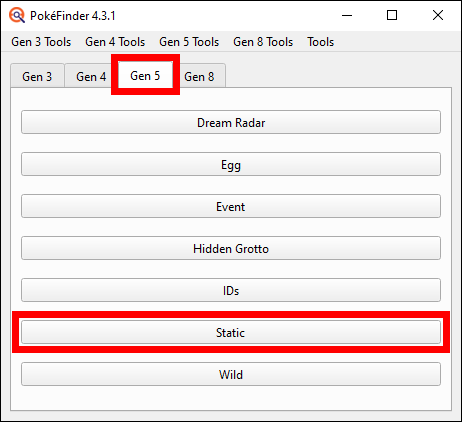
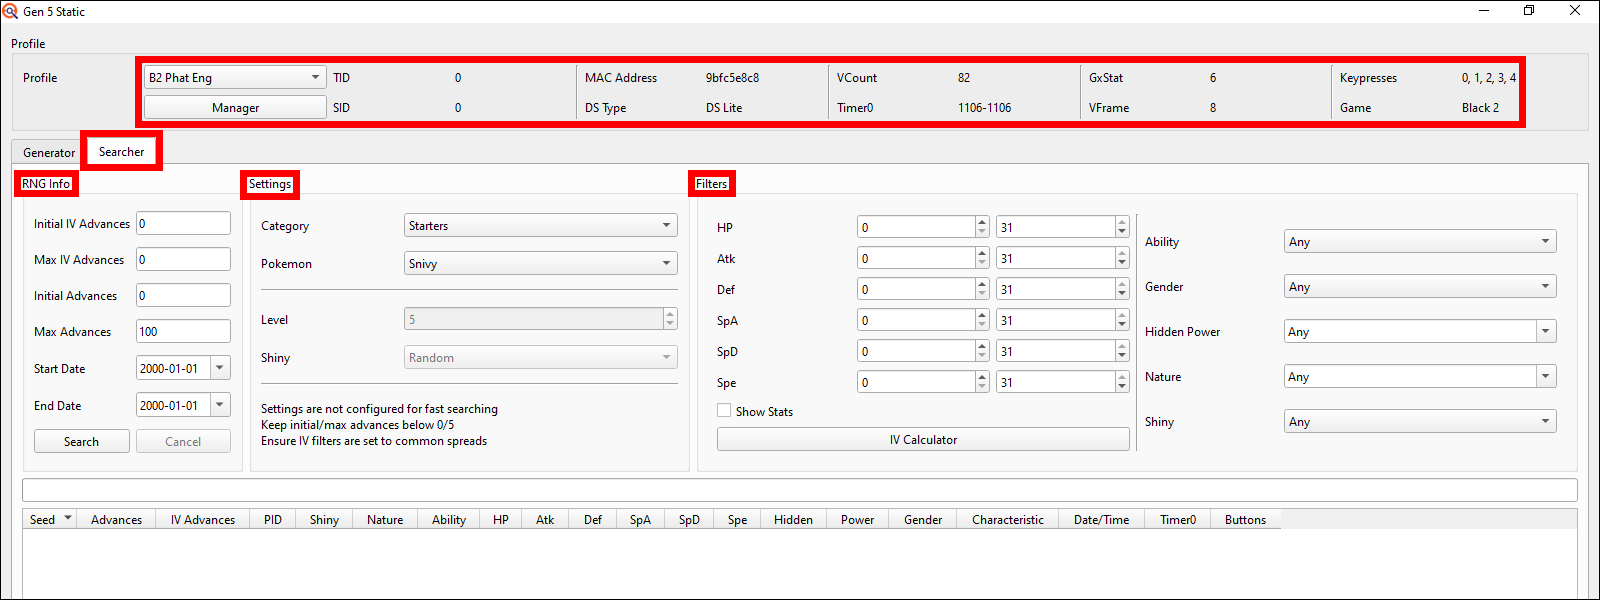
Now we can continue. To get a Seed to target for your Starter, you'll want to start by opening up PokeFinder, going to the Gen 5 tab and once there opening the Static option.
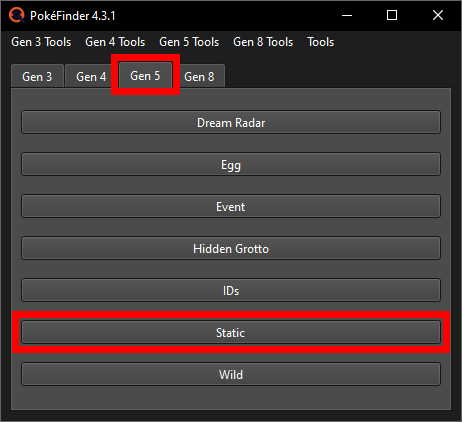
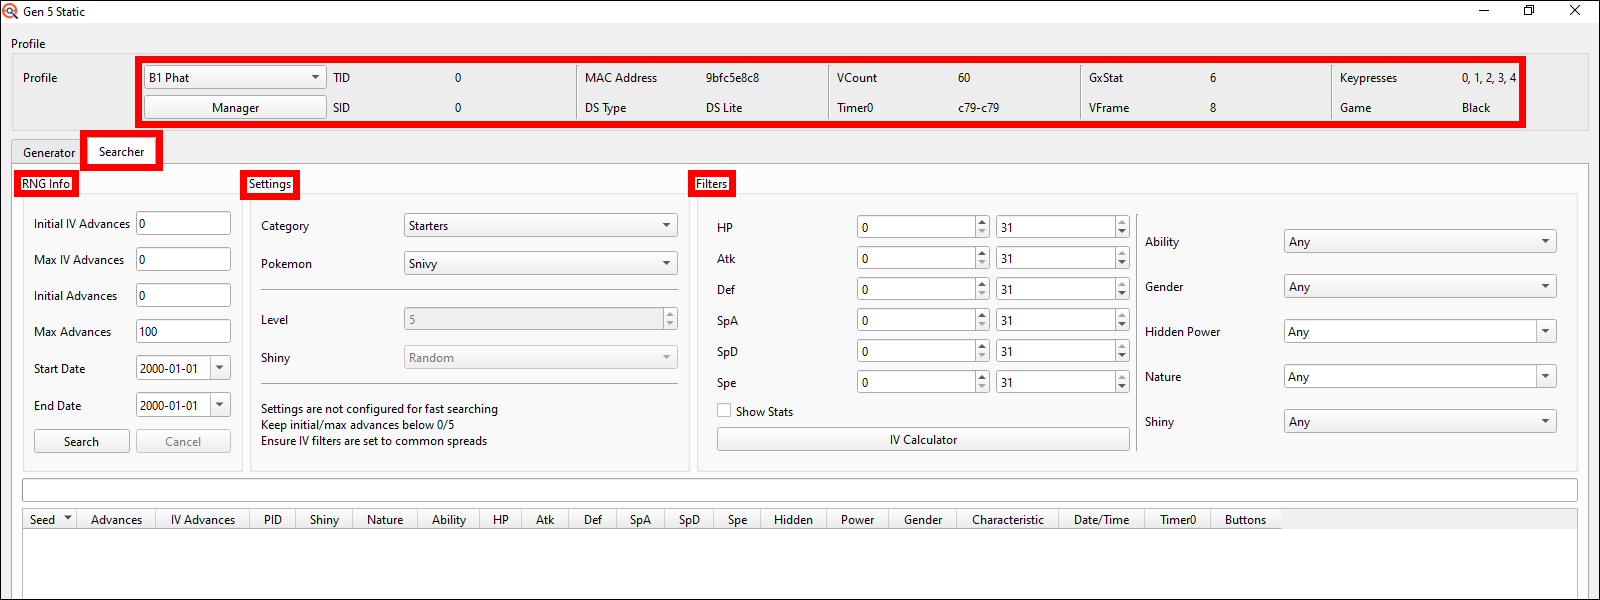
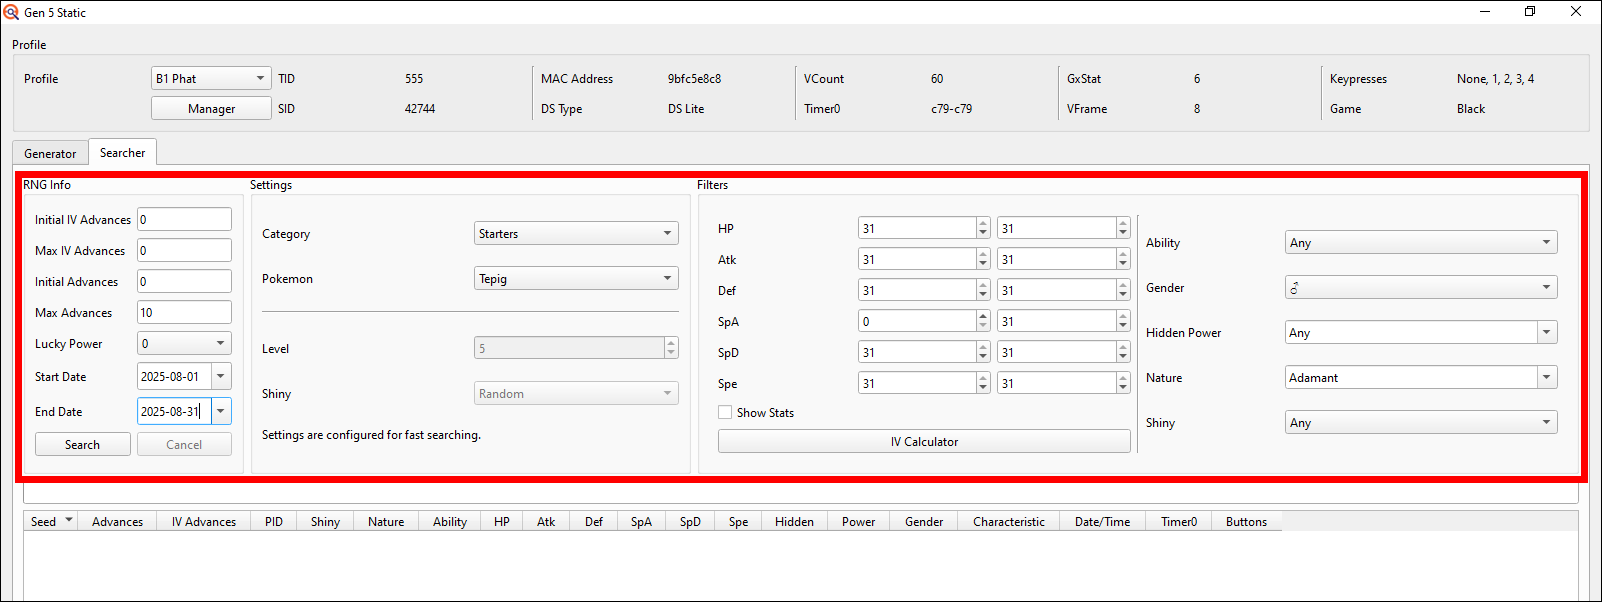
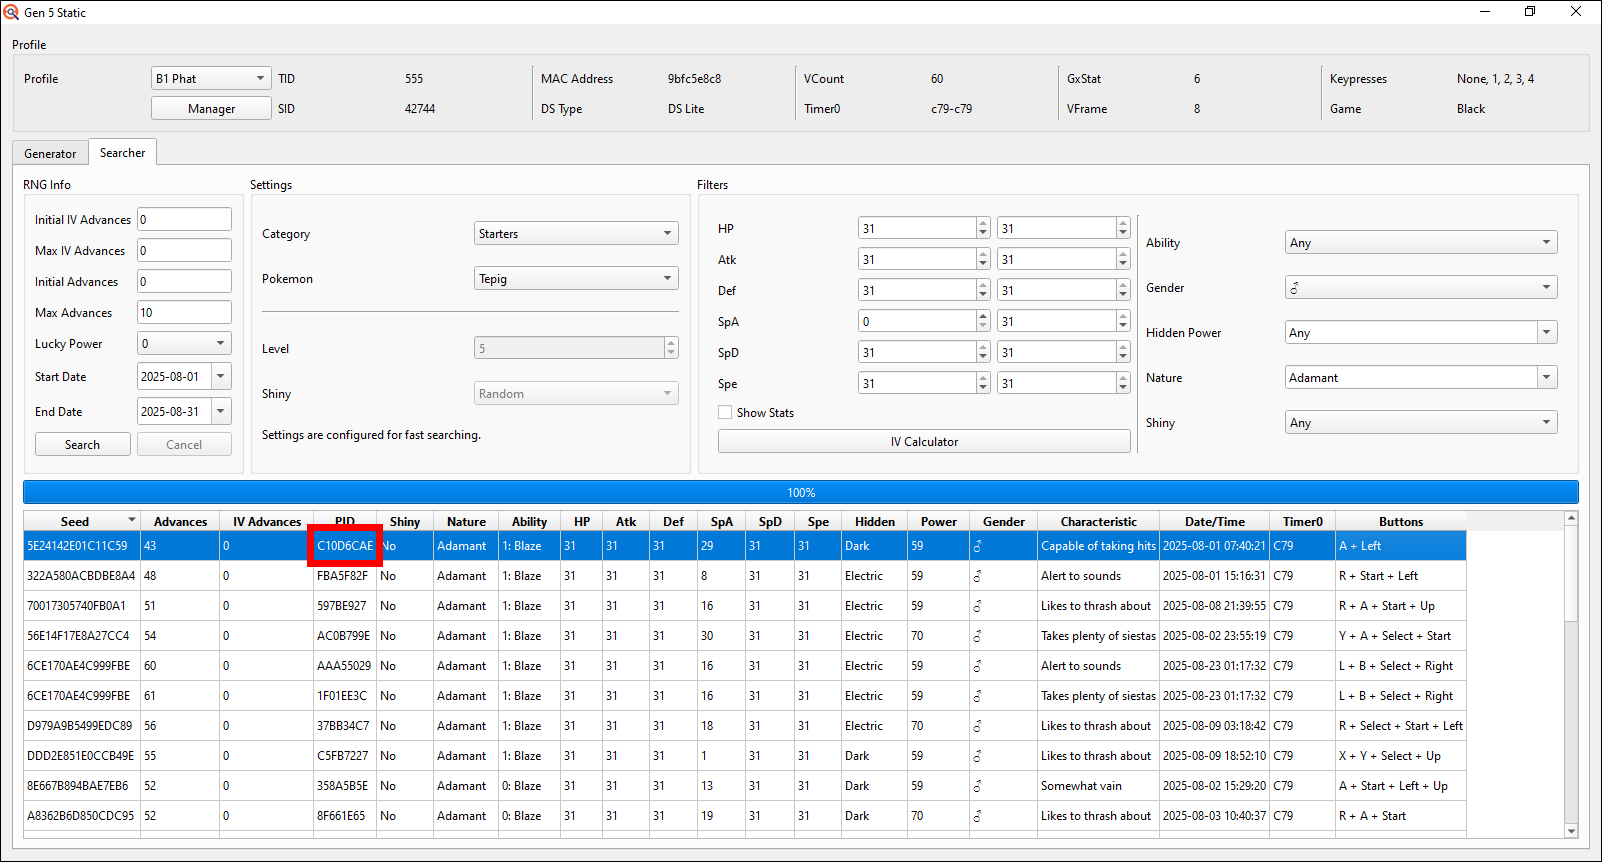
In the Gen 5 Static windows top left make sure the Profile of the game you wish to do this in is selected and right below the Profile option switch to the searcher tab in which there's 3 different sections labeled "RNG Info", "Settings" and "Filters".

In the RNG Info section, put the Max Advances to 10 and input a date range you wish to search through (I personally would pick the full current month) leaving the Initial IV Advances and Max IV Advances both at 0. Next in the Settings section, select the Starters Category with the Starter you wish to RNG and finally in the Filters section input your desired IVs, Gender and Nature. Make sure to NOT search for a shiny here, as the goal is to find a not yet shiny spread that we'll make shiny later.

Now you can hit the Search button. If you get no results you can either search through a different date range (e.g. the full next month), increase the Max Advances (don't forget saving the game to advance is your only option and takes quite a while) or select more possible Keypresses in your Profile. Once you've found a result you're happy with, copy its PID and write it down somewhere you can find it again later.
Note: How to change Keypresses
In the Static window click on the Manager button in the top left and the Profile Manager will open. Select the Profile of the game you're RNGing in and click on the Edit button at the top to open the Profile Editor. Here you can change the active Keypresses. Make sure to click the Accept button after to save your changes.

If I were to prepare for a Starter, I would take this marked one, as the Keypresses are easy and the target second in 21 is very quick (would be quite long if you're on a 3DS model but I'm not). Now best to also e.g. take a screenshot of the full window to easily be able to find this target Seed again in the future when you get to actually RNG the starter itself. That's all the prep you need, so you can now continue on with the guide.
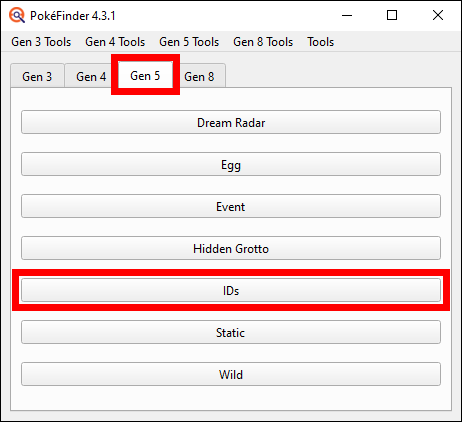
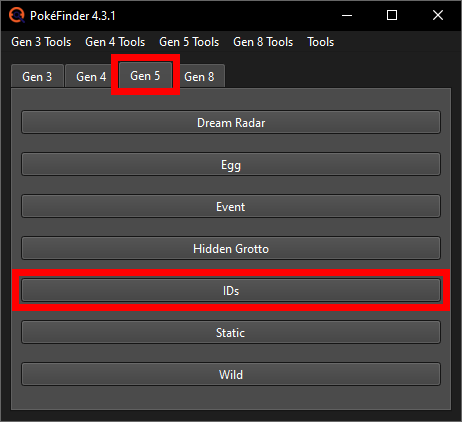
Open up PokeFinder, go to the Gen 5 tab and once there, open the IDs option.
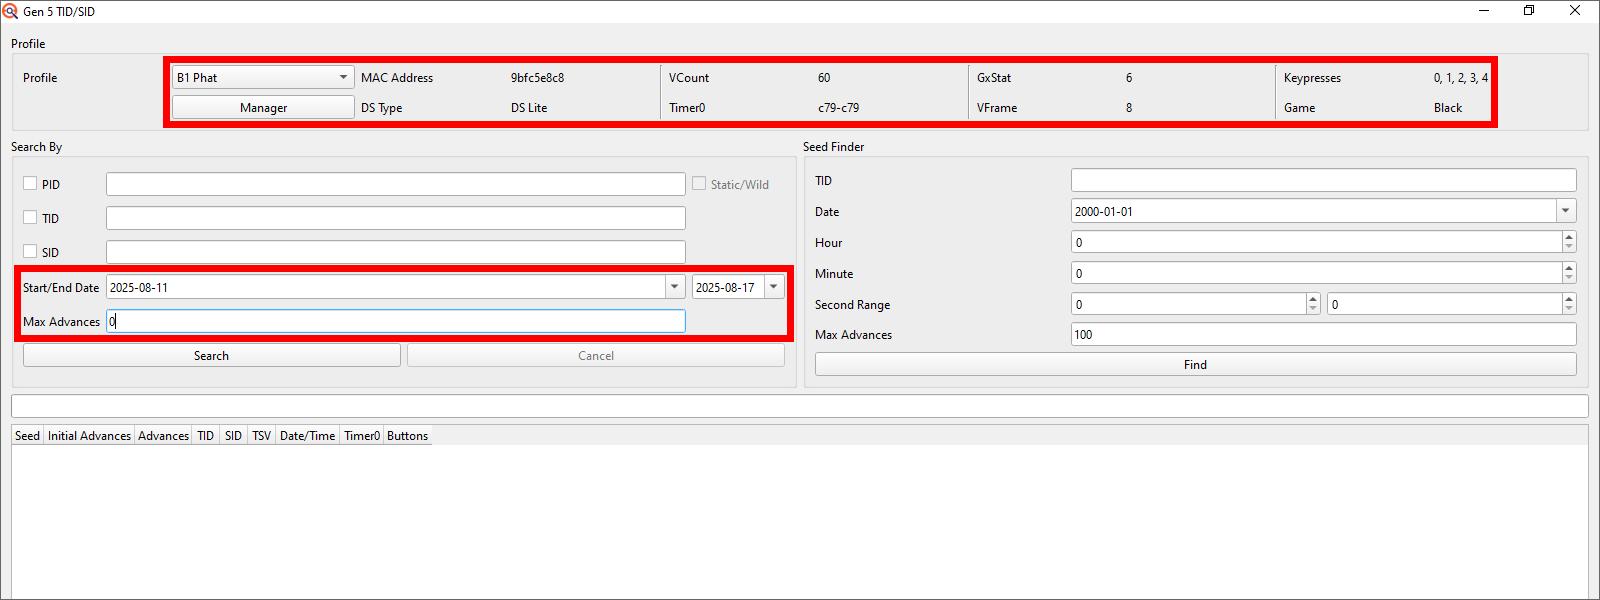
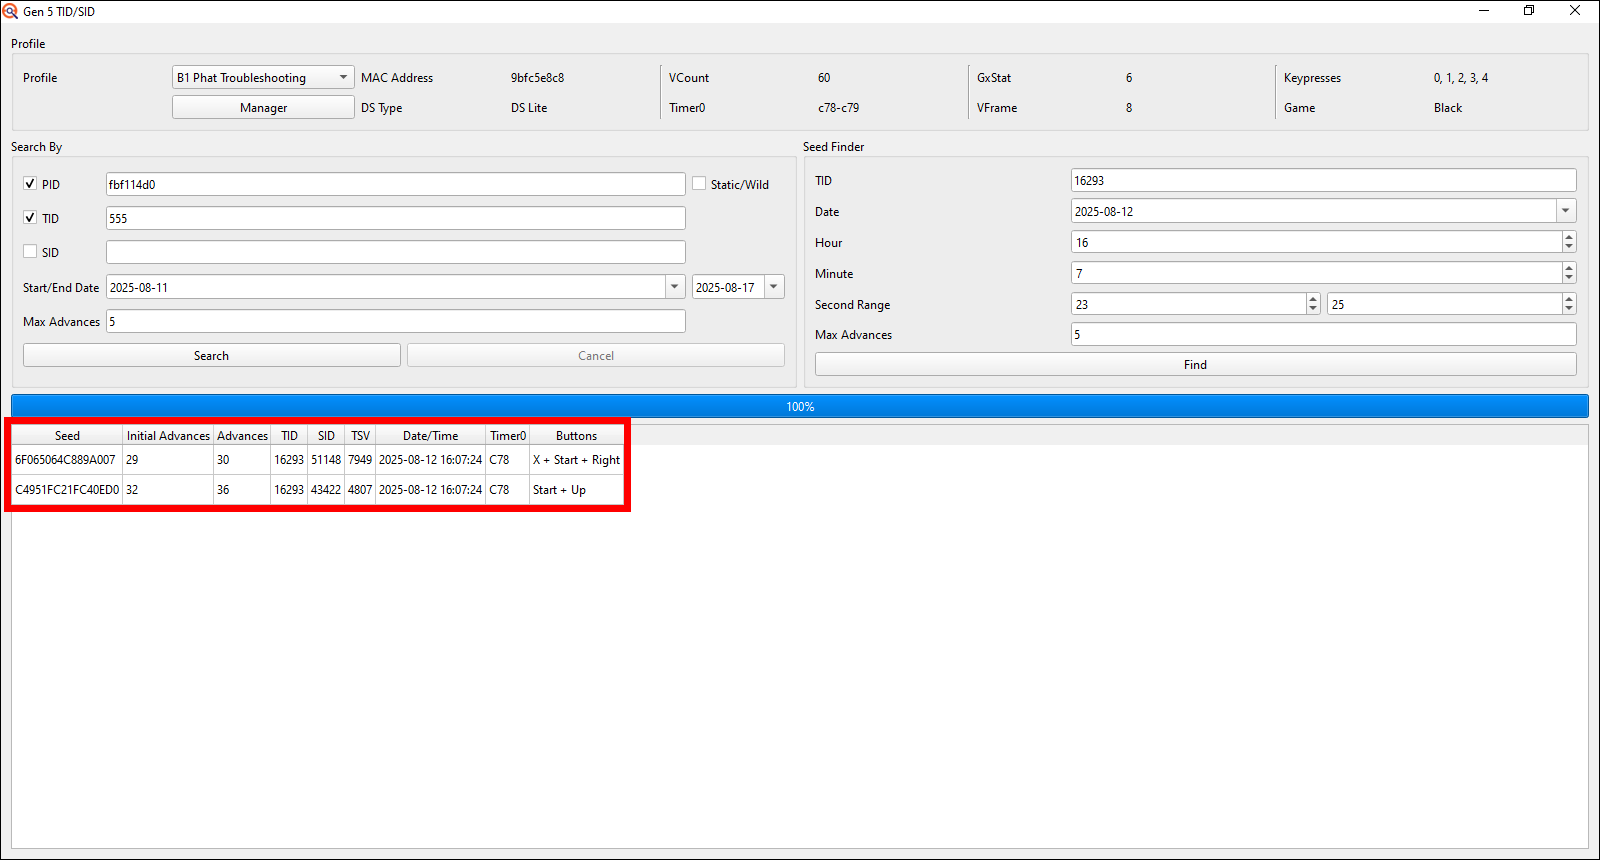
There select the Profile of the game you wish to do TID/SID RNG in if it isn't selected already and in the left half of the window labeled Search By, put the start and end date to however long of a time window you wish to search through (I'll search through one week starting on the 11th of August 2025 and ending on the 17th) and set the Max Advances to 0.

Now there's 3 more checkboxes with fields next to them labeled PID, TID and SID. The SID field you basically never want to use unless you have a HIGHLY specific purpose for it (mainly would be used to nickname event Pokémon, as that requires matching TID, SID, trainer name, trainer gender and game of origin). The PID field is for when you wish to prepare your save file to easily be able to get e.g. a 5/6 IV Starter or Roamer and the TID field is for when you wish to get a specific number Trainer ID. Neither of those two are required but I recommend aiming for a TID number you like, as it does not affect the difficulty of the RNG at all. In this example I will check off both boxes and input the PID of a 5IV Timid Roamer I prepared for and the TID number of 00555 just because I think it's a funny number.
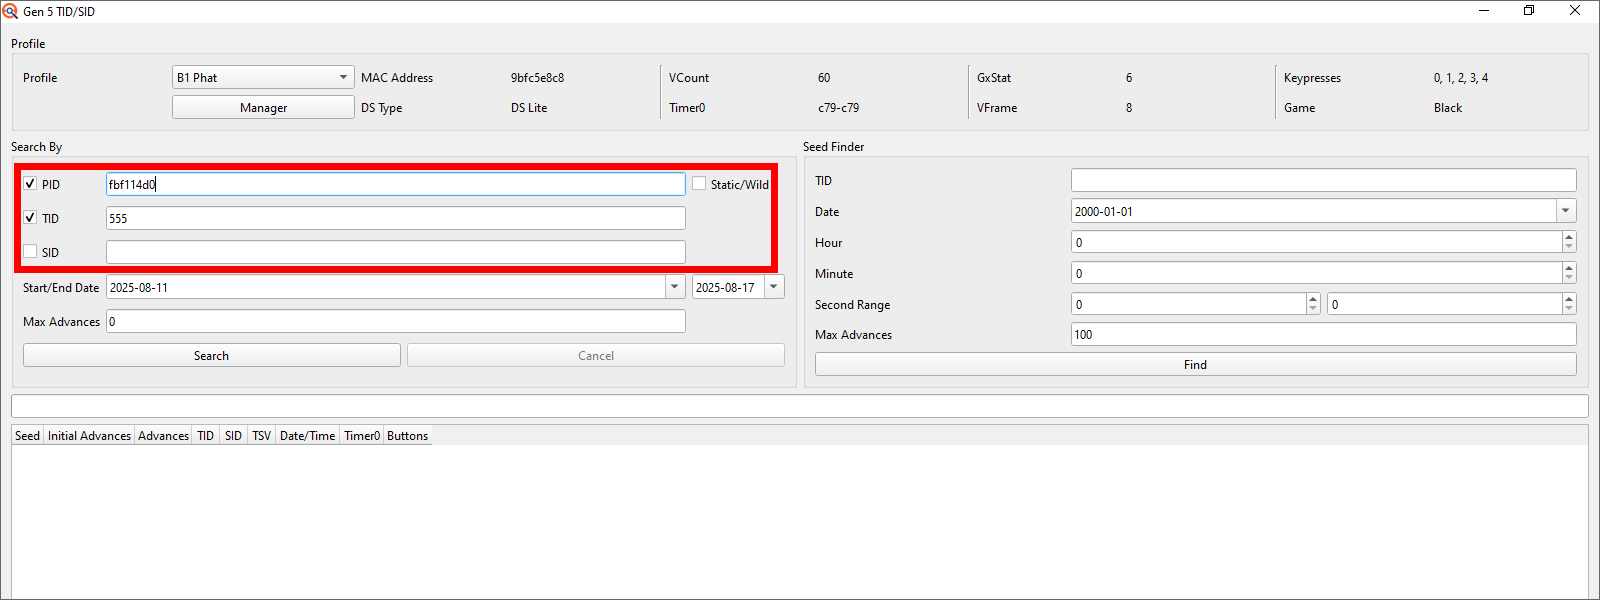
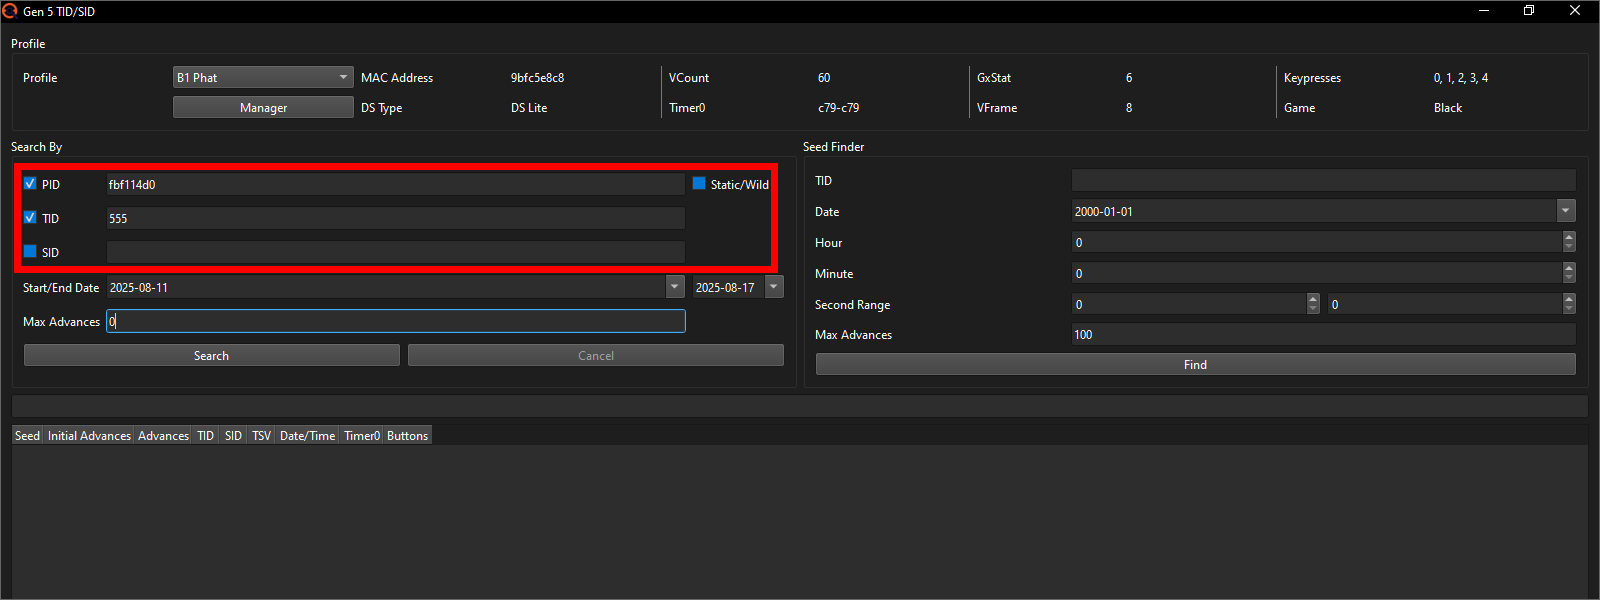
If you wish to get a number that starts with any 0's such as my 00555, be aware that PokeFinder will only let you input the 555, as it has the exact same value as 00555; once you successfully RNG it to be your save files TID, it'll show up as 00555 as expected (05050 for example is input as 5050; only 0's at the front of a number, before any not-0 number, can be ignored). The Static/Wild checkbox is required to check off if you were to prepare for a Stationary or Wild encounters PID to turn shiny, but you're probably preparing for either nothing, the Starter (Gift encounter) or for the Roamer, so no need to check off that box. Then you can click Search, and if you searched for nothing specific at all, or only searched for either a specific TID number or a specific PID to be turned shiny, but not both, you will most definitely get several results already.
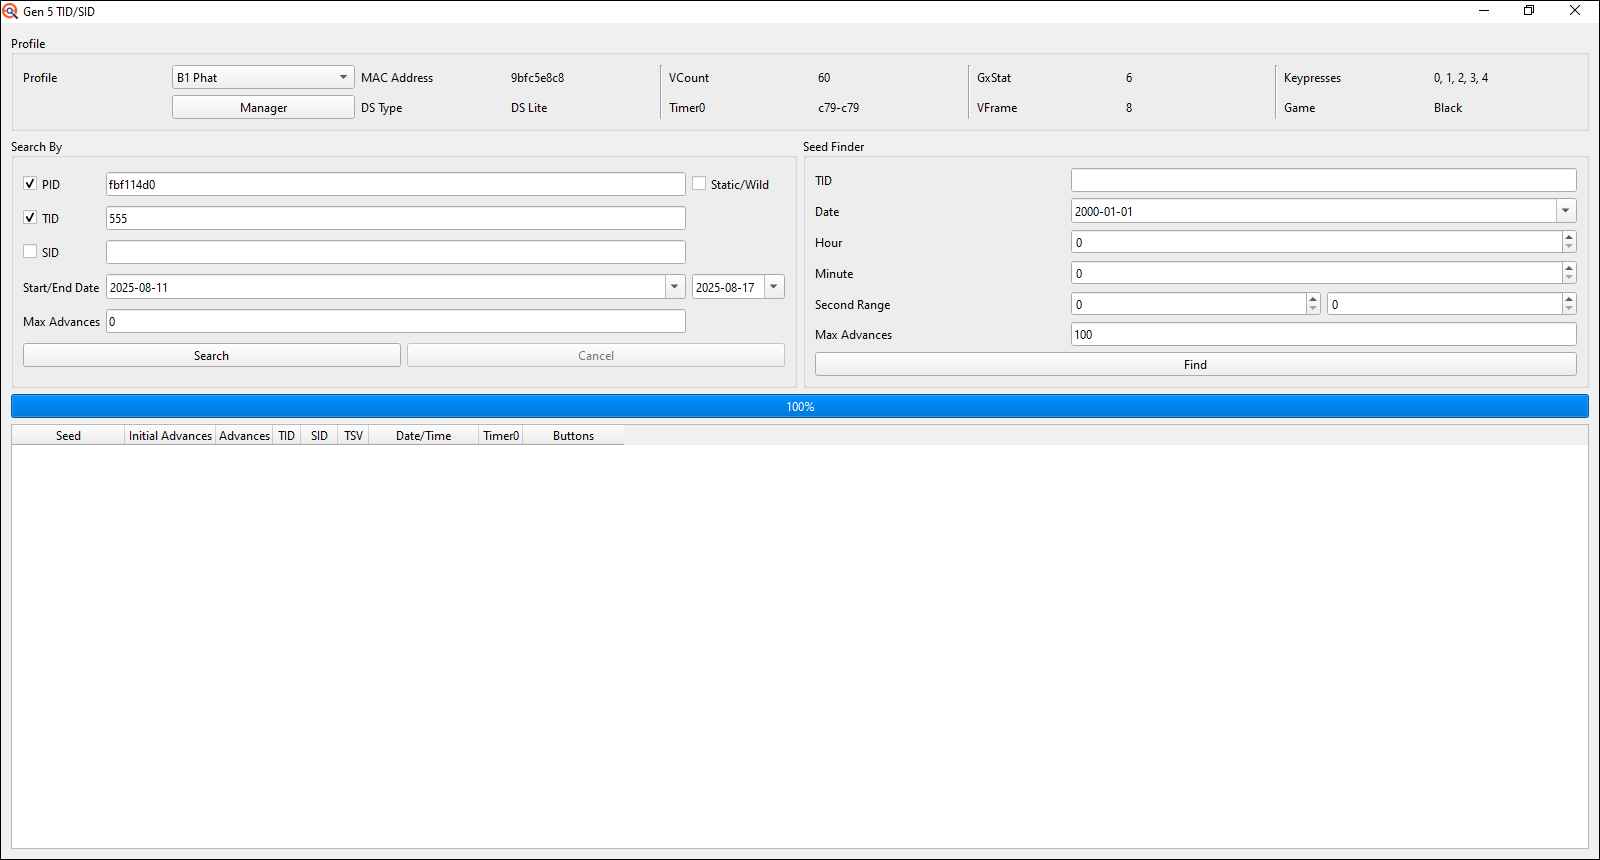
Since I was looking for both a specific TID and a PID, I did not get any results this time and now have 3 options:
-
Increase the date range I search through. Since I want the "Adventure Started" date to be close to the actual date, I personally am not willing to increase this.
-
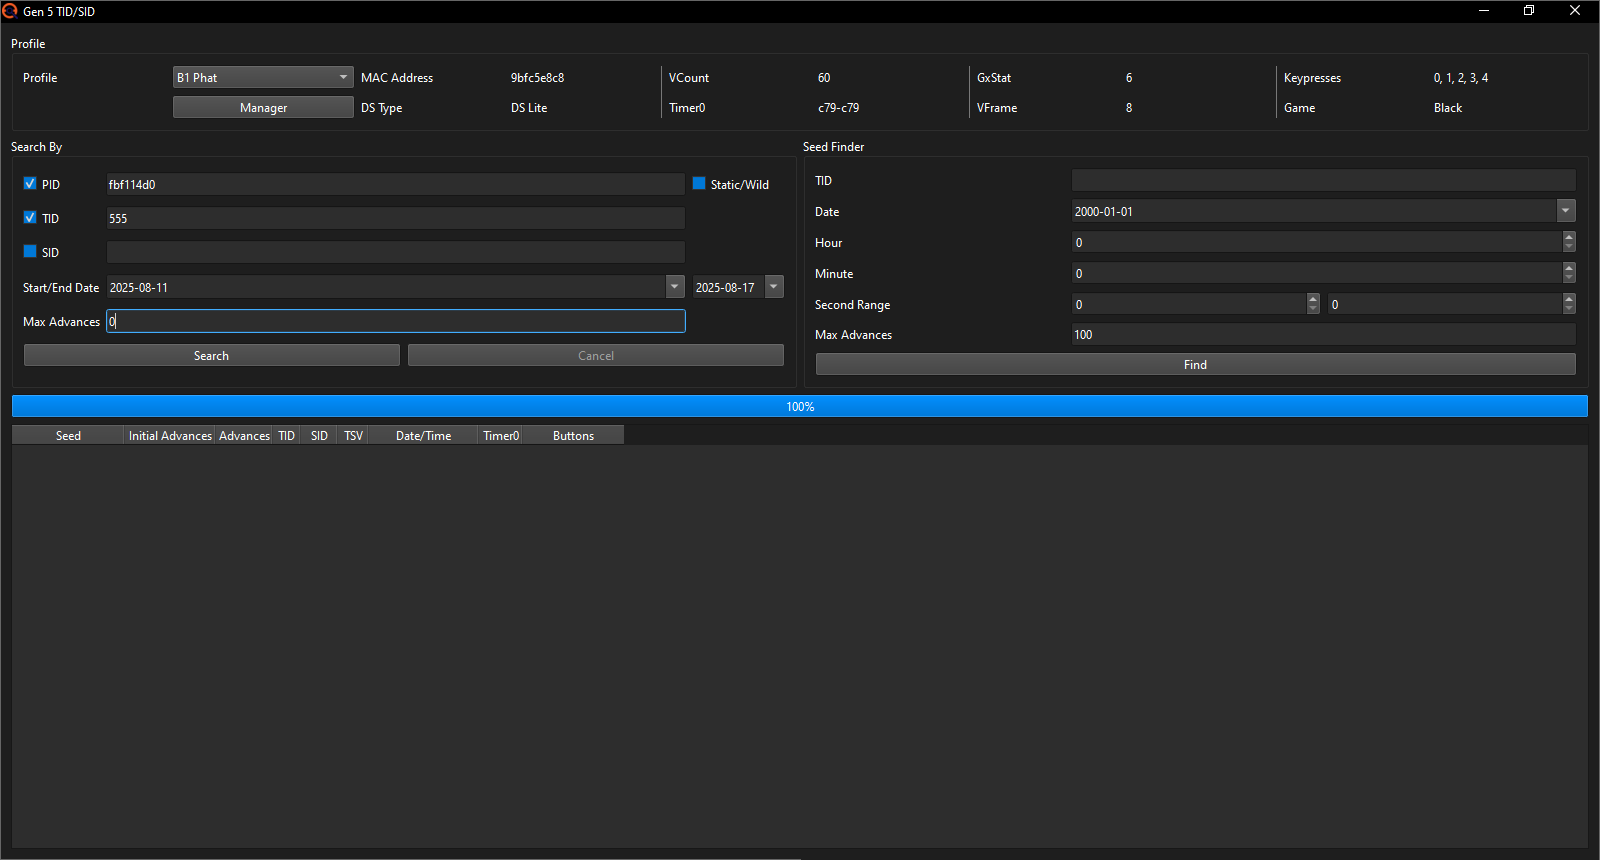
Increase Max Advances. Whilst Advances will make each attempt take a bit longer, even just 5 of them will have PokeFinder search through significantly more results so I'll put them to 5. I'd say doing up to 20 is generally within reason. I will explain how to actually do Advances later.
-
Increase Keypresses in my Profile. I'm already at 0-4 and whilst 5 is still usually doable. I will keep it at 4 for now and see if just increasing the Max Advances to 5 will give me any results.
Note: How to change Keypresses
In the TID/SID window click on the Manager button in the top left and the Profile Manager will open. Select the Profile of the game you're RNGing in and click on the Edit button at the top to open the Profile Editor. Here you can change the active Keypresses. Make sure to click the Accept button after to save your changes.
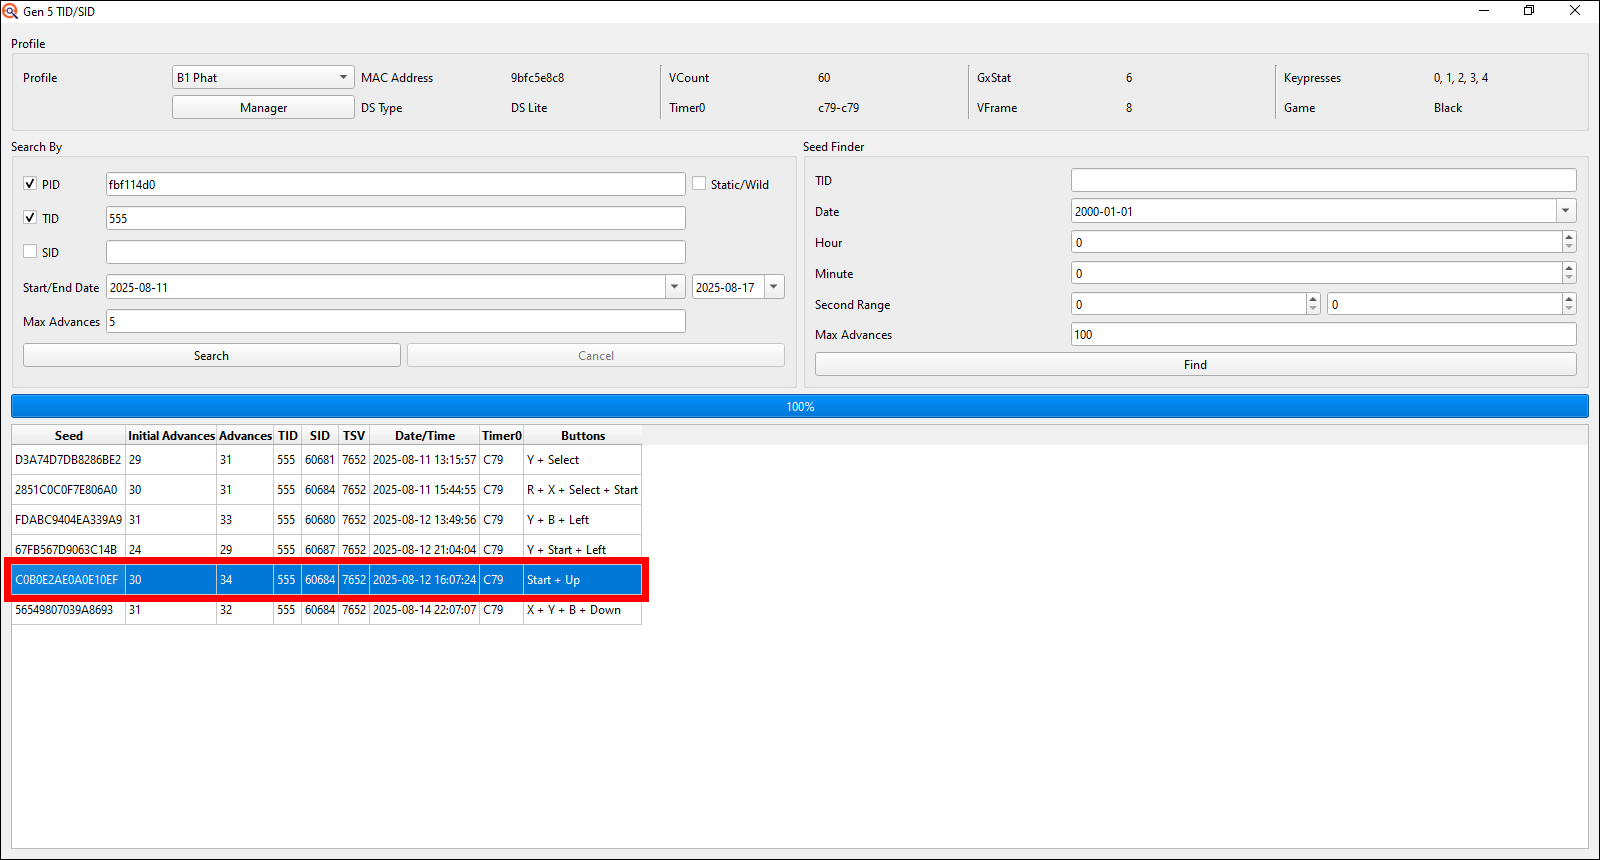
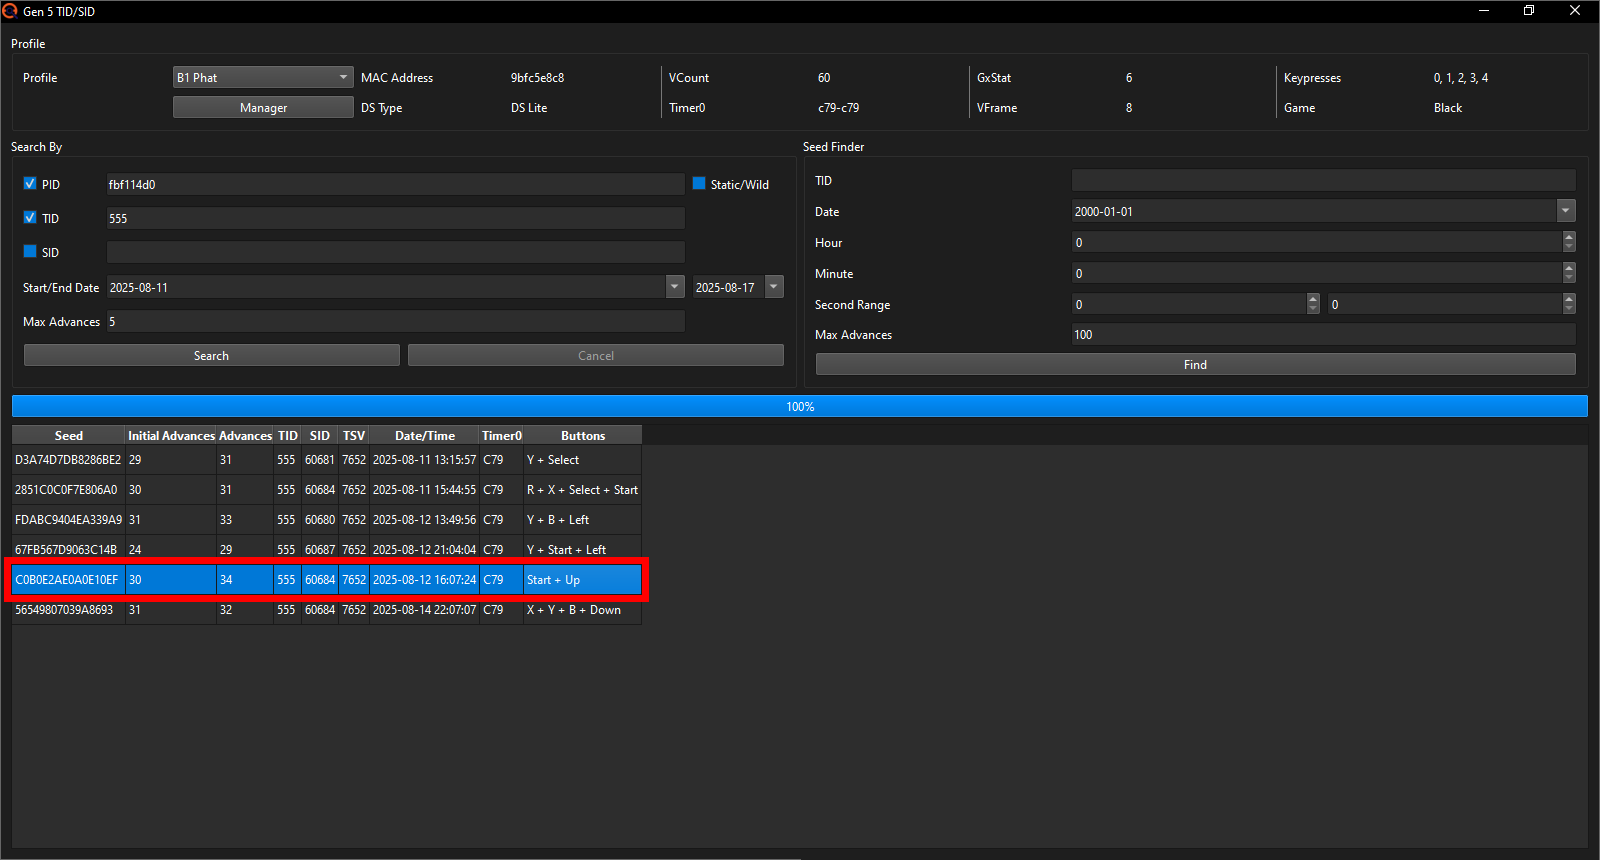
Now searching again with the settings adjusted, PokeFinder found 6 target Seeds I can go for. Since I'm lazy I'll go with the one that requires less work from me. The fifth one has by far the most comfortable target seconds for me to aim for in 24; the others are either so low that I'd have to add a full minute to the timer or are ~30 seconds higher anyways. On 3DS the threshold for what target seconds will have you add a minute to the timer is gonna be much lower so going for something between like 40-55 target seconds would be most comfortable there. The Seed has Advances of 34 and Initial Advances of 30 which means that I'd later have to do 34-30=4 manual Advances myself. There's also 2 Keypresses in the Start and Up buttons that I'll have to press during startup of the game later.
As alluded to earlier, in the case of the Starter in BW2, you may want to prepare for it now. If you simply want a shiny (possibly with a specific nature and gender) or just want it to have perfect IVs and a beneficial nature but without being shiny, there's no use in preparing for that now, as it'll be fairly easy to get later on anyways. If you however do want 5/6 perfect IVs AND for it to be shiny, you should prepare for that to save yourself many hours of time later.
This is important for the Starter, as that early on in the game you lack Chatot which are the primary tool used to advance the RNG forward relatively quickly and consistently, and instead you only have the very slow saving the game as a way to advance. But even that is highly unreliable for the Starter, as there's 2 randomly moving NPCs loaded in when you're standing in front of Bianca which can and will advance the RNG by inconsistent amounts between saves. Here you should prepare a target Seed that has 5/6 perfect IVs on IV Advance 0 with an early PIDrng Advance that has the nature you desire which you can then turn shiny.
Note: Difference between PIDrng Advances and IV Advances
Generation 5 uses 2 completely separate RNG algorithms derived from the Initial
Seed to each decide some of the random things that happen in the game:
The first of the two, commonly referred to as the PIDrng, controls
the "regular" Advances. These Advances decide a wild Pokémons encounter
slot (so which species of the on a Route available ones you'll battle when
walking through grass), its Nature, ability, gender, PID (which decides shininess)
and whether it's holding an item or not.
This PIDrng algorithm is also used by several other things in the game to
determine their random patterns, which also means it is advanced whenever
those need to perform a randomized action. Notably this includes
the movement of randomly moving NPCs, Rain/Snow/Hail/Sandstorm
patterns, the game deciding whether you should trigger a wild encounter
when walking through Tall Grass (/Caveground/Surfing on water etc.), what
position the clock's needle should start in when saving the game and
how high of a pitch a custom recorded Chatter should have each time you
view the summary of a Chatot (among many other more minor things).
The second RNG algorithm, commonly referred to as the IVrng, is used for far fewer things however. It mainly controls what IVs (and with that the Hidden Power type and base power, since that's fully dependent on IVs) a Pokémon you encounter will have. It also controls the friendship step counter, which activates every 128 steps and has a 50/50 chance to increase each party members friendship by 1, whether a Pokémon gets Pokerus after a battle and ALL the randomized actions inside a battle, including whether a Focus Blast hits or misses or whether a Flamethrower gets a burn on the opposing Pokémon. Due to it controlling all random actions in battles, it was made to advance at 60 Advances per second for each Pokémon active on the field to make it harder to manipulate the luck in battles.
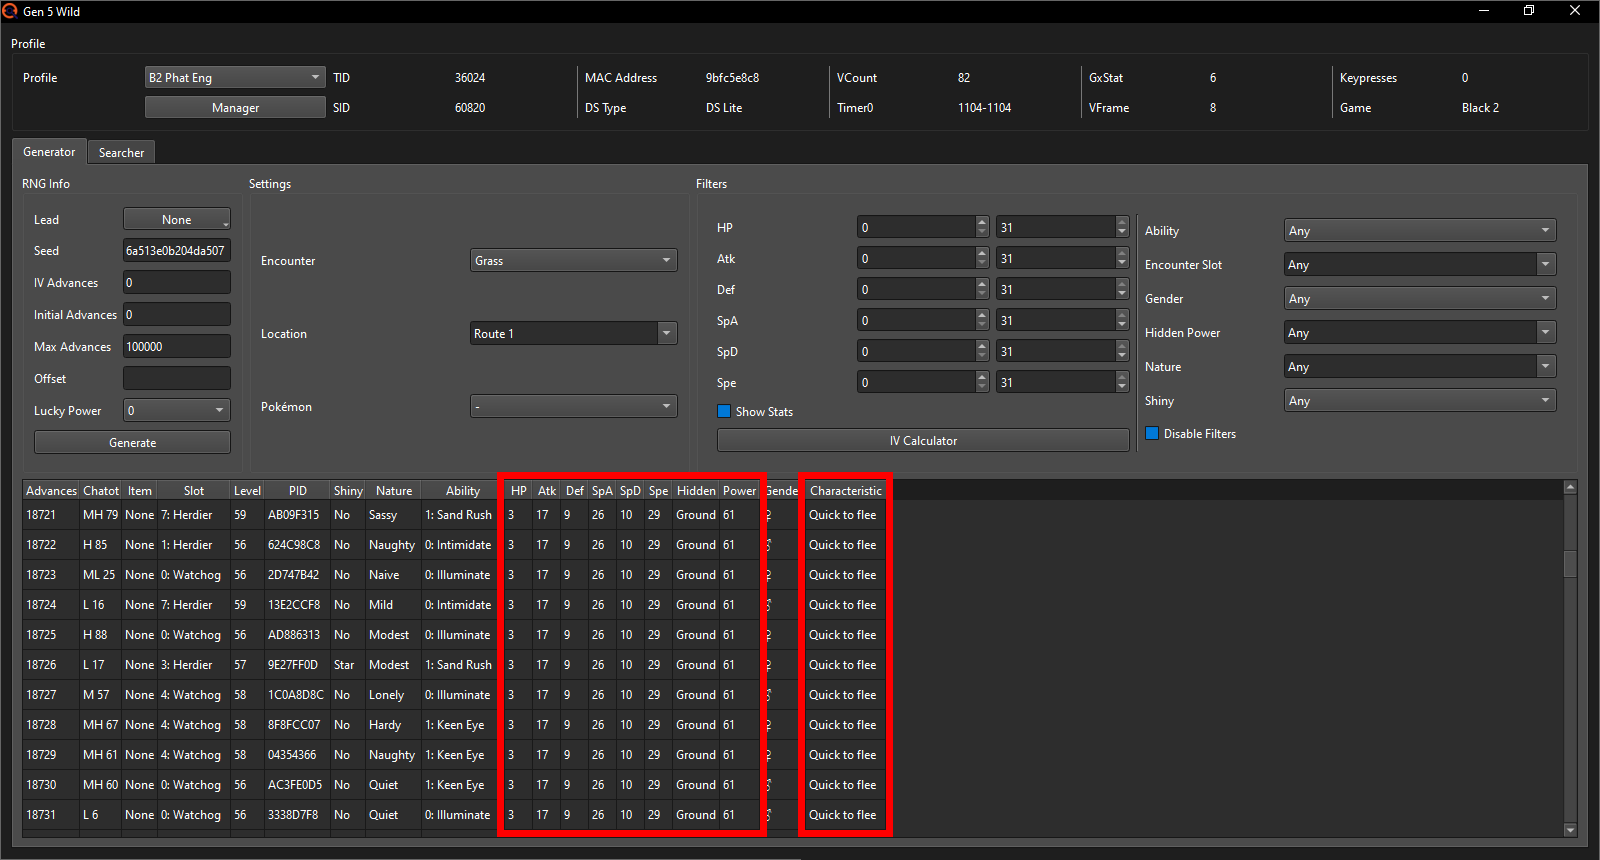
The two RNG algorithms being separate also means that, whilst one of the two can move by hundreds or even thousands of Advances, the other can remain at the exact same Advance throughout it all, which is why in these pictures you see the parts controlled by the PIDrng changing with each Advance, whilst the parts controlled by the IVrng remain the exact same. Due to the lack of good and reliable tools for advancing the IVrng, you will later see us always searching for an IVrng Advance of 0 and only ever adjusting the PIDrng Advances since those can easily be advanced via e.g. Chatot.
As a sidenote the C-Gear is a bit of an odd case here, as it Advances both the PIDrng AND the IVrng whenever it's active. Make sure to always deactivate it when prompted upon loading your save file whilst doing RNG Manipulation.
How to actually RNG manipulate the Starter later I will not explain here but in a specific Starter RNG guide. To find out how to prepare for a 5/6 IV shiny Starter, check out the following note.
Note: Getting a 5/6 IV shiny Starter
Before we continue, we'll want to import an IV Cache into our Profile to significantly speed up the target Seed search.
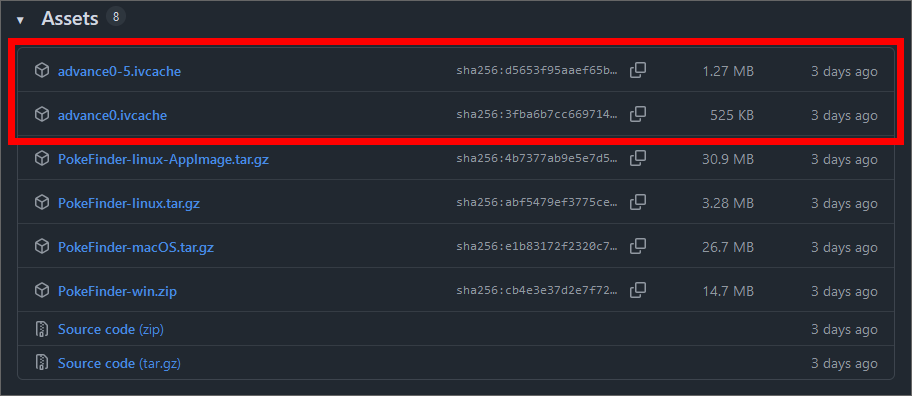
For this we need to download the IV Cache first. You can get it from the Assets on PokeFinder's GitHub page. I'll pick the 0-5 IV Advance Cache so I'll have more options if I want to do some advanced IV advancement methods in the future (not discussed in this guide). It also costs less than 1 MB space more than the one with only IV Advance 0, so I don't see a point in ever choosing the Advance 0 file. I recommend you save it in the PokeFinder folder so you can easily find it again later. Should you accidentally delete the file you can always just redownload it.
In the main window of PokeFinder go to Gen 5 Tools at the top, open the Profile Manager and once there, select the Profile of the game you wish to do this RNG in and click the edit button at the top.
A smaller Profile Editor window will pop up with 2 empty fields in the bottom right labeled IV Cache and SHA Cache. Click on the Select File button next to the IV Cache and PokeFinder will open your file explorer in the folder you saved PokeFinder in.
Here select the IV Cache file you downloaded earlier. The SHA Cache you can ignore for now. It's primarily useful for wild RNG when you're going for highly specific targets and cuts down the search time even further.
Now we can continue. To get a Seed to target for your Starter, you'll want to start by opening up PokeFinder, going to the Gen 5 tab and once there opening the Static option.
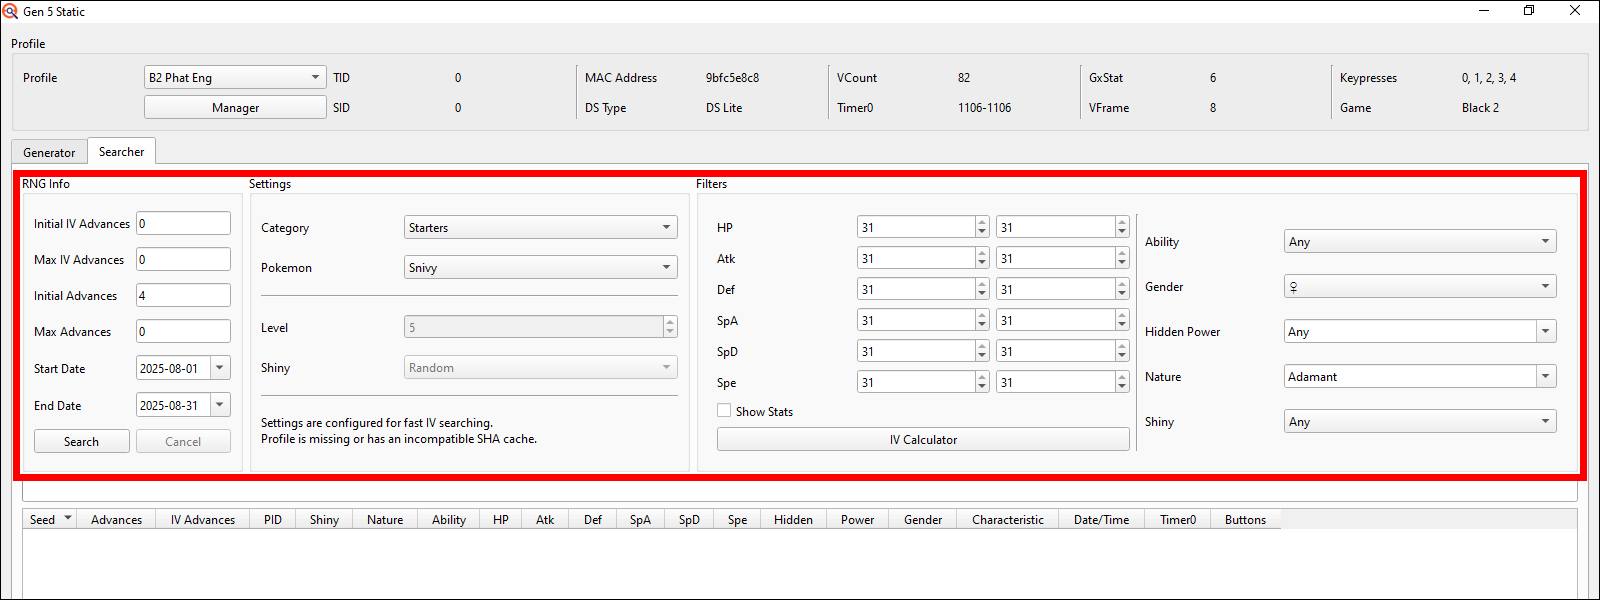
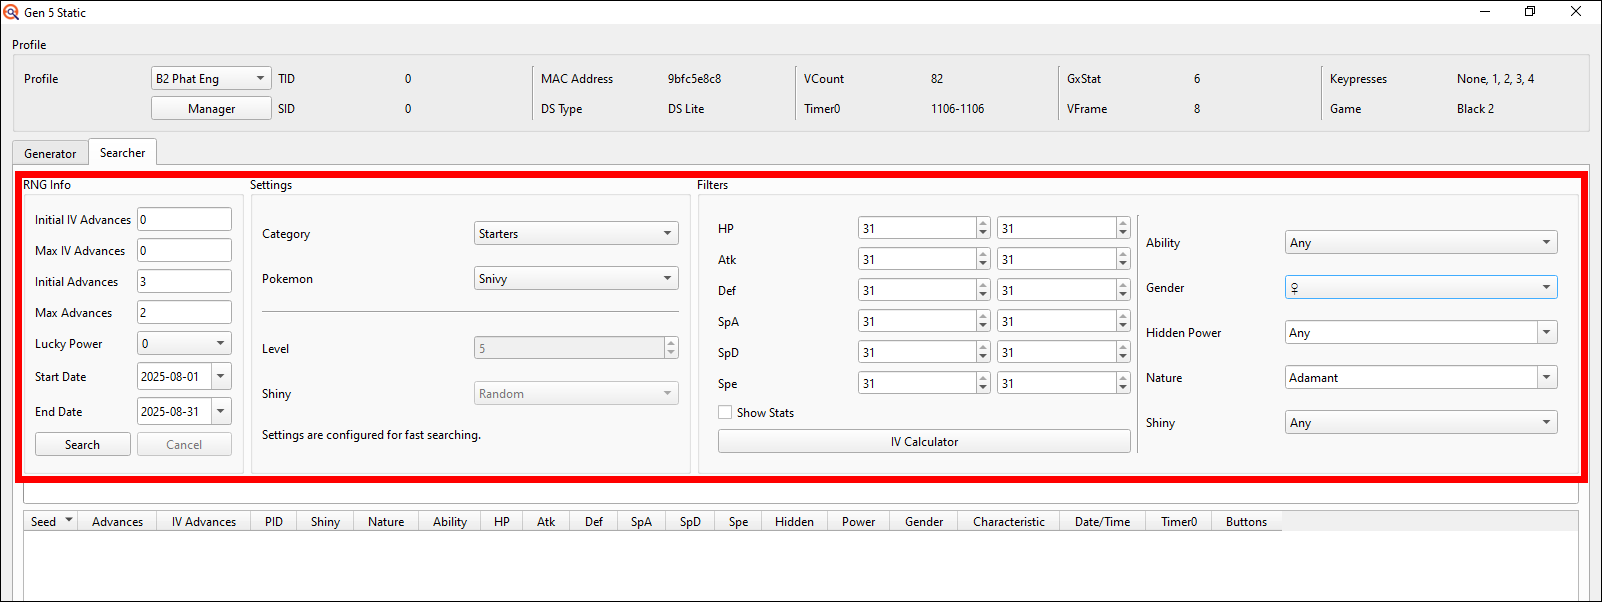
In the Gen 5 Static windows top left make sure the Profile of the game you wish to do this in is selected and right below the Profile option switch to the searcher tab in which there's 3 different sections labeled "RNG Info", "Settings" and "Filters".
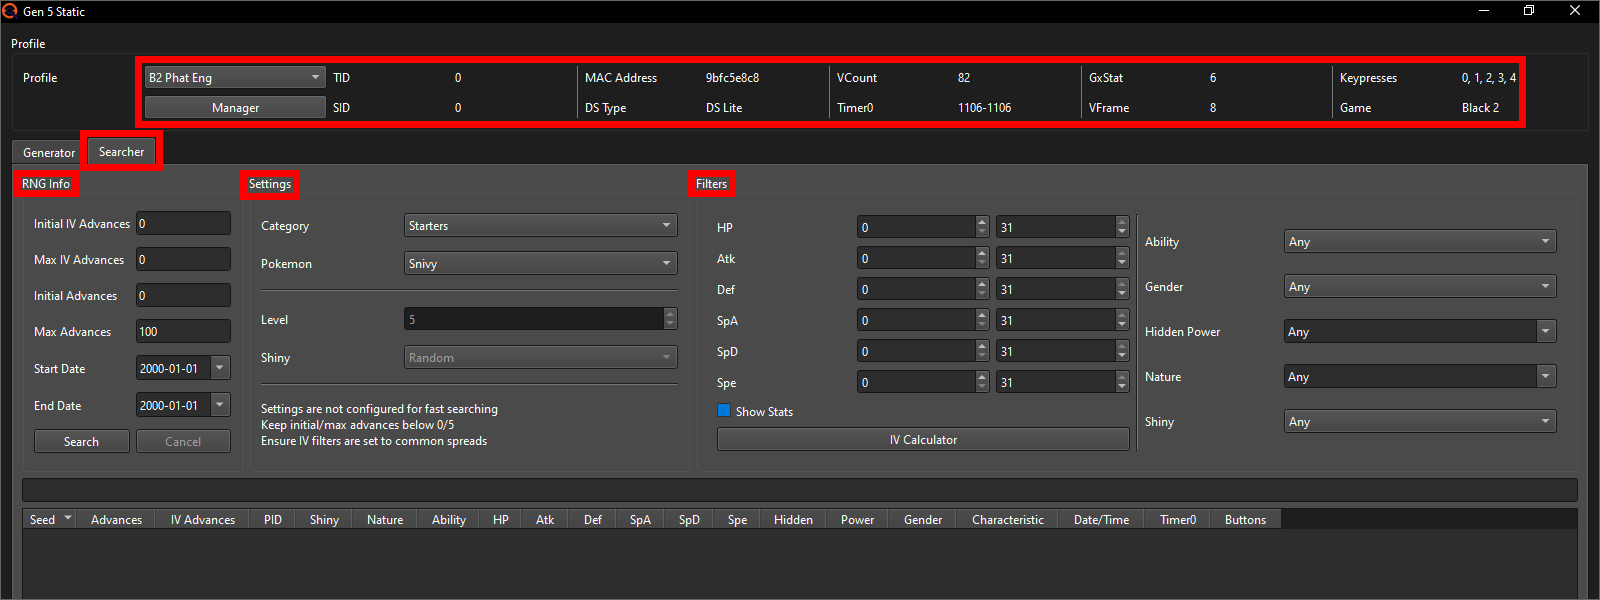
In the RNG Info section, put the Initial Advances to 4, the Max Advances to 0 and input a date range you wish to search through (I personally would pick the full current month) whilst leaving the Initial IV Advances and Max IV Advances both at 0.
Note: Why 4 advances?
Without getting too technical, there's 2 randomly moving NPCs loaded in when taking the starter from Bianca that can already advance the RNG whilst the game is showing you the current season upon loading in. If you're as fast as possible, there will be 40 frames (at 30fps) during which the NPCs can advance, and for the specific NPC types that are loaded there, the odds of 4 advances happening are ~31.69% whilst all other advance numbers have far lower odds at about 15% or less. For more technical details, check out this Google Sheet.
Next in the Settings section, select the Starters Category with the Starter you wish to RNG and finally in the Filters section input your desired IVs, Gender and Nature. Make sure to NOT search for a shiny here, as the goal is to find a not yet shiny spread that we'll make shiny later.
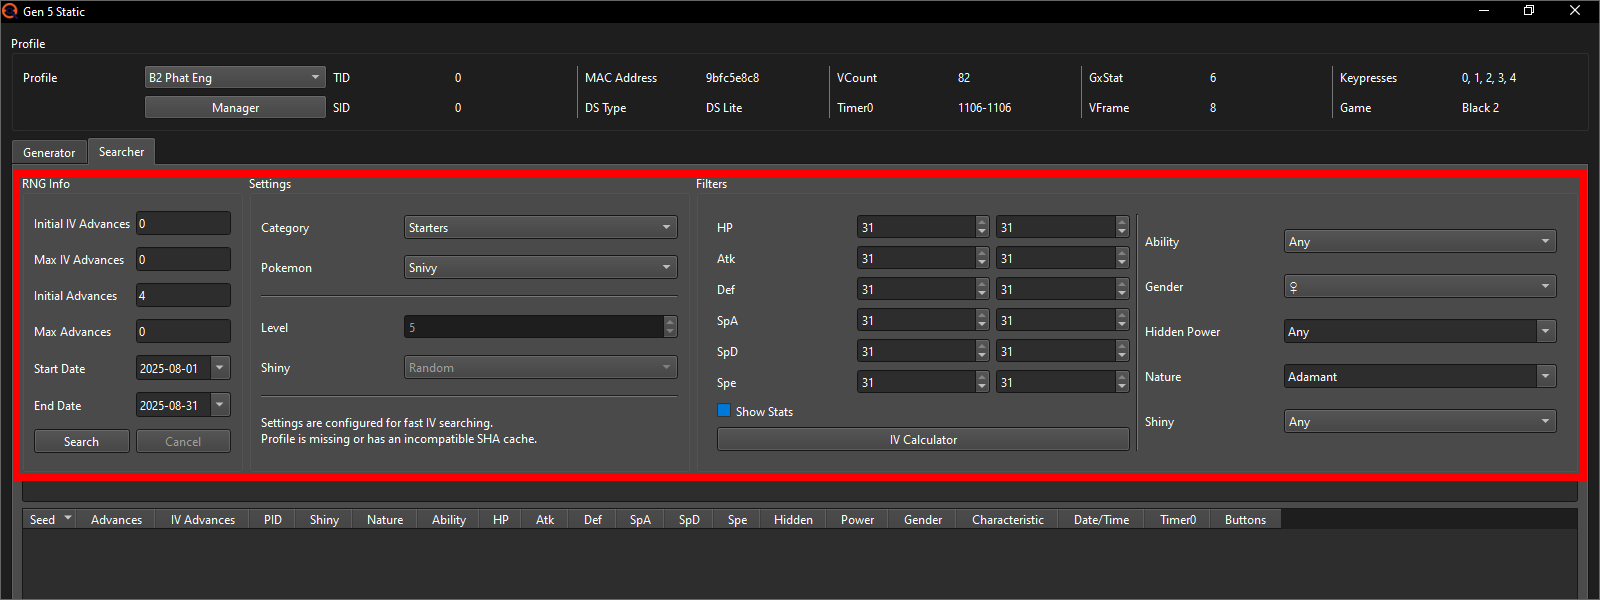
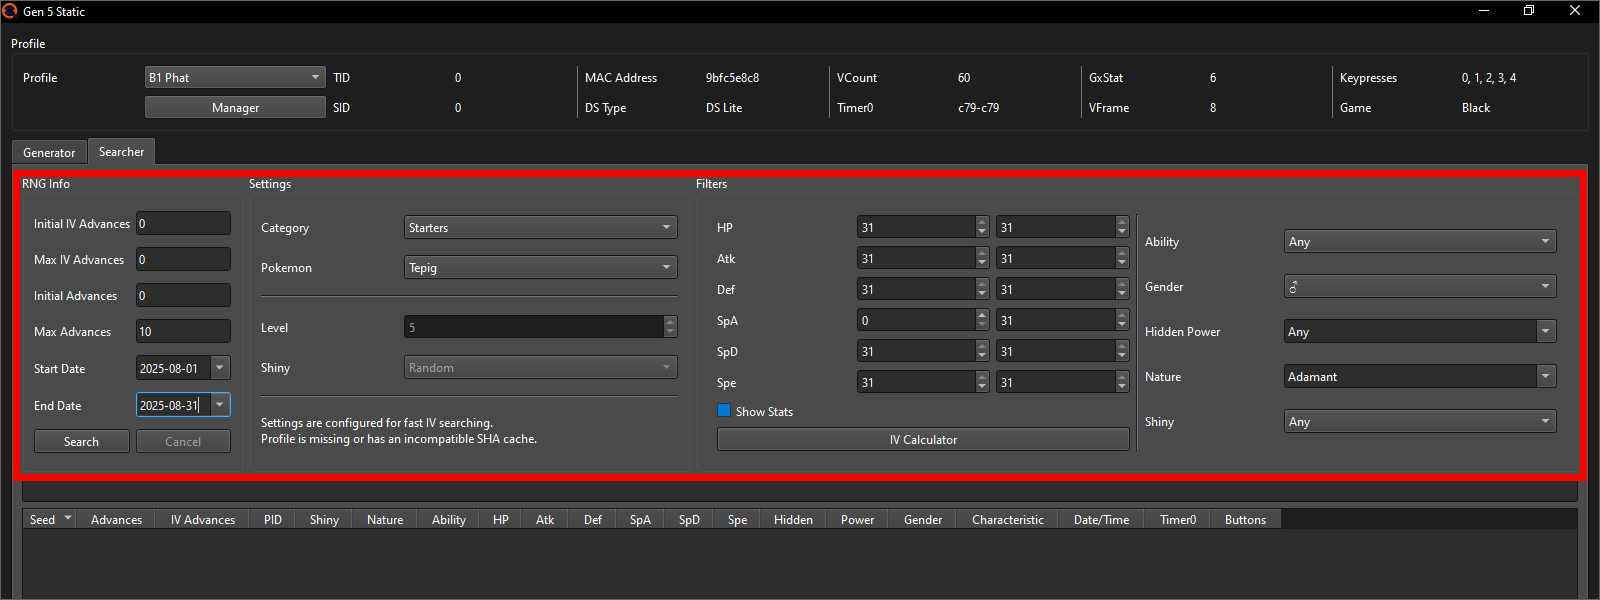
Now you can hit the Search button. If you get no results you can either search through a different date range (e.g. the full next month), increase the Max Advances (don't forget saving the game to advance is your only option and takes quite a while) or select more possible Keypresses in your Profile. I do not recommend changing the Advance range at all for BW2, as that'll mean you'll have to rely on the inconsistent Advances of the NPCs to get you to your target Advance. Once you've found a result you're happy with, copy its PID and write it down somewhere you can find it again later.
Note: How to change Keypresses
In the Static window click on the Manager button in the top left and the Profile Manager will open. Select the Profile of the game you're RNGing in and click on the Edit button at the top to open the Profile Editor. Here you can change the active Keypresses. Make sure to click the Accept button after to save your changes.
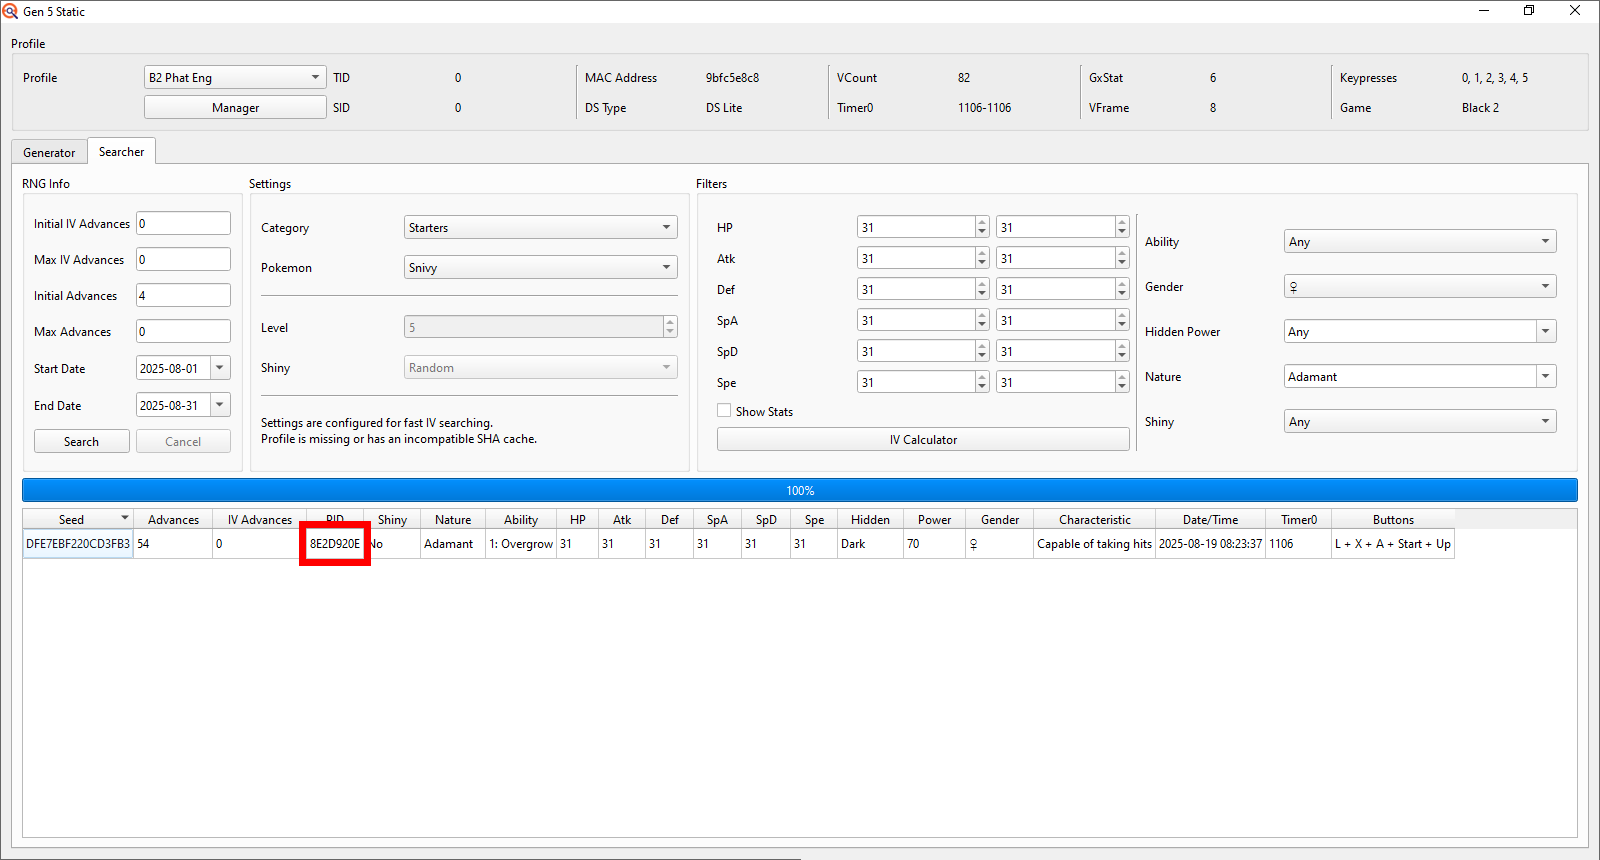
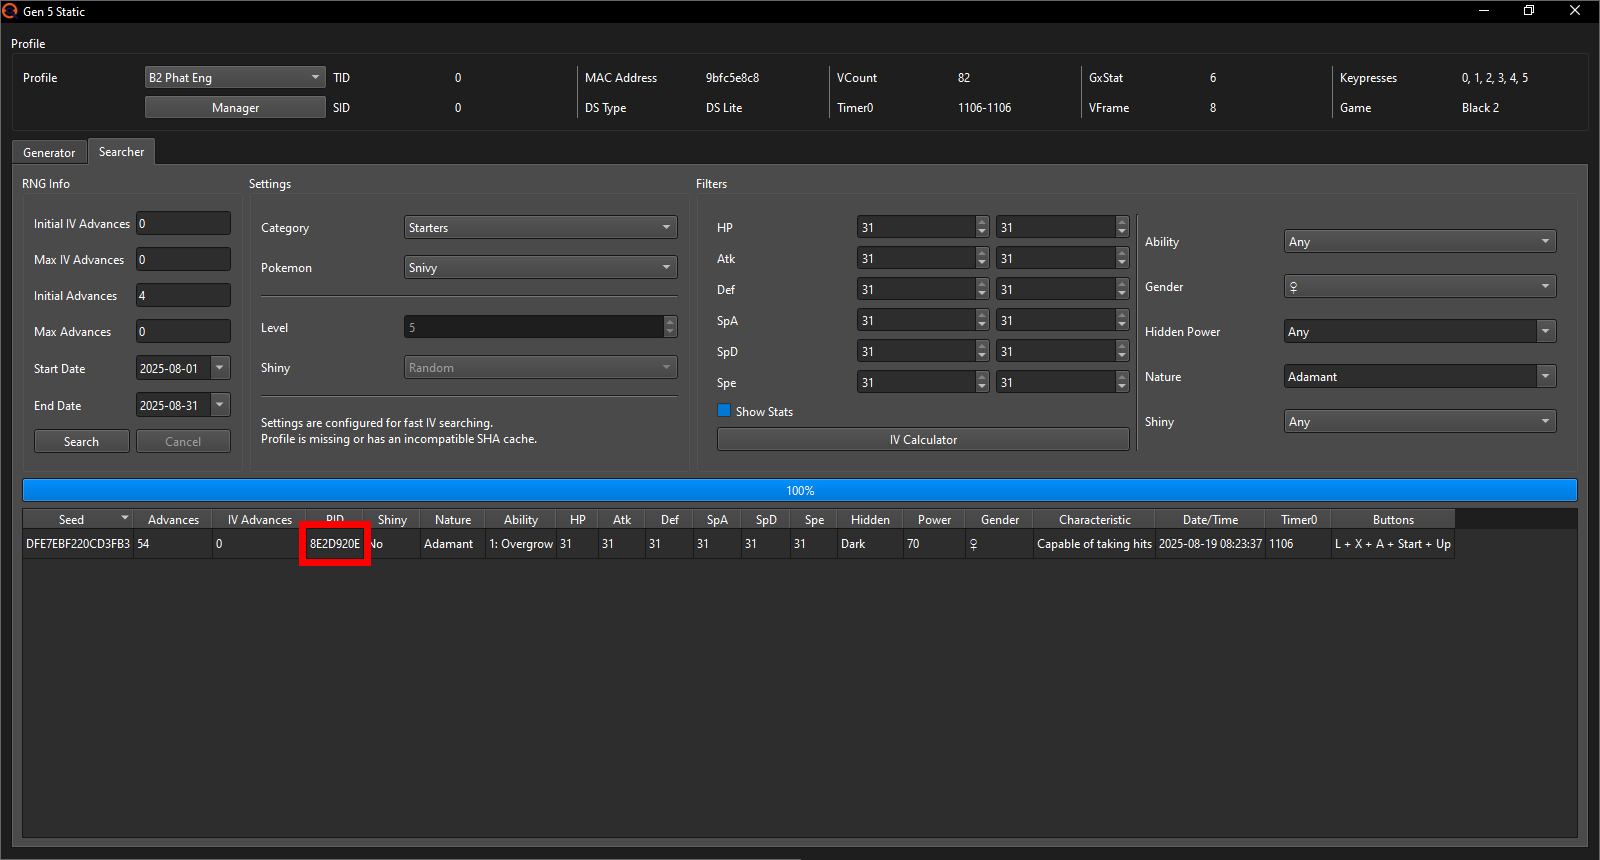
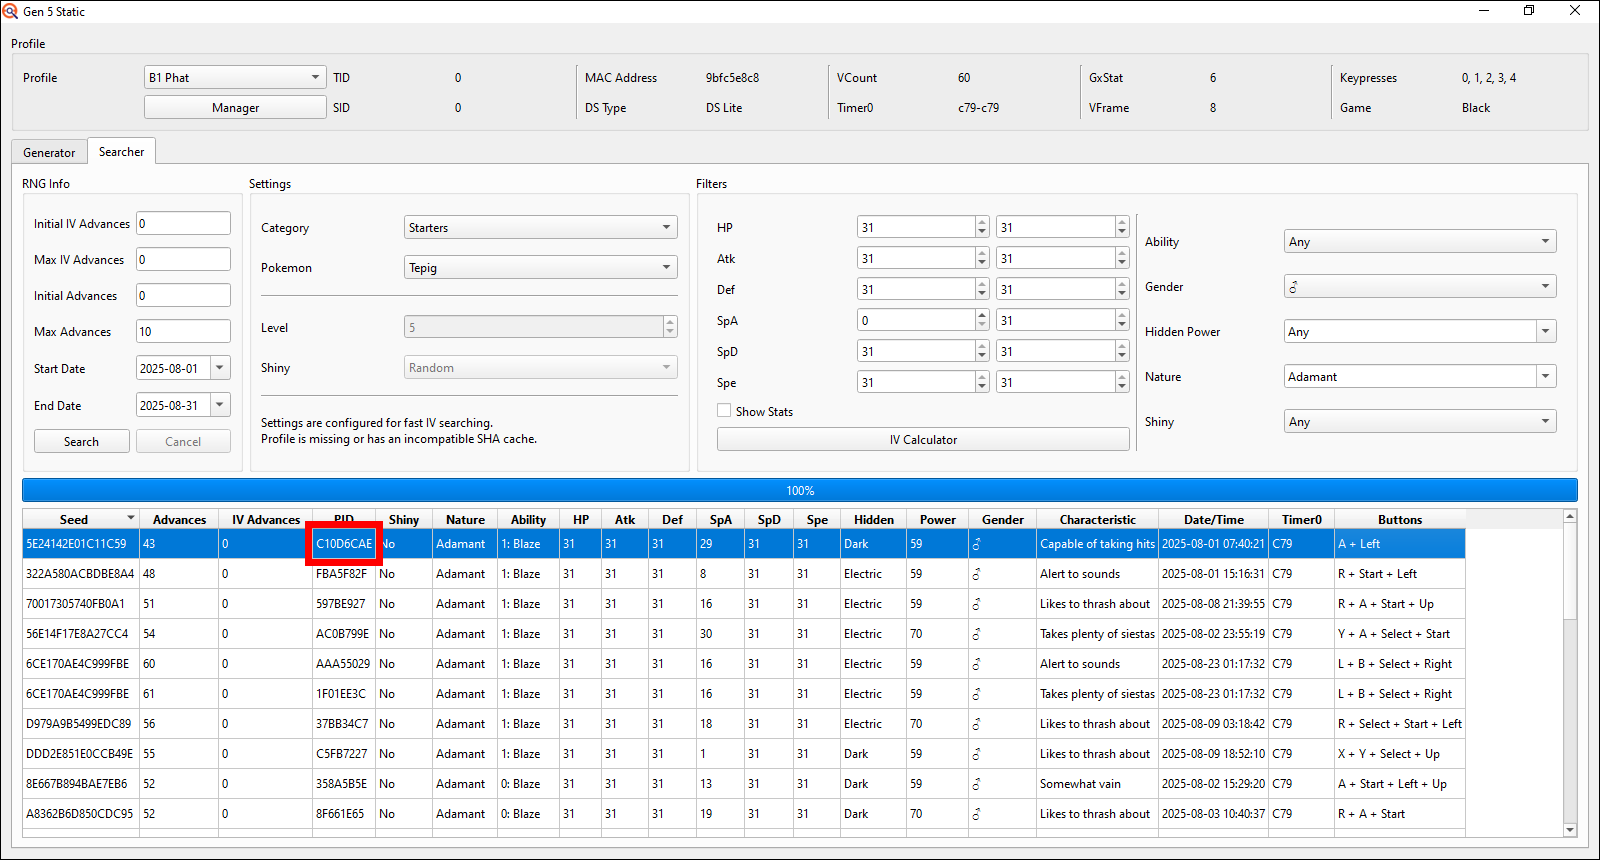
I will use this 6 IV Adamant Female Snivy Seed (for which I needed to increase my Keypresses up to 5 at a time to find it). The target second is not too bad and Keypresses are fine enough; there's far worse combinations of 5 Keypresses to hold on a DS Phat model. Now best to also e.g. take a screenshot of the full window to easily be able to find this target Seed again in the future when you get to actually RNG the starter itself. That's all the prep you need, so you can now continue on with the guide.
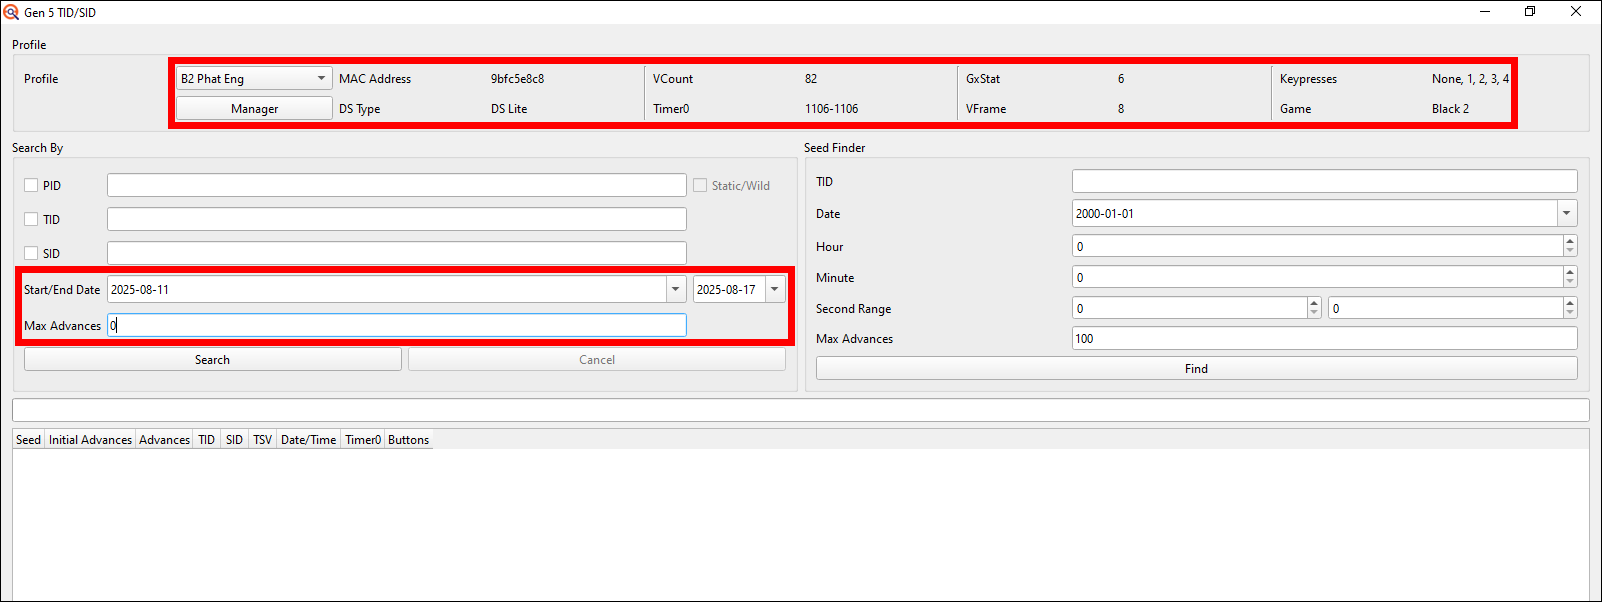
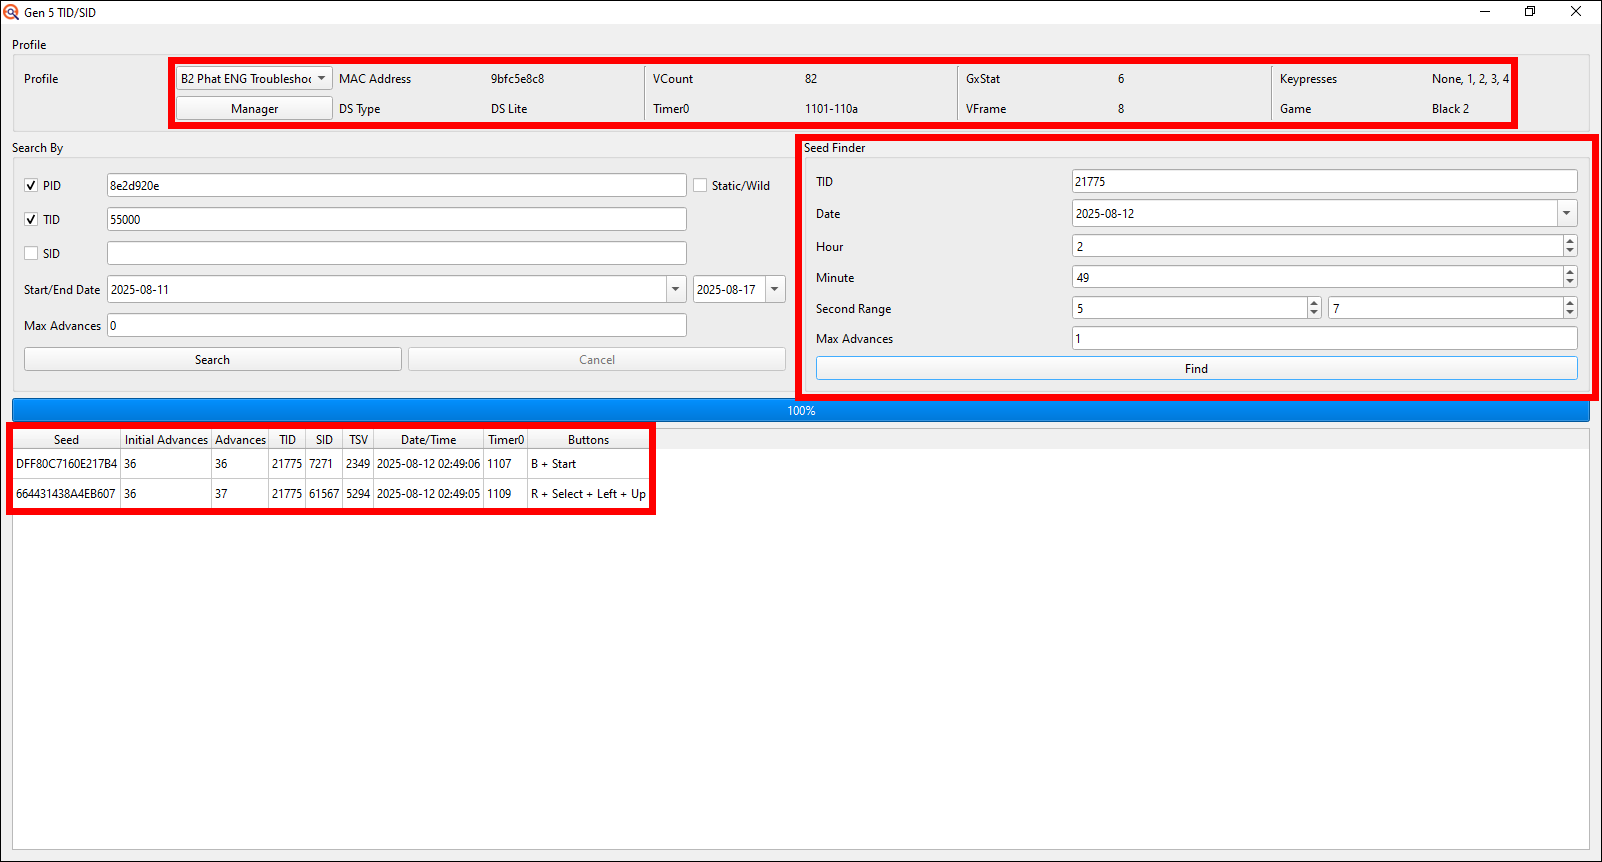
Open up PokeFinder, go to the Gen 5 tab and once there, open the IDs option.
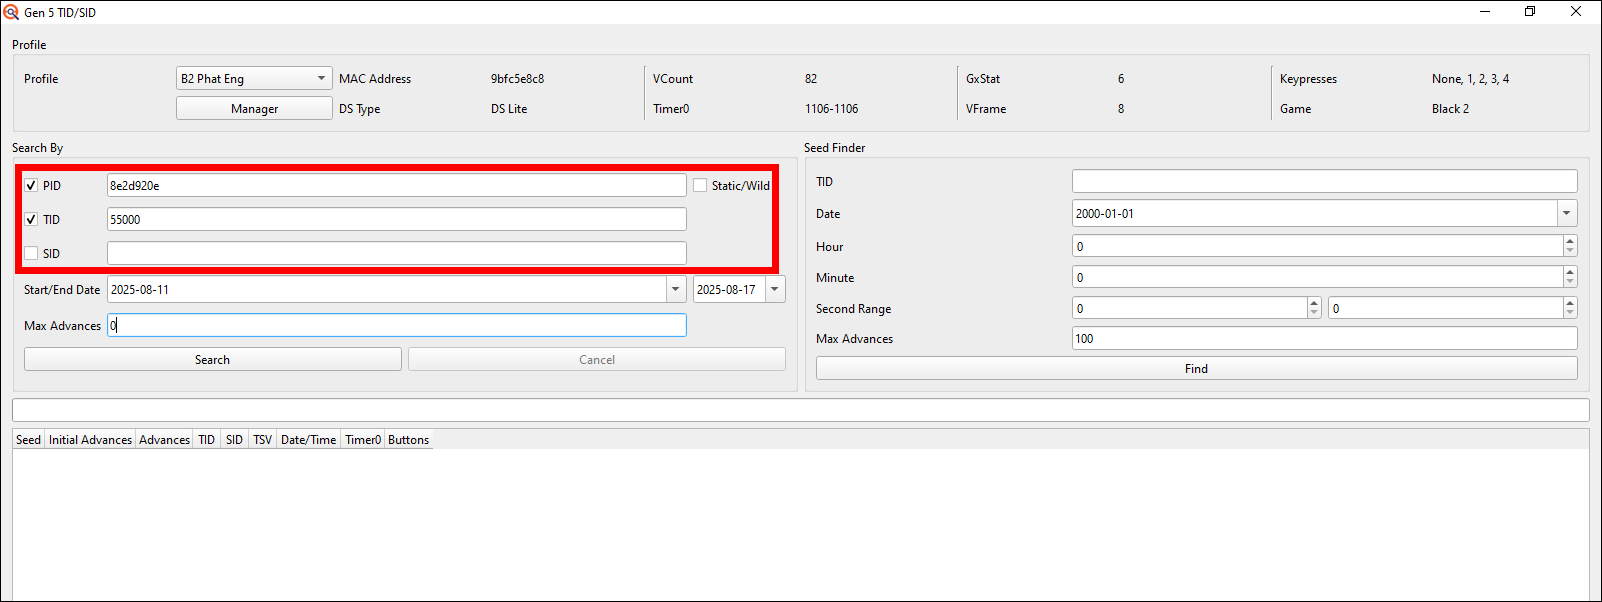
There select the Profile of the game you wish to do TID/SID RNG in if it isn't selected already and in the left half of the window labeled Search By, put the start and end date to however long of a time window you wish to search through (I'll search through one week starting on the 11th of August 2025 and ending on the 17th) and set the Max Advances to 0.

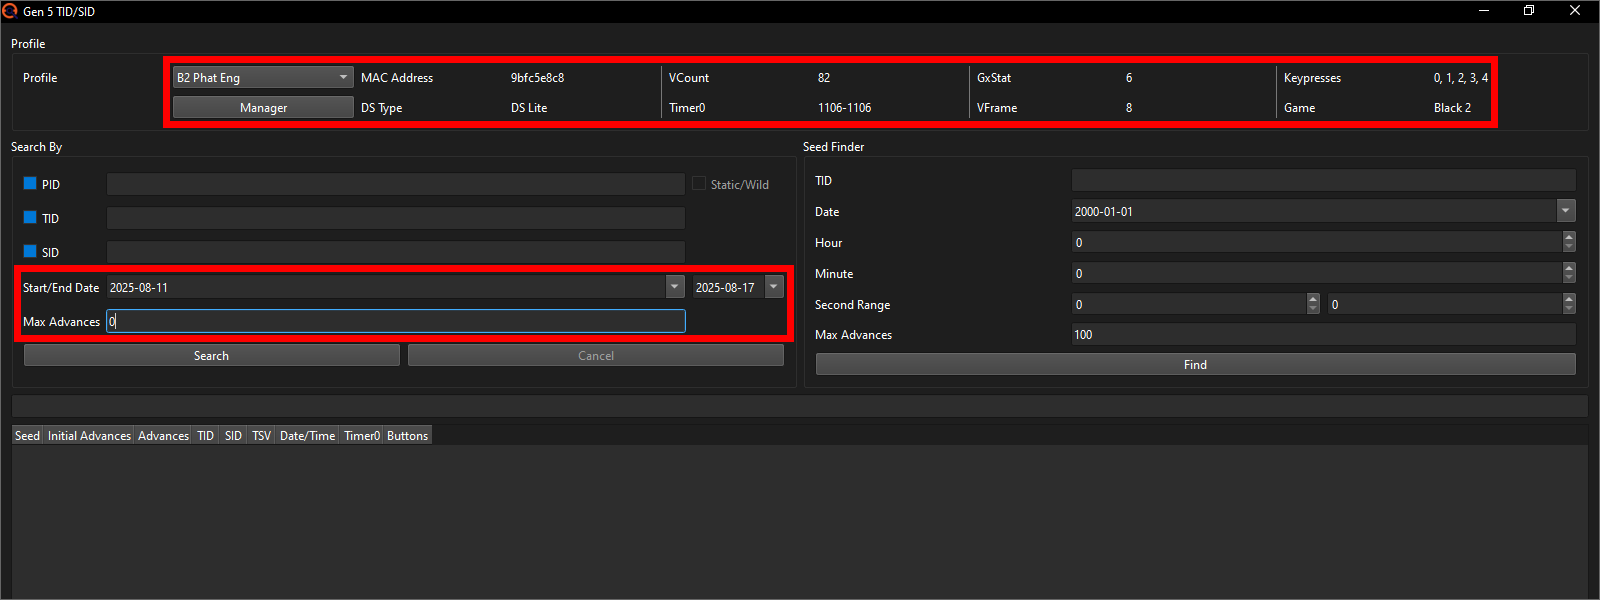
Now there's 3 more checkboxes with fields next to them labeled PID, TID and SID. The SID field you basically never want to use unless you have a HIGHLY specific purpose for it (mainly would be used to nickname event Pokémon, as that requires matching TID, SID, trainer name, trainer gender and game of origin).
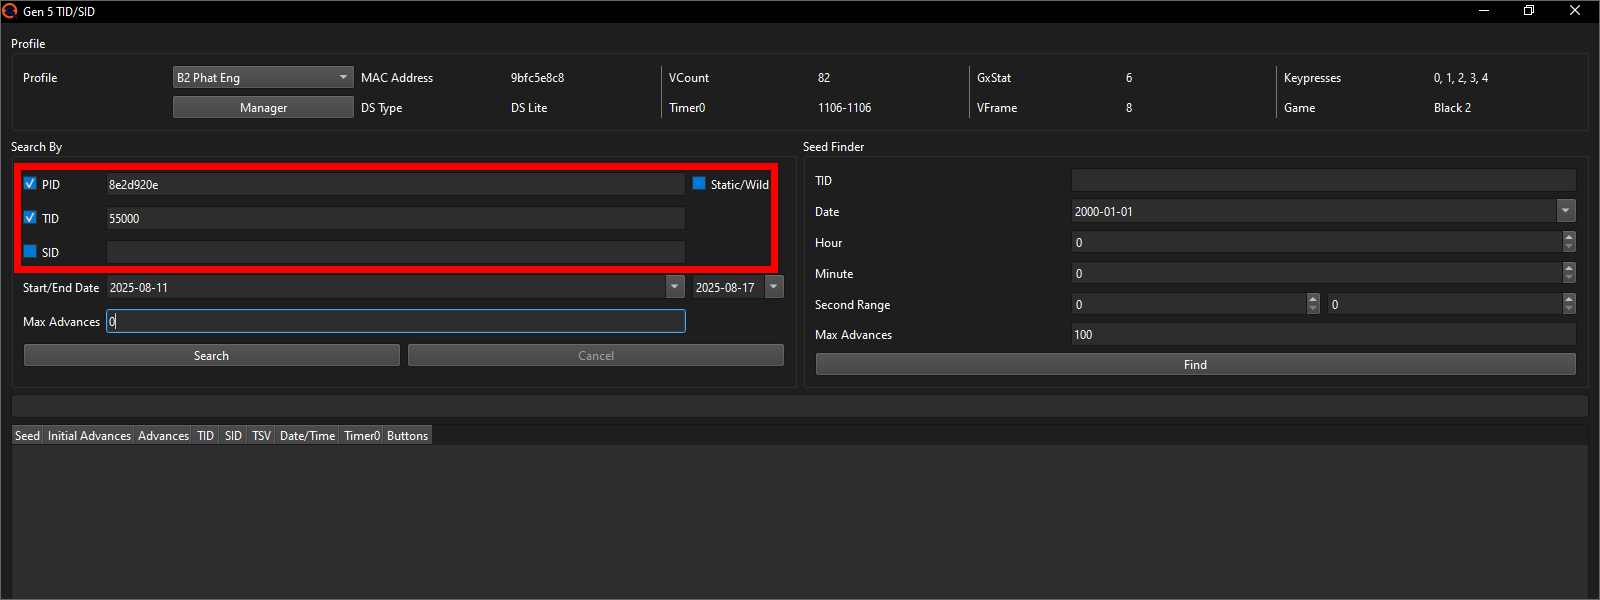
The PID field is for when you wish to prepare your save file to easily be able to get e.g. a 5/6 IV Starter and the TID field is for when you wish to get a specific number Trainer ID. Neither of those two are required but in this example I will check off both boxes inputting the PID of the 6IV Adamant Starter I prepared and the TID number of 55000 just because I think it's a funny number.

If you wish to get a number that starts with any 0's such as 00555, be aware that PokeFinder will only let you input the 555, as it has the exact same value as 00555; once you successfully RNG it to be your save files TID, it'll show up as 00555 as expected (05050 for example is input as 5050; only 0's at the front of a number before any not-0 number can be ignored).
The Static/Wild checkbox is required to check off if you were to prepare for a Stationary or Wild encounters PID to turn shiny, but you're probably preparing for either nothing or the Starter (Gift encounter), so no need to check off that box. Then you can click Search, and if you searched for nothing specific at all, or only searched for either a specific TID number or a specific PID to be turned shiny, but not both, you will most definitely get several results already. But if for example you search for both a TID and a PID, you may not have gotten any results right now in which case you have 3 options:
1. Increase the date range you search through.
2. Increase Max Advances. Whilst Advances will make each attempt take a bit longer, even just 5 of them will have PokeFinder search through significantly more results so I'll put them to 5. I'd say doing up to 10 is generally within reason. I will explain how to actually do Advances later.
3. Increase Keypresses in your Profile. I'm already at 0-4 but 5 is still usually doable just fine whilst 6, 7 or 8 are sometimes not humanly feasible.
Note: How to change Keypresses
In the TID/SID window click on the Manager button in the top left and the Profile Manager will open. Select the Profile of the game you're RNGing in and click on the Edit button at the top to open the Profile Editor. Here you can change the active Keypresses. Make sure to click the Accept button after to save your changes.
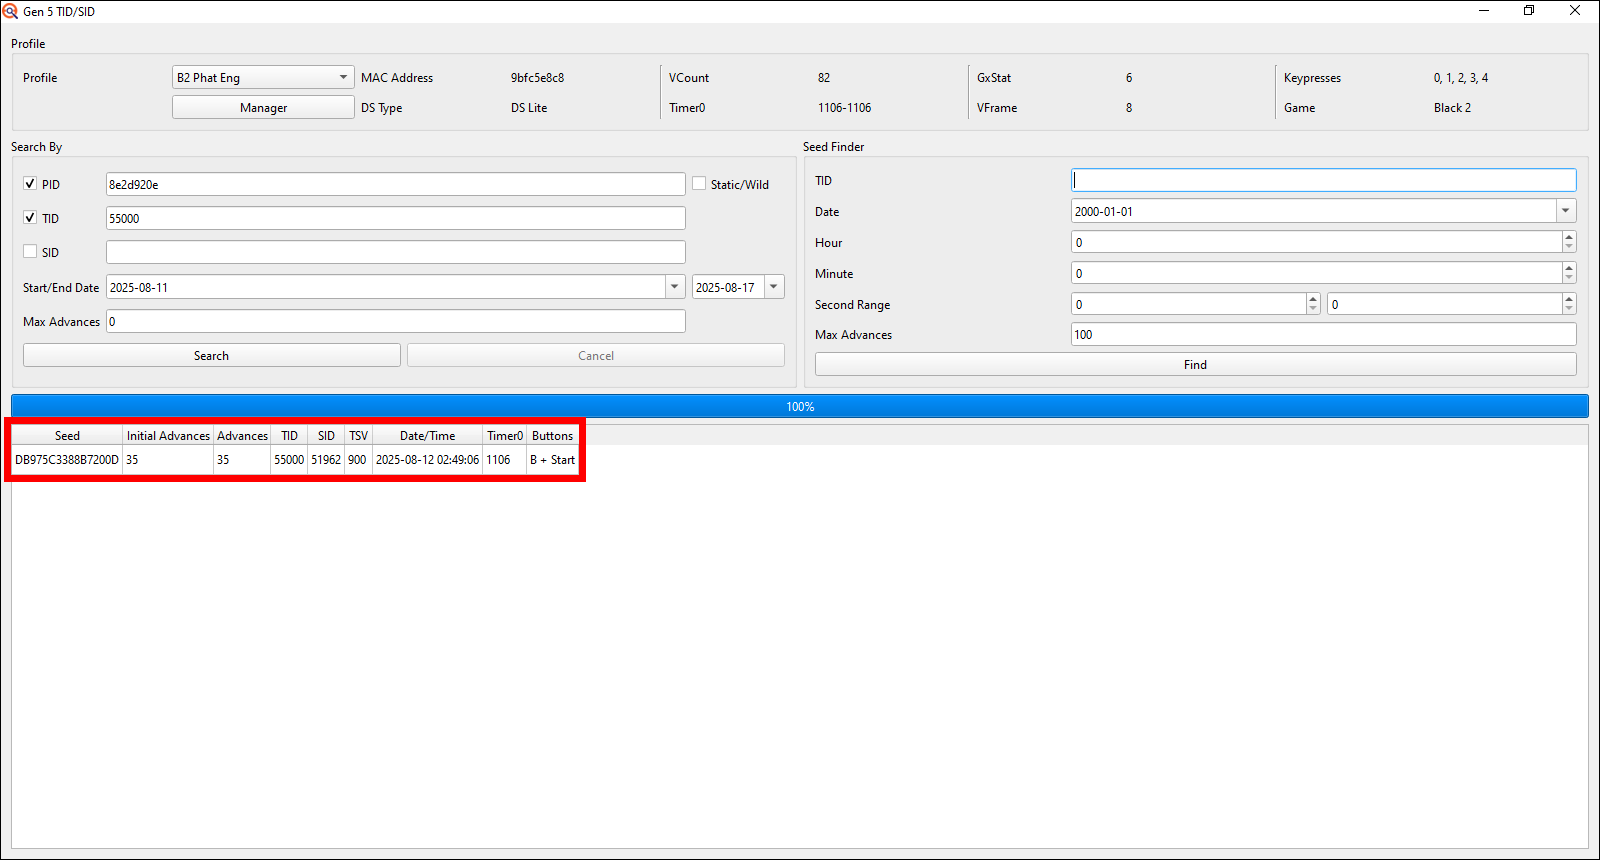
Now with at least one target Seed found, you must choose which to pick. Generally I recommend to prioritize aiming for something with a low target second so like 16-31 on DS/Lite/i and 40-55 on 3DS models. In my case I only got a single one so I have no choice but to take it (or search another date range/more Advances/add more Keypresses).
Since I put the Max Advances to 0, I'll not have to advance at all myself but if you did have to increase the Max Advances, the amount of Advances you have to do yourself is calculated by subtracting the Initial Advances from the Advances. If the Initial Advances were 30 for example and the Advances were 34, I'd later have to do 34-30=4 manual Advances myself. There's also 2 Keypresses in the B and Start buttons that I'll have to press during startup of the game later.
The RNG process
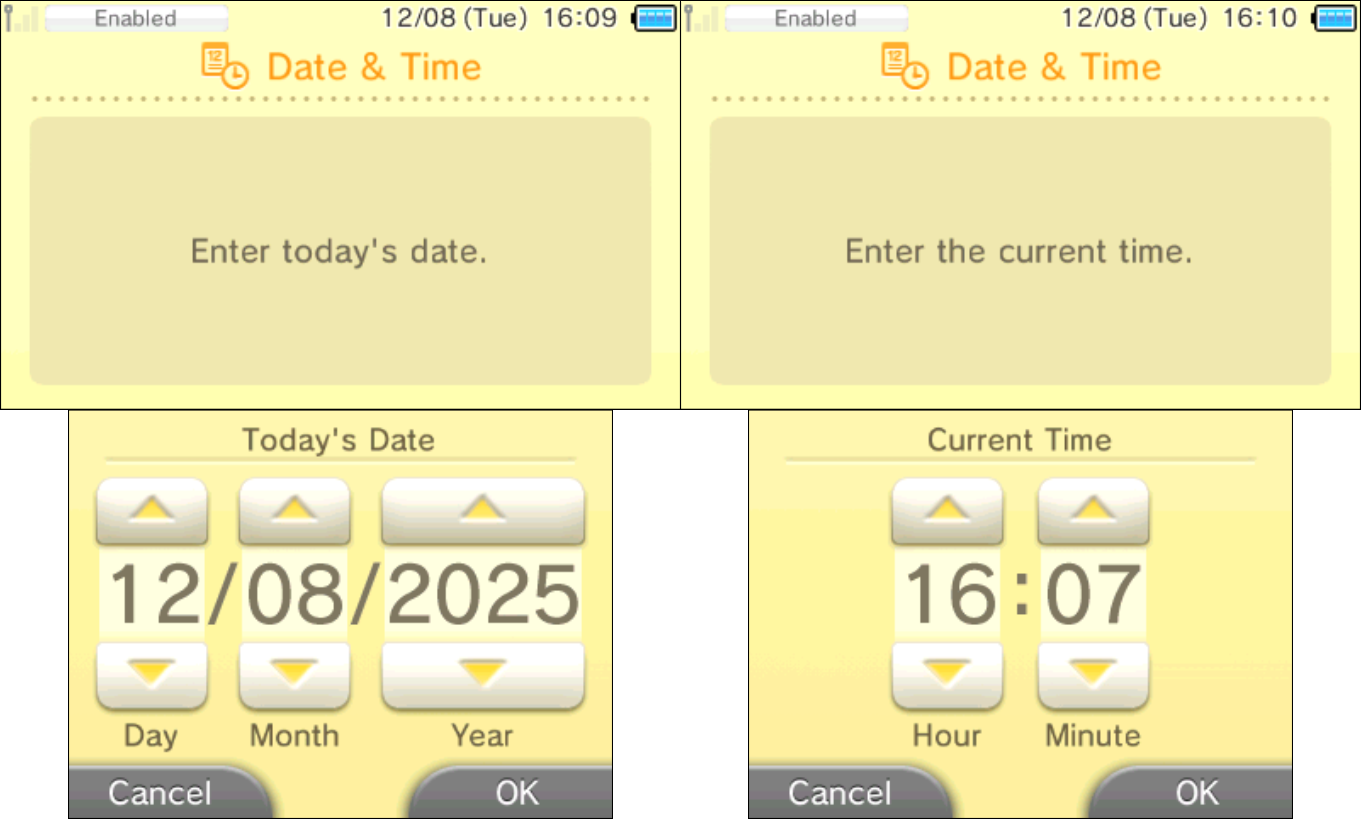
Open up EonTimer and there put the Target Second to your Seeds seconds (24 in my case), go into the DS menu to change the date to the target date (here the 12th of August 2025) and get ready to change and confirm the target time (16:07 for me; should EonTimer say "Minutes Before Target: 1" and your target time is e.g. 12:30:05, you'd need to put it to 12:29 in your DS).

At the moment that you confirm the time change on your DS console, press the Start button in EonTimer. Now go back to the home menu, get ready to start the game as soon as the 6th and final beep of EonTimer sounds and make sure to press and hold any buttons your target Seed may require (start pressing the buttons right after you started the game and you can let go once the star appears on the top screen; I will need to press and hold the Start button and the Up direction on the D-pad).
Now continue on selecting the "NEW GAME" option, go through the introduction sequence, choose your gender and name yourself. After confirming your name on the bottom screen by clicking on OK, Professor Juniper will ask you whether she got your name right and this is the moment you can Advance the RNG if your target ID pair requires any Advances.
In my case I will need to do 4 Advances, so I say "No" to her question a
total of 4 times. Each time you say "No" when Juniper asks you this,
the RNG Advances by 1, so do this however often is required for your
target ID pair. After you're done with advancing you can finish up the
introduction and get through the conversation with Cheren and Bianca.
Right after, as soon as you can move your character, open up the
menu by pressing X, go to the trainer info option (will just be named
whatever you named yourself; has a yellow card symbol), click on the
trainer card symbol in the bottom left and flip the card on its back
using the flip 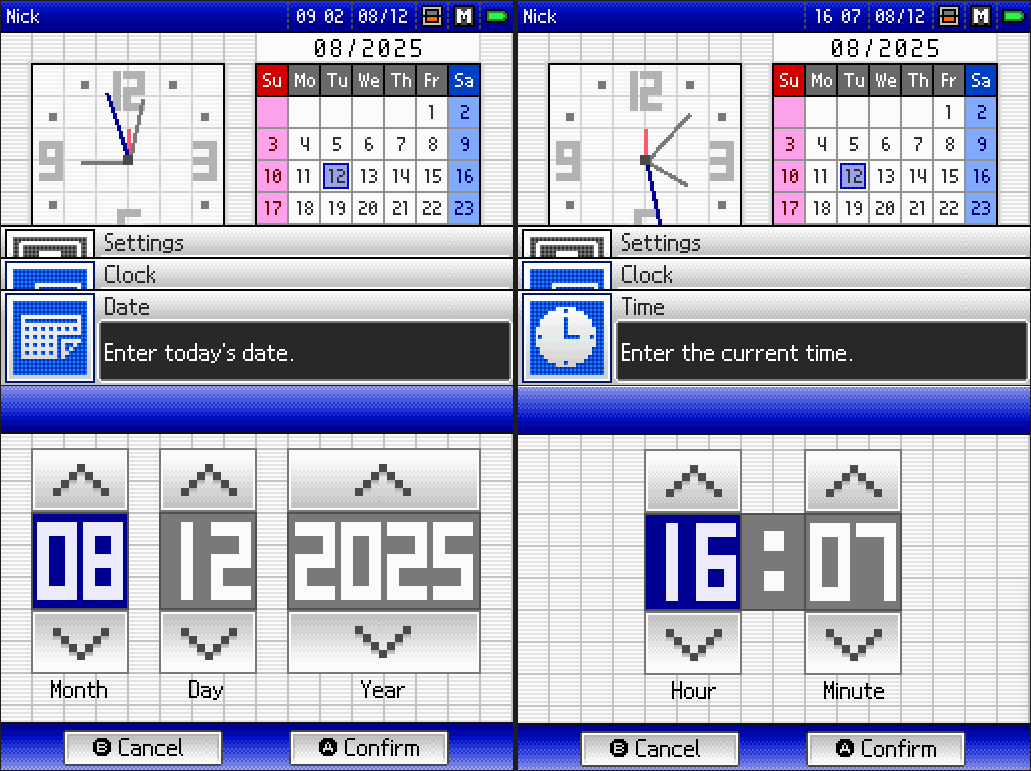 button to
see what TID you got. If you got your target TID number:
Congratulations! You just successfully RNG manipulated your
TID/SID and can now skip to the "Next Steps..."
section.
button to
see what TID you got. If you got your target TID number:
Congratulations! You just successfully RNG manipulated your
TID/SID and can now skip to the "Next Steps..."
section.
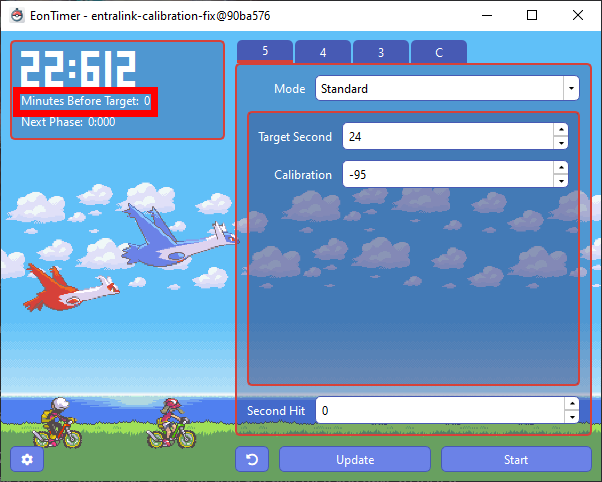
Open up EonTimer and there put the Target Second to your Seeds seconds (6 in my case), go into the DS menu to change the date to the target date (here the 12th of August 2025) and get ready to change and confirm the target time (normally it'd be 02:49 for me with that target Seed, however EonTimer says "Minutes Before Target: 1" so I need to put the time to a minute earlier in 02:48 on my DS; this is due to 6 being too low of a target second to feasibly hit, so EonTimer adds a full minute to the time).
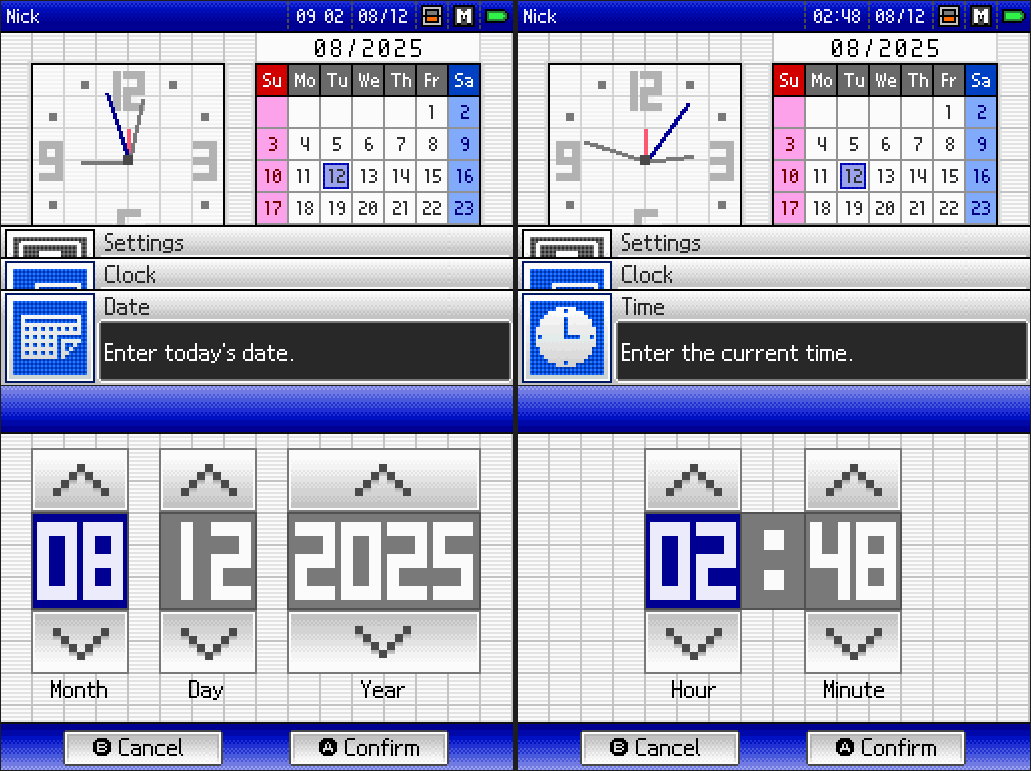
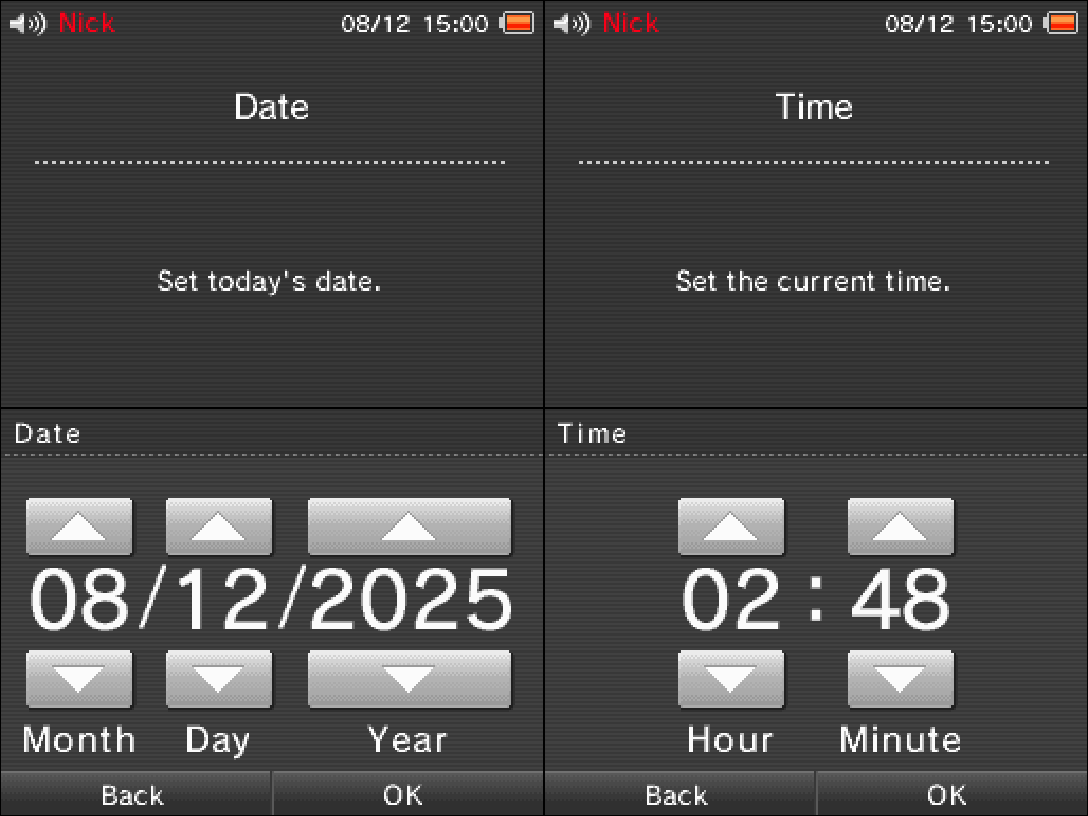

At the moment that you confirm the time change on your DS console, press the Start button in EonTimer. Now go back to the home menu, get ready to start the game as soon as the 6th and final beep of EonTimer sounds and make sure to press and hold any buttons your target Seed may require (start pressing the buttons right after you started the game and you can let go once the star appears on the top screen; I will need to press and hold the B and Start buttons).
Now continue on selecting the "NEW GAME" option, go through the introduction sequence, choose your gender and name yourself. After confirming your name on the bottom screen by clicking on OK, Professor Juniper will ask you whether she got your name right and this is the moment you can Advance the RNG if your target ID pair requires any Advances.
In my case I don't need to do any Advances but if you had to do e.g. 4 Advances, you'd say "No" to her question a total of 4 times. Each time you say "No" when Juniper asks you this, the RNG Advances by 1, so do this however often is required for your target ID pair. You also get to name your rival in these games but saying "No" to Juniper when she asks you whether she got his name correct will not advance the RNG.
After
you're done with advancing you can finish up the introduction and as
soon as you can move your character, open up the menu by pressing X,
go to the trainer card option (will just be named whatever you named
yourself; has a yellow card symbol) and flip the card on its back using
the flip button to
see what TID you got. If you got your target TID number:
Congratulations! You just successfully RNG manipulated your
TID/SID and can now skip to the "Next Steps..."
section.
Troubleshooting
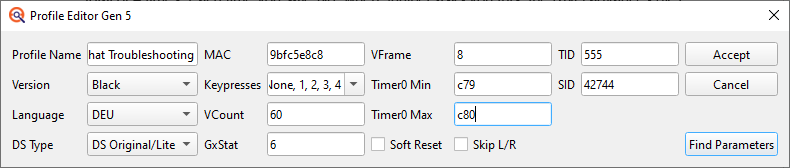
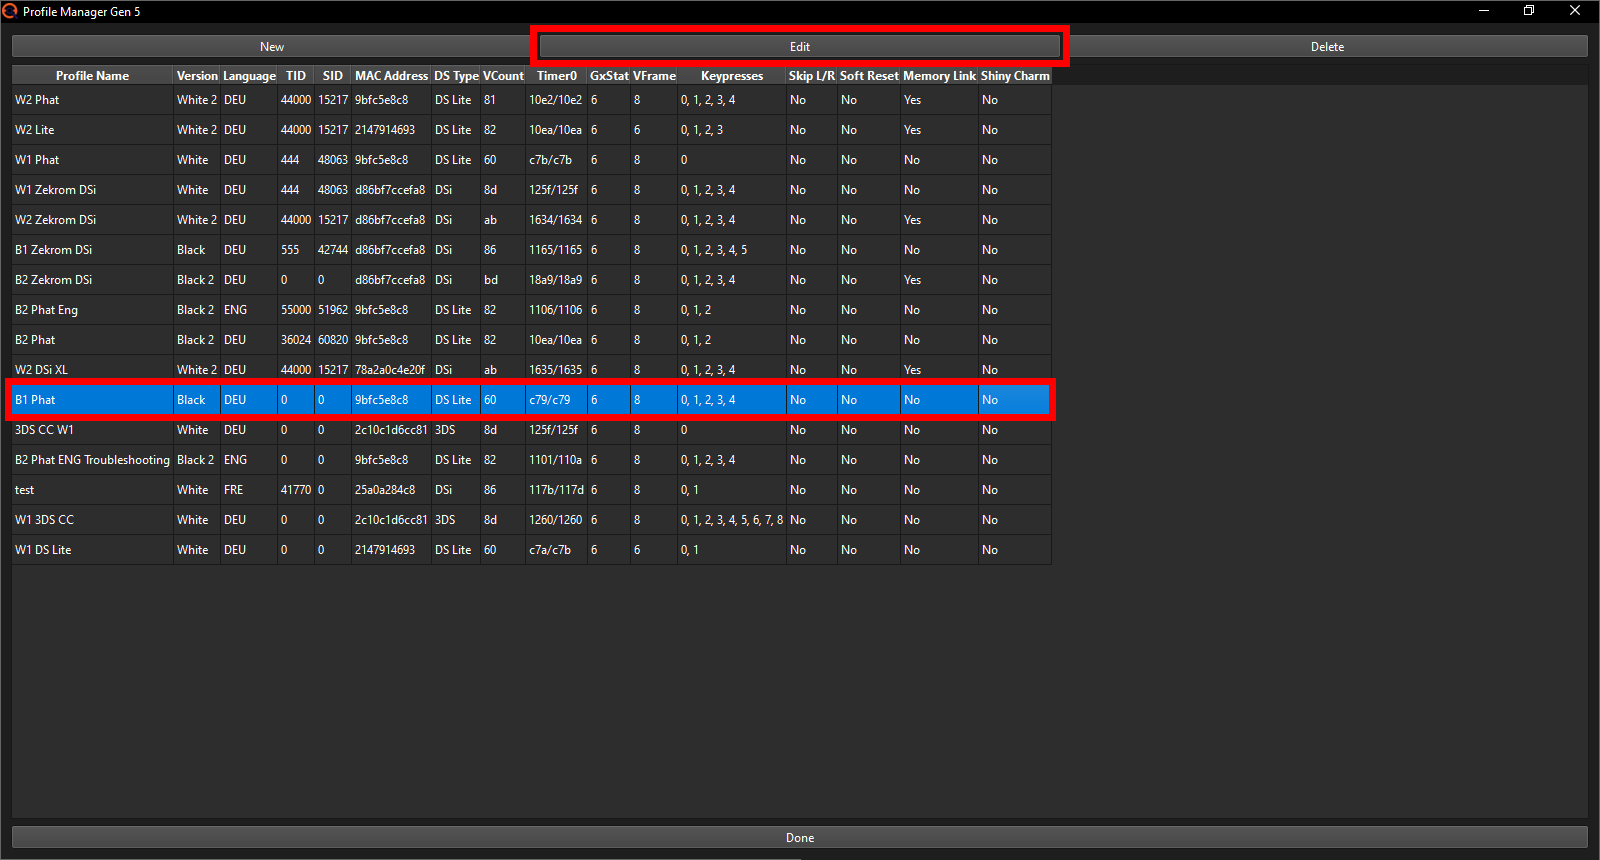
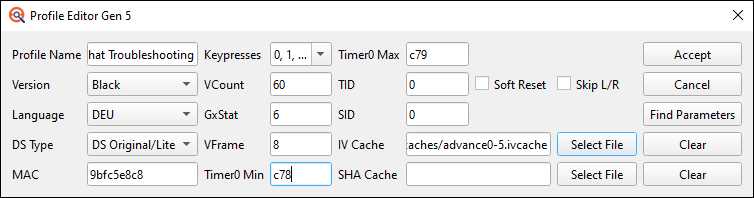
If this is not your target TID number however, you first gotta find out what else you may have hit to make sure nothing else went wrong. Start by opening the Profile Manager at the top. Here create a new Profile that is an exact copy of the Profile of the game that you have been using for this IDrng as of yet, but with one difference: for the Min and Max Timer0, input both Timer0 values that you can get here. I for example can get both C78 and C79 as my Timer0's, so I'll put the Min to the lower value of the two in C78 and the Max to the higher value in C79. If you don't know your other, less common Timer0 value, just put the range to include both the Timer0 above and the Timer0 below your main one (in my case that would be C78 below and C7A above my main C79), as that'll make the program search all three Timer0's. I'll name this new Profile "B1 Phat Troubleshooting" since it's for troubleshooting my Black 1 game that I RNG with on my "Phat" DS.

This Profile will ONLY be for troubleshooting. Whenever you search for a target Seed, you should always select your main Profile.
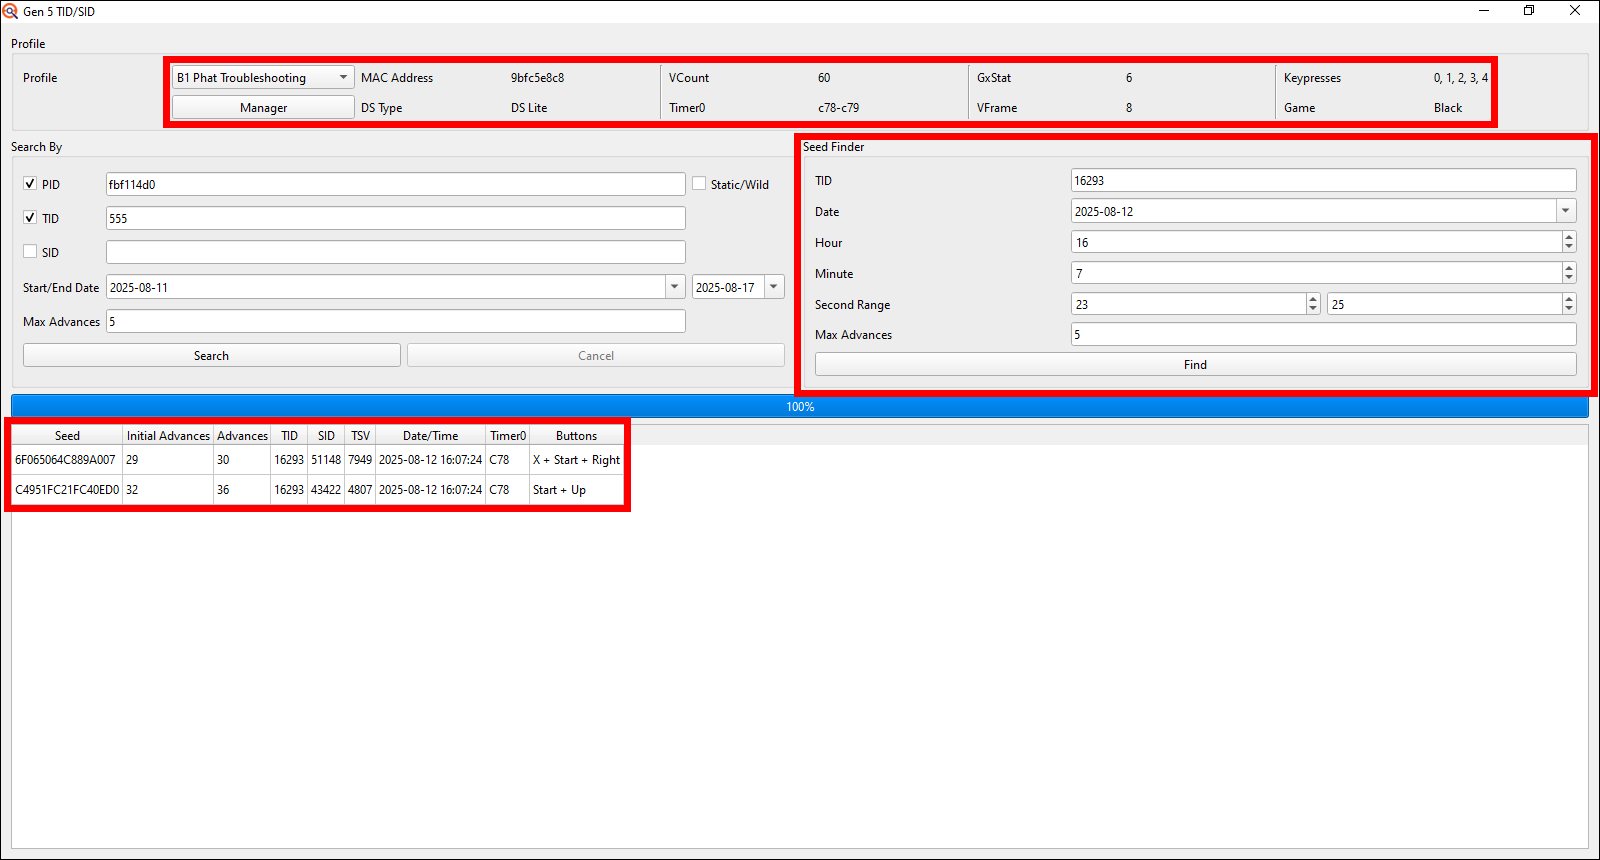
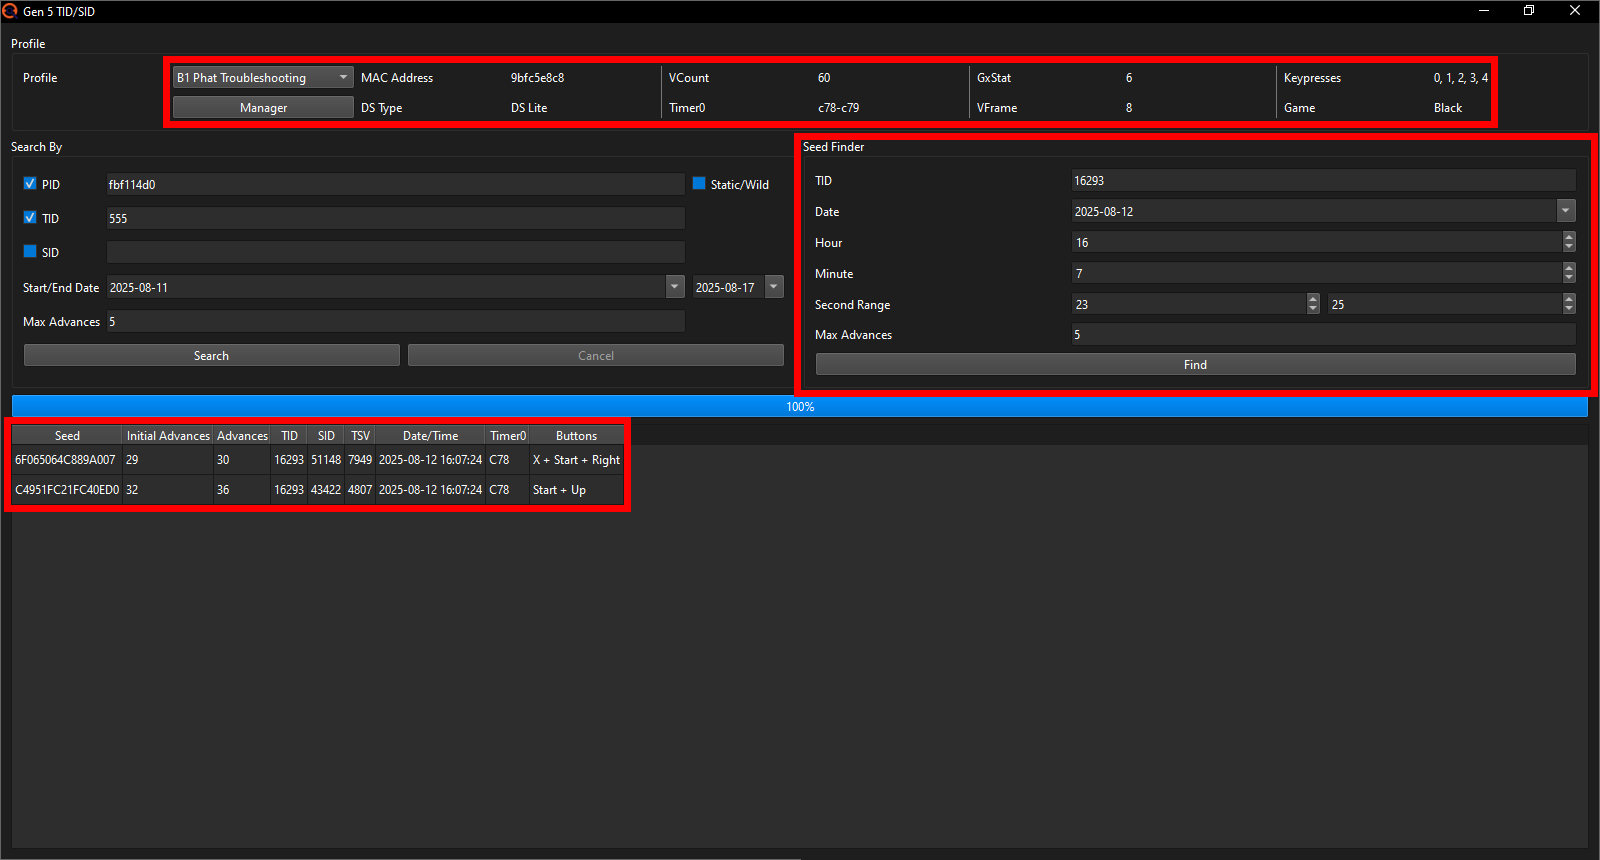
Save the Profile, go back to the IDs window, select this newly created Profile and now input the TID you got into the right half of PokeFinder's IDrng section labeled "Seed Finder", put the date, hour and minute to that of your target Seed, the Second Range to be +/-1 of your target second if you're on DS/Lite/i and +/-3 if you're on 3DS models (so 23-25 for me since my target is 24 and I'm on a DS) and put the Max Advances to the amount you need to do +1 (so 4+1=5 in my case). Now press the Find button and you should be presented with at least 1 result.
If there's nothing that likely means you did something wrong. Double check all the date and time settings match in both PokeFinder and on your DS. After you checked simply try again, whether you noticed something or not, and if you still get nothing, calibrate your Profile one more attempt to make sure you didn't accidentally write down the wrong VCount or something. If after all that you still cannot seem to get anything, join im a blisy ._.'s RNG manip assistance Discord server and ask for help in the bw_b2w2 channel providing an explanation of the issue and full window screenshots of your PokéFinder IDs window and EonTimer.
If you do get a result, you now need to check whether it's sensible by having a look at the Advances. Optimally whatever you hit should have the exact same Keypresses your target ID has and the difference between the Advances and the Initial Advances columns should match the amount of manual Advances you did, but since we're all only human and can e.g. miscount, if it's 1 Advance too much or 1 too little it's likely still valid. Also have a look at the second you hit vs the second you targeted. Normally on DS, Lite and i you should always hit your exact target second whilst on 3DS models hitting 1 off is fairly common. If the result is off any more than that, do 1 more Profile Calibration and adjust your EonTimer with the second you hit instead of your target if needed.

In my first attempt I hit a TID of 16293 which I get 2 results for. I know the second one is the one I hit because the Keypresses match and 36-32=4 which matches the amount of Advances I did precisely as well. The second I hit is also 24 just like my target but the Timer0 I hit is my rarer Timer0 in C78 instead of my target C79. That'll just happen sometimes; nothing I can do about that except try again and hope I won't get Timer0'd again.
Whilst in theory this is a valid hit, and if I didn't care for my TID to be 00555 specifically (and didn't want a 5/6IV shiny Starter or Roamer), I could just proceed now being done with TID/SID RNG, I would advise against it. The amount of times I've seen people who thought they got an ID pair just because PokeFinder displayed it to them when in reality something went wrong making them unable to get e.g. a shiny Starter later is in the dozens.
I ALWAYS recommend people to continue until they get the specific TID/SID pair they originally aimed for. That is the only way to ensure you did indeed get what PokeFinder tells you you got and with IDrng being one of the easiest RNGs in Gen 5 it's not gonna take particularly long or be very difficult to successfully do either. So now you just rinse and repeat this RNG until you get your desired ID pair.
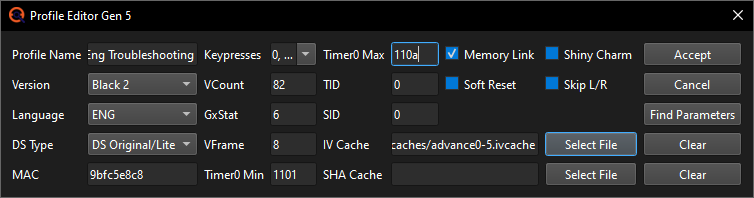
If this is not your target TID number however, you first gotta find out what else you may have hit to make sure nothing else went wrong. Start by opening the Profile Manager at the top. Here create a new Profile that is an exact copy of the Profile that you have been using for this IDrng as of yet, but with one difference: for the Min and Max Timer0, check out what Timer0's you have gotten during Profile Calibration and input the lowest value -1 as the Min and the highest value +1 as the Max (if you got e.g. 1102, 1103, 1104, 1105, 1106, 1107, 1108 and 1109 as Timer0's, put the range to 1101-110A). If you did not write down all the Timer0's you can get or lost the writeup, put the range to your most common Timer0 -A and +A. You can use the following input field to calculate this new Profiles Min and Max Timer0 based on your most common Timer0, if you don't know your full range.
00This will give you a larger Timer0 range than you can actually hit, thus making you get more invalid results than otherwise, but it's still going to be very helpful in determining what you hit. Just not quite as efficient as knowing your actual Timer0 range would be. If I didn't know my full range already, I'd just input 1106 for example, as that is my most common Timer0, and this calculator would return me 10FC as the Min and 1110 as the Max.
I'll name this new Profile "B2 Phat Eng Troubleshooting" since it's for troubleshooting my English Black 2 game that I RNG with on my DS (If you are using one of the DSi/3DS consoles that can have 2 different VCounts, you'll need to make 2 of these Profiles each having 1 of the two VCounts you can get).
This Profile will ONLY be for troubleshooting. Whenever you search for a target Seed, you should always select your main Profile.
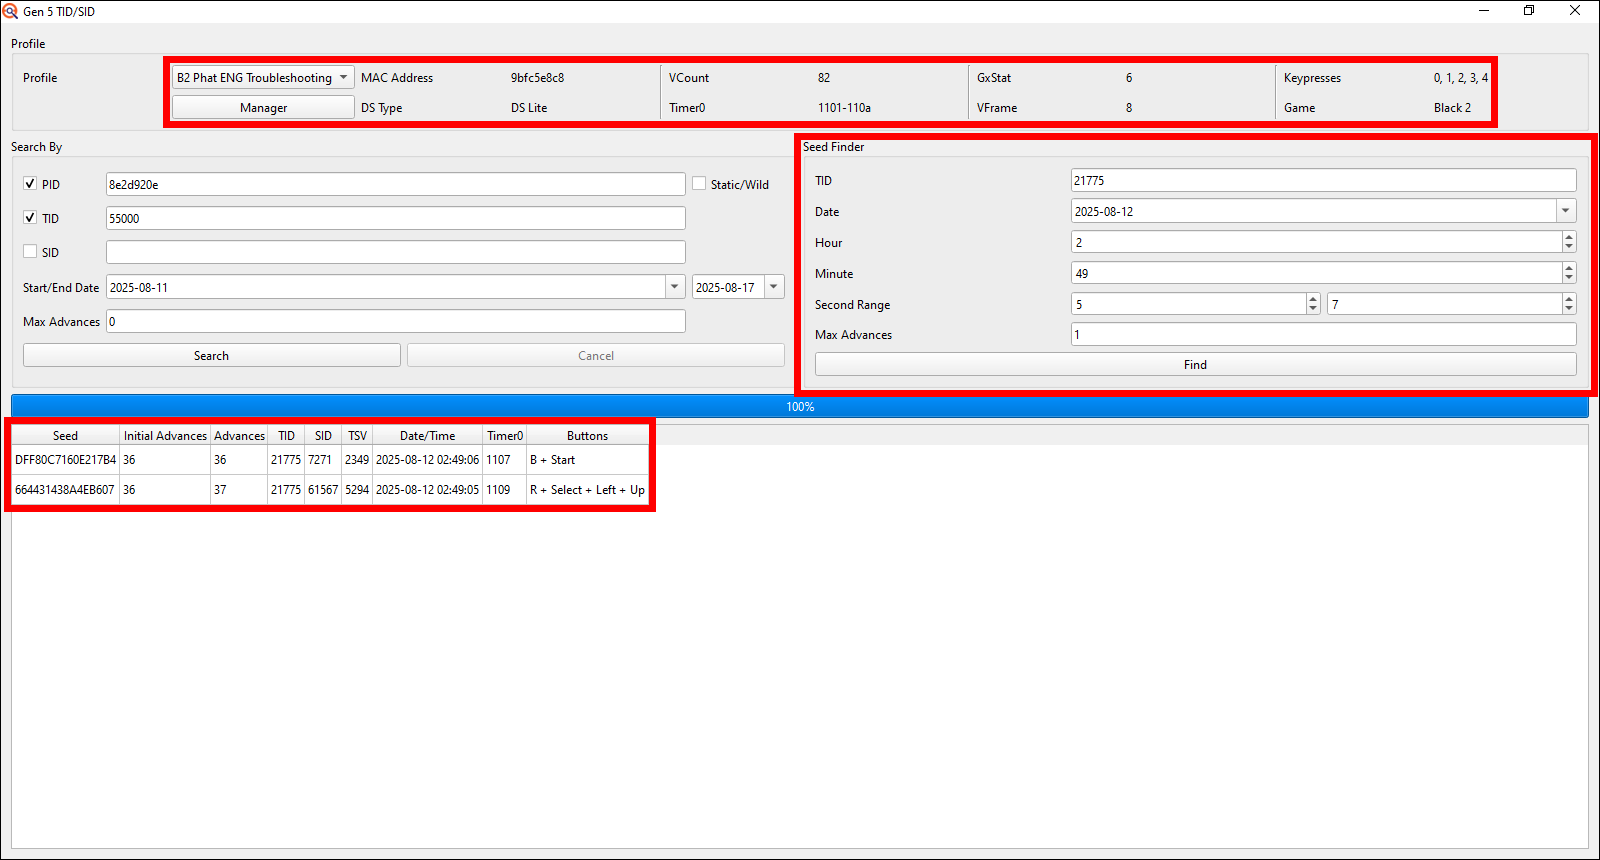
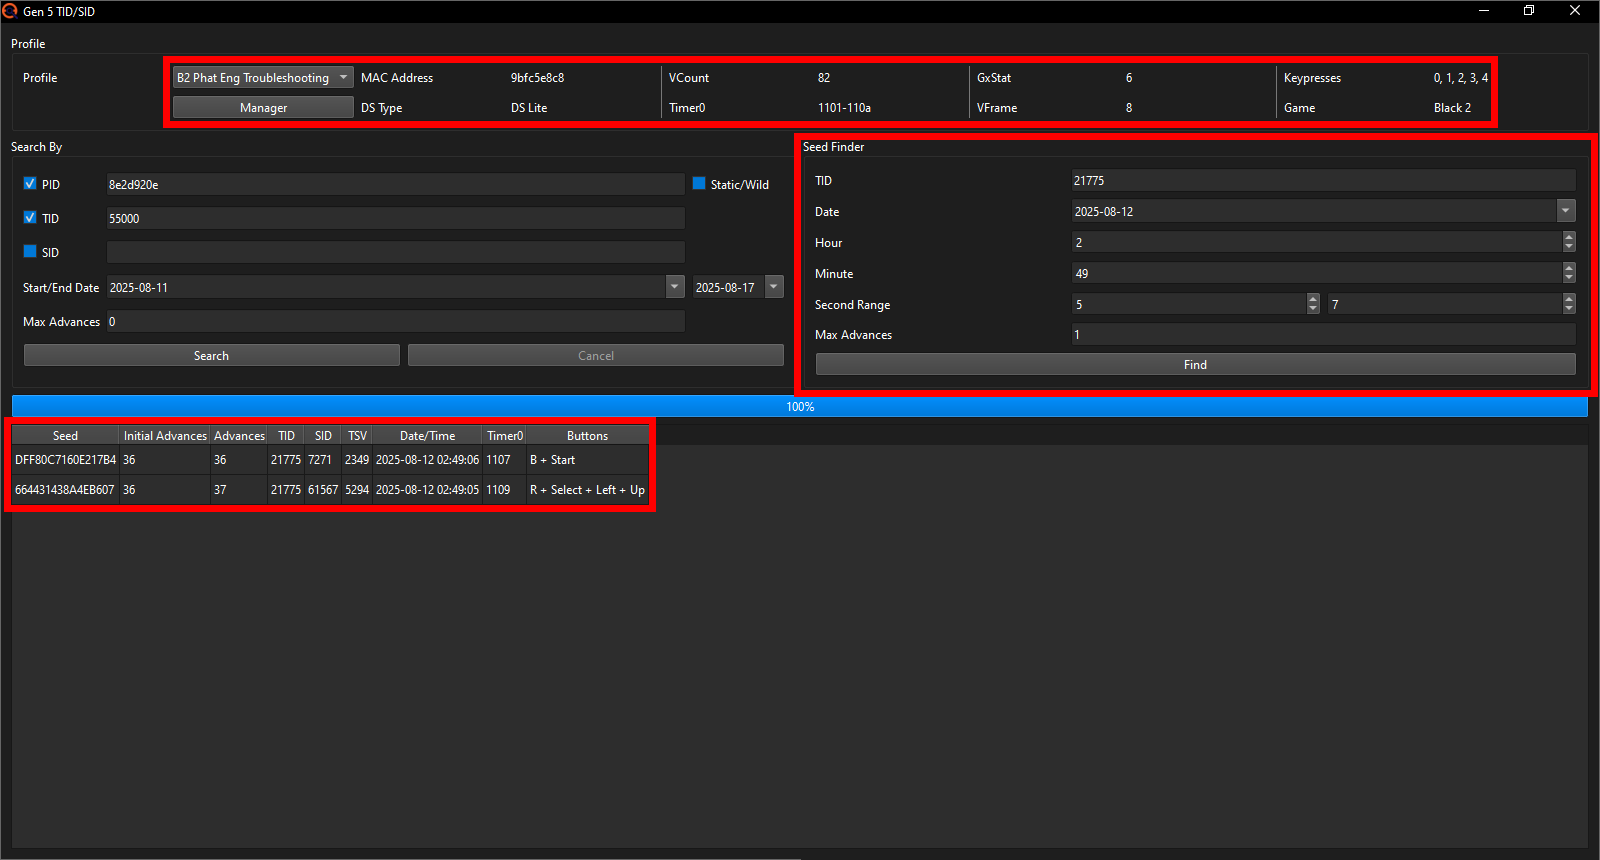
Save the Profile, go back to the IDs window, select this newly created Profile and now input the TID you got into the right half of PokeFinder's IDrng section labeled "Seed Finder", put the date, hour and minute to that of your target Seed, the Second Range to be +/-1 of your target second if you're on DS/Lite/i and +/-3 if you're on 3DS models (so 5-7 for me since my target is 6 and I'm on a DS) and put the Max Advances to the amount you need to do +1 (so 0+1=1 in my case). Now press the Find button and you should be presented with at least 1 result.
If there's nothing that likely means you did something wrong. Double check all the date and time settings match in both PokeFinder and on your DS. After you checked simply try again, whether you noticed something or not, and if you still get nothing, calibrate your Profile one more attempt to make sure you didn't accidentally write down the wrong VCount or something. If after all that you still cannot seem to get anything, join im a blisy ._.'s RNG manip assistance Discord server and ask for help in the bw_b2w2 channel providing an explanation of the issue and full window screenshots of your PokéFinder IDs window and EonTimer.
If you do get a result, you now need to check whether it's sensible by having a look at the Advances. Optimally whatever you hit should have the exact same Keypresses your target ID has and the difference between the Advances and the Initial Advances columns should match the amount of manual Advances you did, but since we're all only human and can e.g. miscount, if it's 1 Advance too much or 1 too little it's likely still valid. Also have a look at the second you hit vs the second you targeted. Normally on DS, Lite and i you should always hit your exact target second whilst on 3DS models hitting 1 off is fairly common. If the result is off any more than that, do 1 more Profile Calibration and adjust your EonTimer with the second you hit instead of your target if needed.
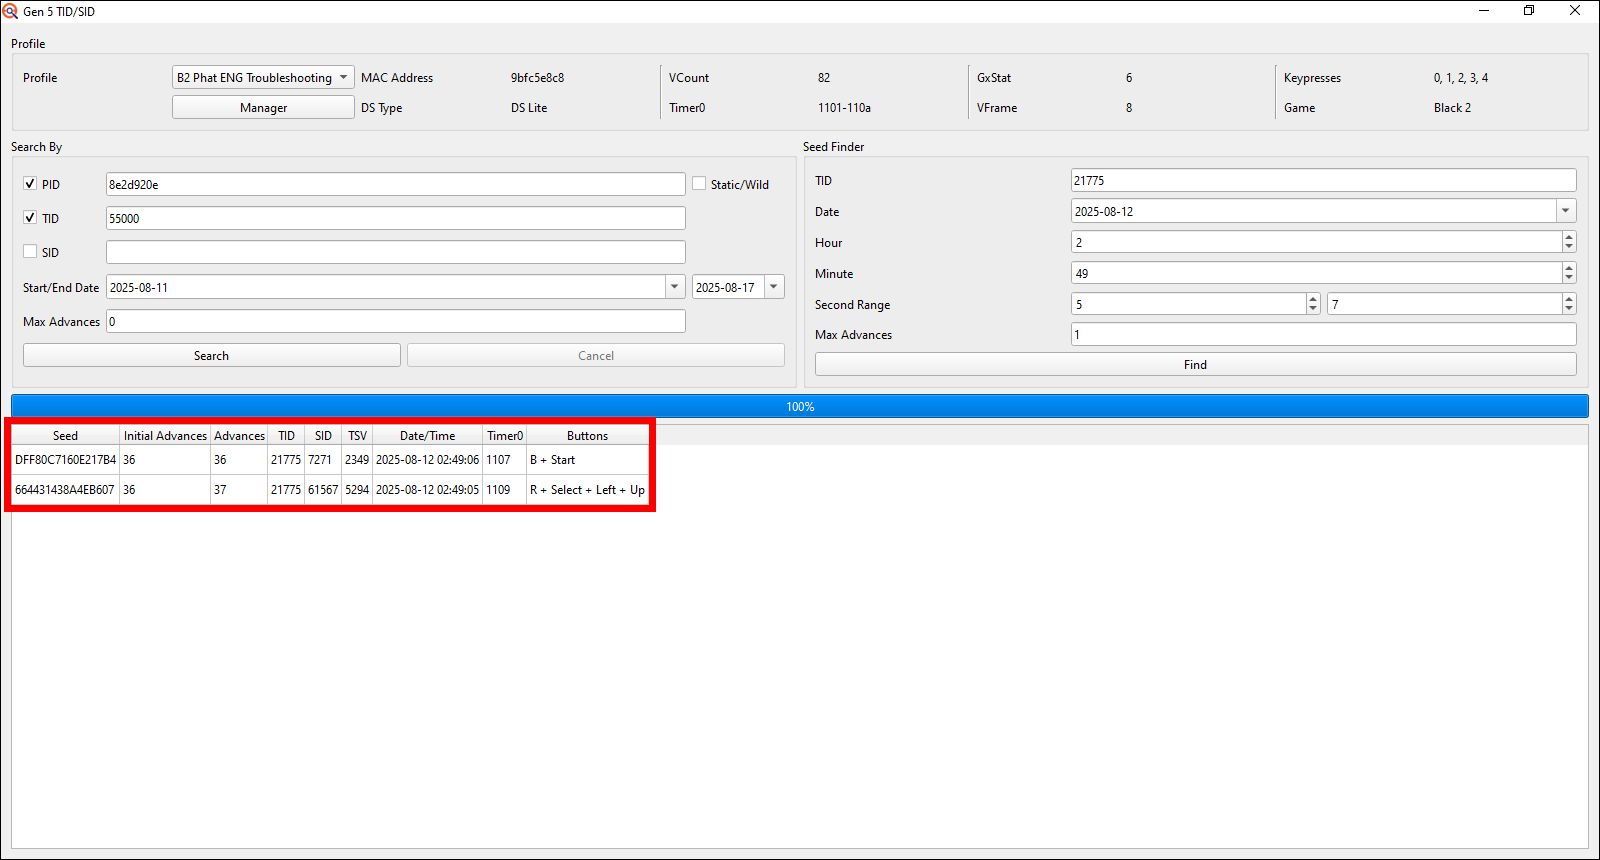
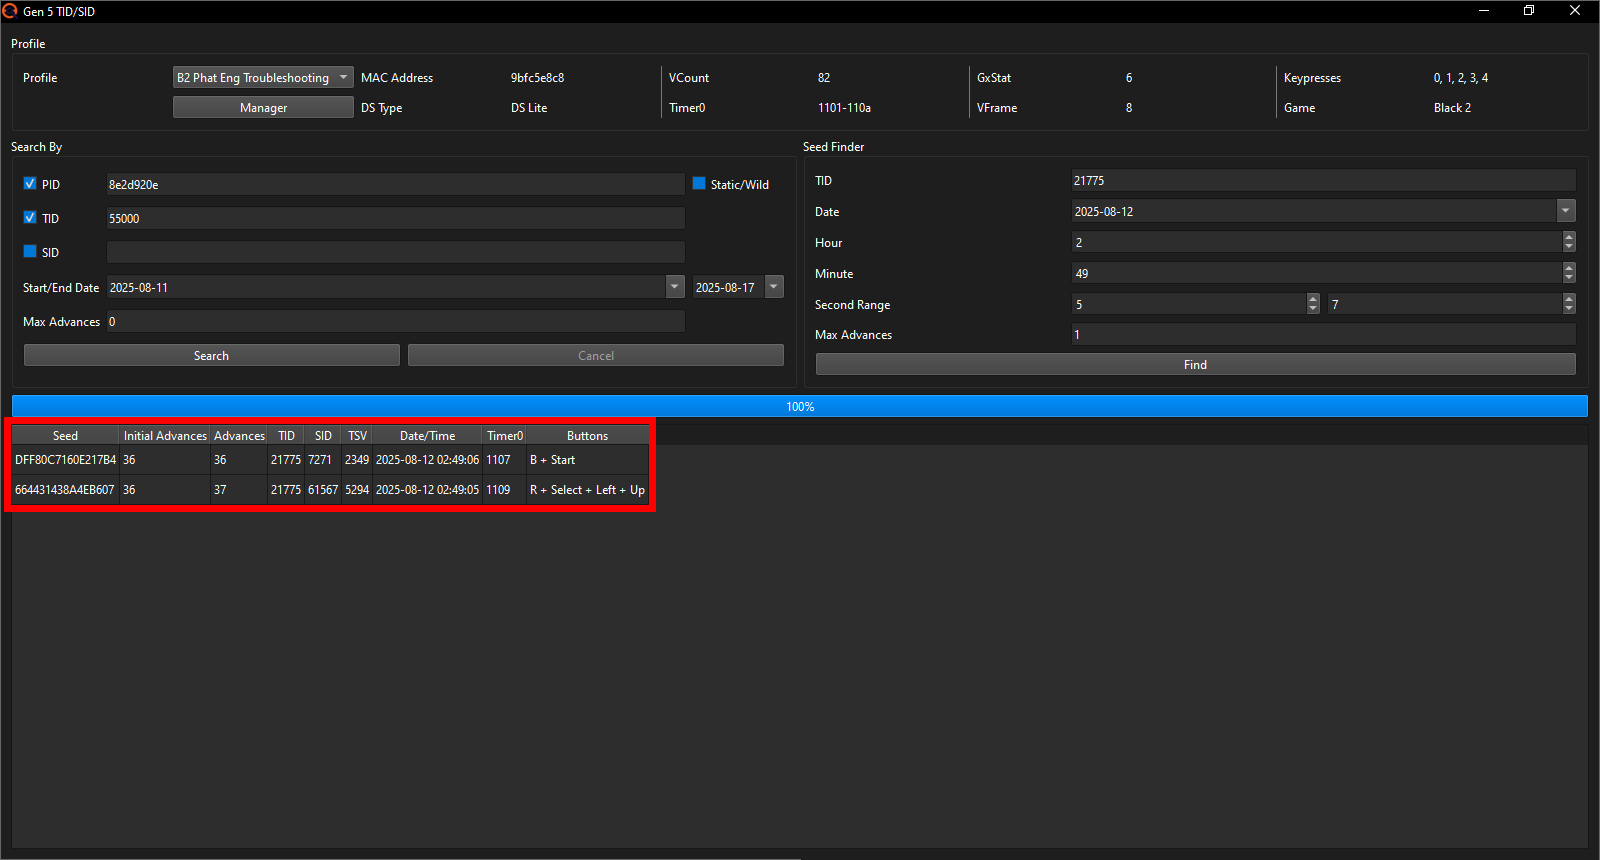
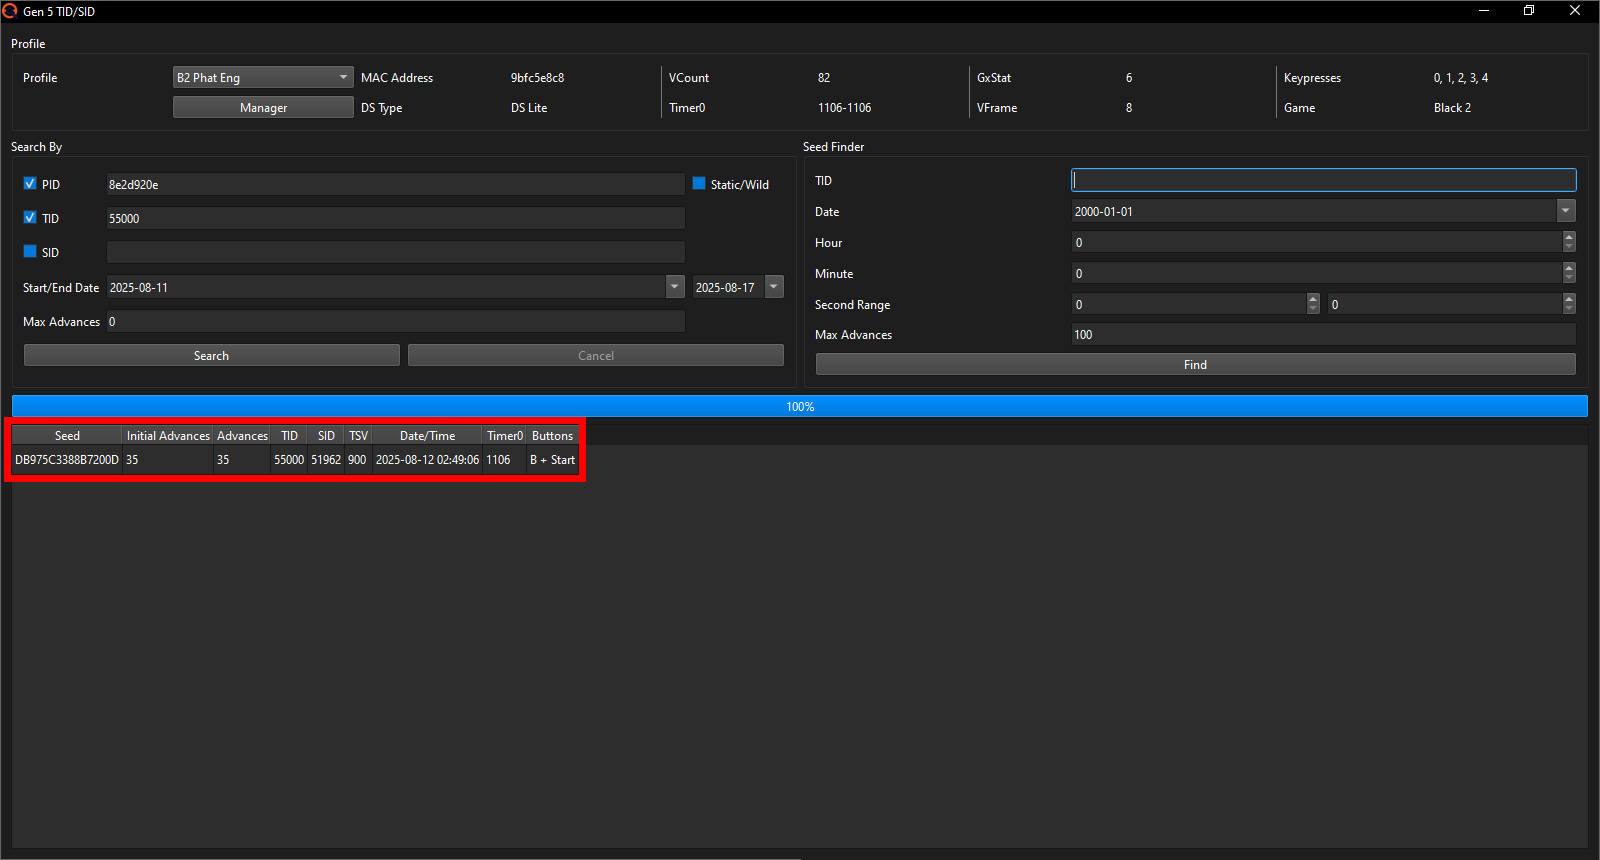
In my first attempt I hit a TID of 21775 which I get 2 results for. I know the first one is the one I hit because the Keypresses match and 36-36=0 which matches the amount of Advances I did precisely as well. The second I hit is also 6 just like my target but the Timer0 I hit is 1107 instead of my target 1106. That'll just happen a fair lot in BW2; nothing I can do about that except try again and hope I won't get Timer0'd too much. Whilst in theory this is a valid hit and if I didn't care for my TID to be 55000 specifically (and didn't want a 5/6IV shiny Starter) I could just proceed now being done with TID/SID RNG, I would advise against it.
The amount of times I've seen people who thought they got an ID pair just because PokeFinder displayed it to them when in reality something went wrong making them unable to get e.g. a shiny Starter later is in the dozens. I ALWAYS recommend people to continue until they get the specific TID/SID pair they originally aimed for. That is the only way to ensure you did indeed get what PokeFinder tells you you got and with IDrng being one of the easiest RNGs in BW2 it's not gonna take particularly long or be very difficult to successfully do either in comparison to other BW2 RNGs. So now you just rinse and repeat this RNG until you get your desired ID pair; due to the volatility of the Timer0 in BW2 it's not unlikely you'll have to do 10 or more attempts depending on your luck (also will be more on 3DS models due to the inconsistency with the seconds you hit).
Updating the Profile
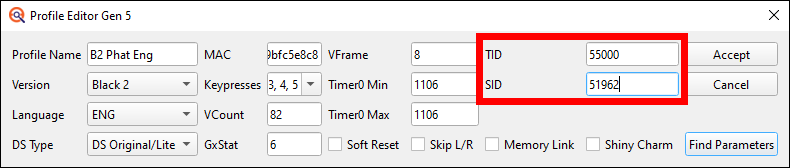
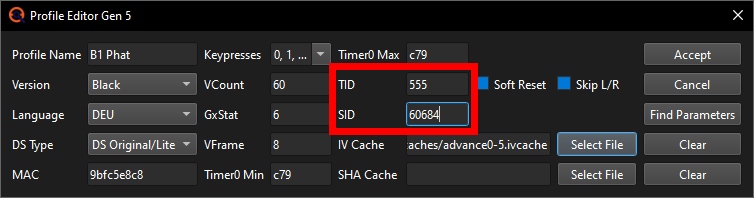
I got my wanted TID of 00555 on the second try already! Now all that's left to do is go to the Profile Manager at the top left of the IDs window and edit our main Profile by inputting the TID/SID pair we got.
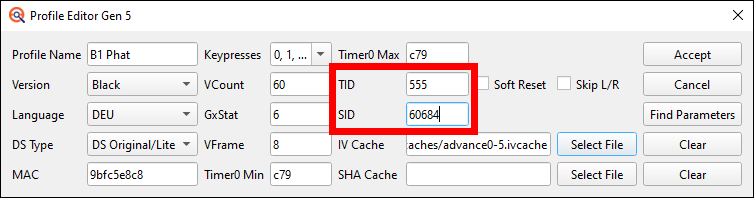
After 7 attempts, I got my target ID of 55000! Now all that's left to do is go to the Profile Manager at the top left of the IDs window and edit our main Profile by inputting the TID/SID pair we got.
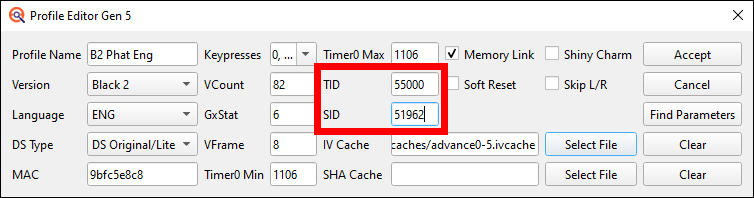

Finally click on Accept to save the changes.
Next steps...
And with our TID/SID successfully RNGd, we can now save the game. And that's it; now you can continue your RNG journey and manipulate yourself some shinies! If you'd like to RNG a shiny Starter, check out this guide if you're on BW1 or this guide if you're on BW2.
Thank you for reading and have fun RNGing!
Get the Pokemon you wanted? Consider supporting us on Ko-fi & keep us ad free!