BW/BW2 Calibration
Overview
Calibrating your game is the mandatory first step for any Gen 5 RNG Manipulation. Calibrating in this context means finding certain values that are tied to 1 specific combination of game cartridge + a DS console (specifically the console's Motherboard and Wi-Fi Board). So if you e.g. have a Pokémon White Version, a Pokémon Black Version, a Pink Nintendo DS Lite and a Blue Nintendo 3DS and you calibrate your White Version + the Pink DS Lite, you will have ONLY found the Calibration for that specific cartridge + console combination. If you now wish to RNG with your White Version on the Blue 3DS or with your Black version on either of the two DS Consoles, you will need to calibrate those specific combinations as well.
With your White Version + Pink DS Lite calibrated, you could RNG a few Pokémon and then e.g. just continue to play your adventure normally on your Blue 3DS if you wanted to. If you then switch back to the Pink DS Lite, you will not need to calibrate again as the Calibration does not change. It is also not tied to your savefile in any way so if you delete the savefile you originally calibrated with, the calibration will remain exactly the same on any new one.
The Process is almost exactly the same no matter what model DS console you're using, however there's some small but important differences I'll explain later. The most noteworthy difference is that 3DS and 2DS model consoles both take longer to boot up DS games AND take an inconsistent amount of time, making you miss your targeted time by a second or two every now and then. If you have a DS, Lite, or i at your disposal, I recommend you do Gen 5 RNG on that. But if you don't have one, using a 3DS line model will work as well no problem.
Note: New research regarding 3DS second inconsistency.
New research suggests that the reason for the second you hit being so inconsistent on 3DS models is due to the console not resetting its hidden millisecond timer when the user changes date or time whereas the DS and DSi did reset it. In the future timer tools may have a metronome feature or something similar that may help make it significantly more consistent. Though the loading times will still be much longer and therefore you will still often have to wait longer on an RNG attempt before you can enter the game compared to playing on a DS, Lite or i.
This Guide will likely only work for you if you have an original copy of a gen 5 game as ROMs played via Twilight Menu or NDS forwarder and fake cartridges calculate these values we're trying to figure out in a different, largely unknown way, making it much more difficult or often even impossible to calibrate.
If you are playing using an original cartridge but on a hacked DSi or 3DS, I recommend you always remove the SD card before doing any RNG Manipulation, as SD cards on hacked consoles, especially larger ones, tend to increase the inconsistency. The console will still boot up just fine without it. If you're unsure whether your DSi or 3DS is hacked, turn it off, start pressing and then hold the A & B buttons on DSi or Select on 3DS and then start the console again. If you now see a menu pop up with a lot of text and the words "Nocash Unlaunch" (DSi) or "Luma3DS" (3DS) in the top left of the top screen, it's hacked. If it just boots into the normal home menu, it's not hacked.
The values we're looking to find using this Calibration process are called the VCount, Timer0, VFrame and GxStat.
Whilst the VCount, VFrame and GxStat always stay consistent throughout this Calibration process (so you can get only 1 specific value for each of those), the Timer0 varies between a limited number of values. Which Timer0 you get exactly is random every time you start the game or soft reset, though for RNG Manip in Generation 5, we want to stay away from soft resetting for now as the current RNG programs cannot account for that. How many different Timer0's you can get here depends on both the game you're playing and the console you're playing on.
Here we have the first difference between BW1 and BW2.
In Black and White 1, you can always get exactly 2 different, numerically adjacent Timer0 values. If one of your Timer0's is 1110 for example, the other Timer0 you can get must either be 110F or 1111. The F can be here because these are hexadecimal numbers, meaning instead of counting from 0-9 and then going over to the next 10th, this system counts from 0-9 and then A-F so there's 16 different values possible instead of only 10 going 0, 1, 2, 3, 4, 5, 6, 7, 8, 9, A, B, C, D, E, F, 10, 11, [...]. Which of the other two Timer0 values it actually is you may find out during this Calibration process, but even if you don't that's fine, as in that case it would be your lesser common Timer0 value which you generally wouldn't want to use for RNG Manipulation. Should both the Timer0 values you find be evenly split in how often you got them, you can either just choose one at random to RNG with in the future or input both of them into your RNG Profile to use both for RNG Manipulation; whichever you prefer.
In Black and White 2, however, you can get more than just 2 Timer0's making RNG there more inconsistent than it is in BW1, but in exchange BW2 have other advantages such as more varied wild and static encounters to choose from and much better methods for advancing the RNG quickly. From my experience I've found that there's 3 different ways the Timer0 can be distributed for a given console+cartridge combination in BW2:
-
The standard distribution:
Here you'll have between ~6-8 Timer0's, 1-2 of which are a fair bit more common than the rest. This one is by far the most common and it is the only Timer0 distribution you can get if you're playing on a DS or DS Lite, though it is also most common on DSi and 3DS models. -
The lucky distribution:
With this one you'll only hit 1 or 2 specific Timer0's about 90% of the time, making hitting the Timer0 you are aiming for almost as quick as it is in BW1. This distribution can ONLY exist on DSi and 3DS and is pretty rare. -
The unlucky distribution:
This is by far the worst one, as you can get between ~10-20 or possibly even more different Timer0's, none of which are particularly more common than the rest. If this is the Timer0 distribution you got, RNG Manipulation will be VERY annoying and honestly I wouldn't torture myself with that. If you have ANY other console than the one you got this unlucky distribution with, even if it is the exact same model, I still recommend to try Calibration on that one as well, as there's a chance you will get a standard or maybe even lucky Timer0 distribution there. This distribution can also ONLY exist on DSi and 3DS and is pretty rare too.
This is still a fairly recent discovery and I'm sure we don't know everything about this that there is to know yet, but for now this is what to expect when Calibrating BW2 on a DSi or 3DS.
Recommended setup
Hardware requirements
-
Pokémon Black, White, Black 2 or White 2 in ANY language
-
a Nintendo DS line console (DS, DS Lite, DSi, DSi XL, 3DS, 3DS XL, 2DS, New 3DS, New 3DS XL, New 2DS XL)
-
a Windows 10/11 PC, MacOS Ventura/Sonoma/Sequoia, Ubuntu 22.04/24.04 or QT 6.8 or newer
In-Game requirements
- Currently have any savefile on your cartridge (for BW2 the Unova Link option does appear without a savefile, but is not usable for Calibration without one). Whether you started it 5 minutes ago or it's been on your cartridge since the game's release doesn't matter.
Tools used
-
PokéFinder version 4.3.1 or newer
Pro tip: You can change the language of PokeFinder under "Tools" -> "Settings" to fit your game's language. This will change the names of the Pokémon, locations, Characteristics and Natures to be that of the game's language, which may be helpful later. For some languages, UI elements are also translated (e.g. in German and Italian), but not for all (e.g. Japanese and Korean don't have full UI translation).
-
For Windows: EonTimer 3.0.0-rc.6-calibration-fix
-
For Mac & Linux: EonTimer 3.0.0-rc.4
-
There is also a web version of EonTimer. The UI is different than what this guide uses though, so you'll have to make that adjustment yourself if you wish to use this web version instead of the downloadable app.
Video example
The Guide
EonTimer setup
EonTimer will use the exact same setup for both BW1 and BW2.
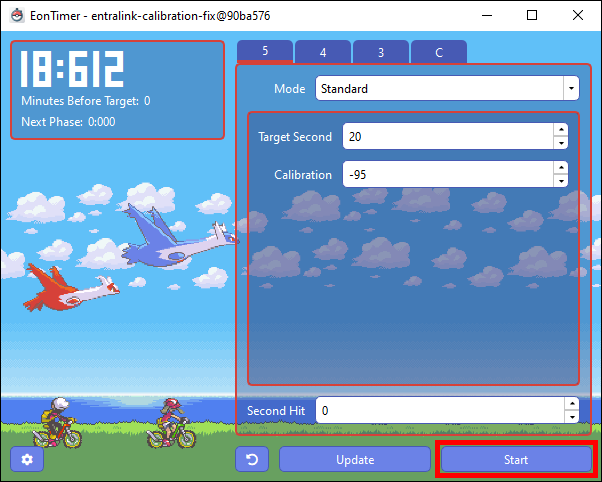
If you're using a DS, DS Lite or DSi, set the target second to 20 and the calibration to -95, and if you're wanting to calibrate on a (New) 3DS (XL) or (New) 2DS (XL), set the target second to 40 and the calibration to -424 (if your DSi is hacked and has a very large SD card with 128 or more GB, you may need to put the Target Second to 25 instead of the base 20 and adjust all second related numbers later by adding +5 to them. Same goes for the 3DS, but you should put the target second to 45 instead of the base 40. If you remove the SD card before trying to RNG, this is not required).
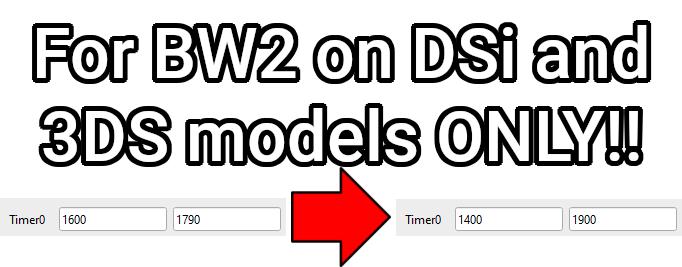
Which target second you pick generally doesn't matter, however I've chosen 20 and 40 respectively so you will (almost) always have enough time to get back to the home menu after changing your ds console's time, but also don't have to wait unnecessarily long. The Calibration is more important to be at the recommended values here, however they won't work perfectly for everyone and I'll explain later how to adjust it for yourself if needed.
Also make sure that “Precision Calibration” is turned off in the settings under the “Timer” tab.
Pick a method to use
If you're playing BW1, select the Save Needle Calibration Tab and if you're playing BW2, select the Unova Link Needle Calibration Tab. IV Calibration is a Plan B & works for both BW1 & BW2. You can try it if the first method you tried yielded no results for you.
Setup
This method can be used in both BW1 and BW2, but if you are playing BW2, go to the Unova Link Needle Calibration Tab to not waste your own time. There are also some BW2 exclusive specifications that I will not mention in this Save Needle Calibration tab, but only in the Unova Link Needle Calibration and IV Calibration tabs.
I will be using my German White 1 game together with my Nintendo 3DS console for this example.
Before you start you need to move your player character to a silent location that doesn't have anything that can advance the RNG on its own, then save the game. Your character's home room is recommended here as it's the first accessible location when starting a new savefile.
You also have to make sure that Tornadus or Thundurus are NOT actively roaming throughout the Unova region in your game as that will advance the RNG whenever you boot up the game by a bit and make Save Needle Calibration impossible.
If you're far enough into the game to activate the roamer, which is after the 7th gym, and are unsure whether your Tornadus or Thundurus is currently roaming, you can check a gate's electronic bulletin board for news about a storm (GIF displays Thundurus' message; Tornadus is a bit different).
If it is indeed roaming, it would be fastest to just encounter and kill it; it'll respawn after you beat the champion again. Should you for some reason not be willing to kill or capture it, you'll have to use the IV calibration method. It is unaffected by the roamer and will allow you to successfully calibrate.
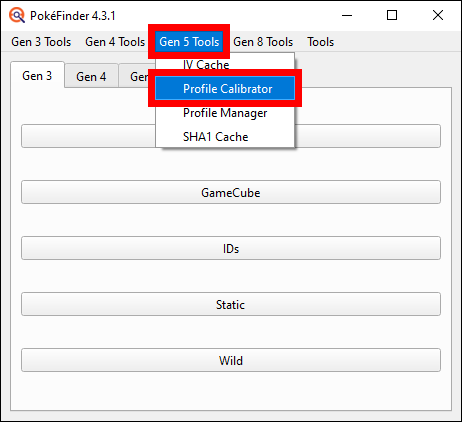
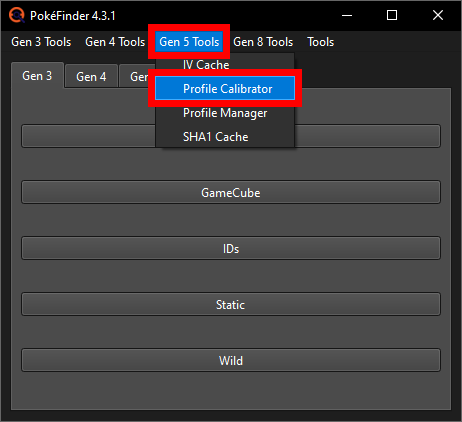
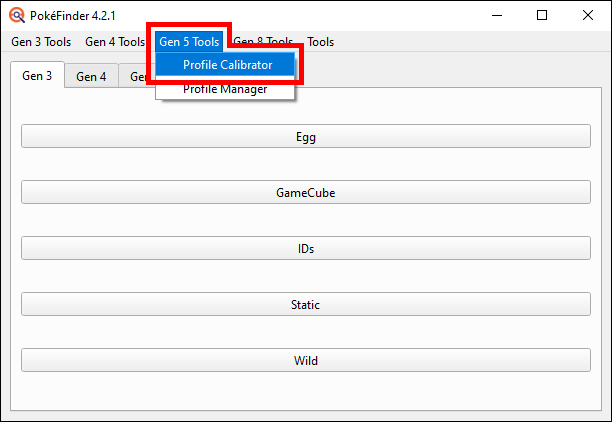
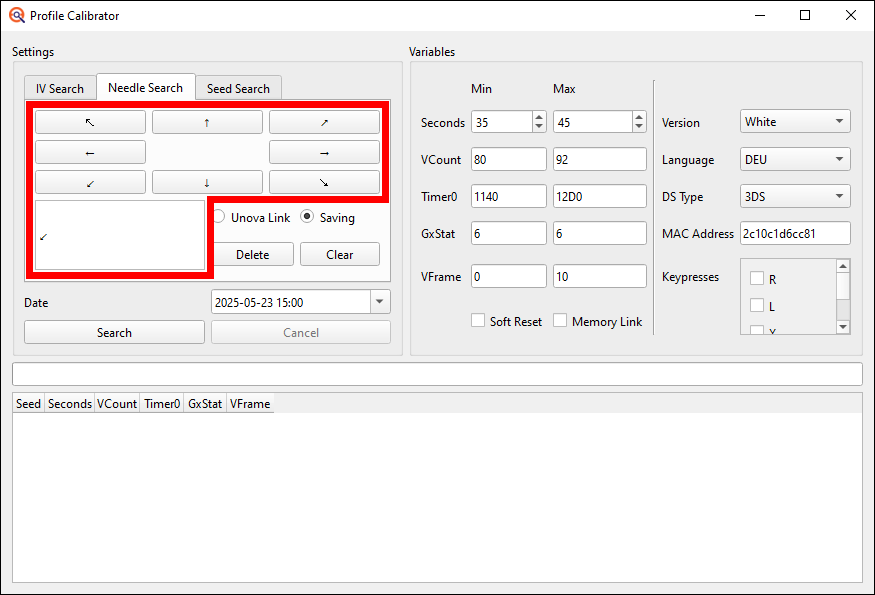
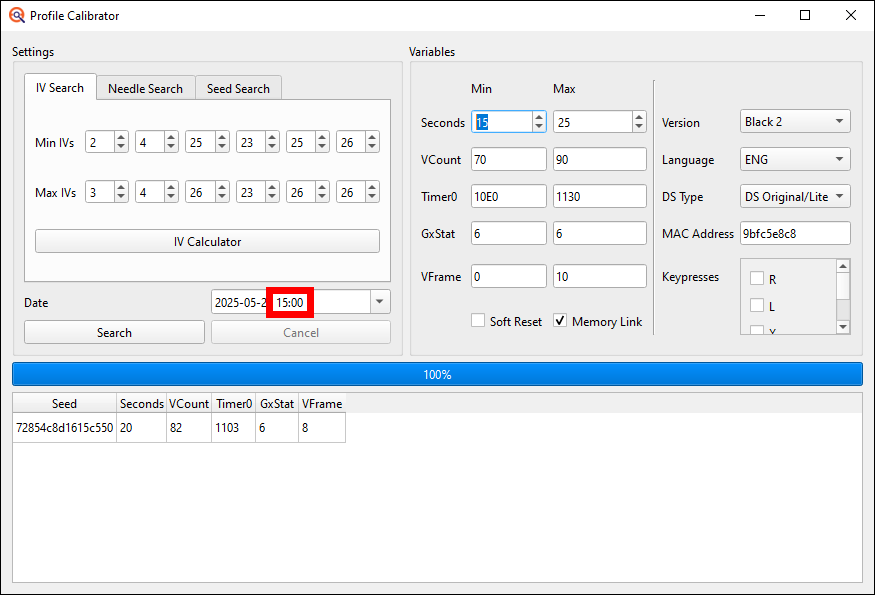
To start the Save Needle Calibration, you open up PokéFinder, go to Gen 5 Tools at the top and open up the Profile Calibrator.
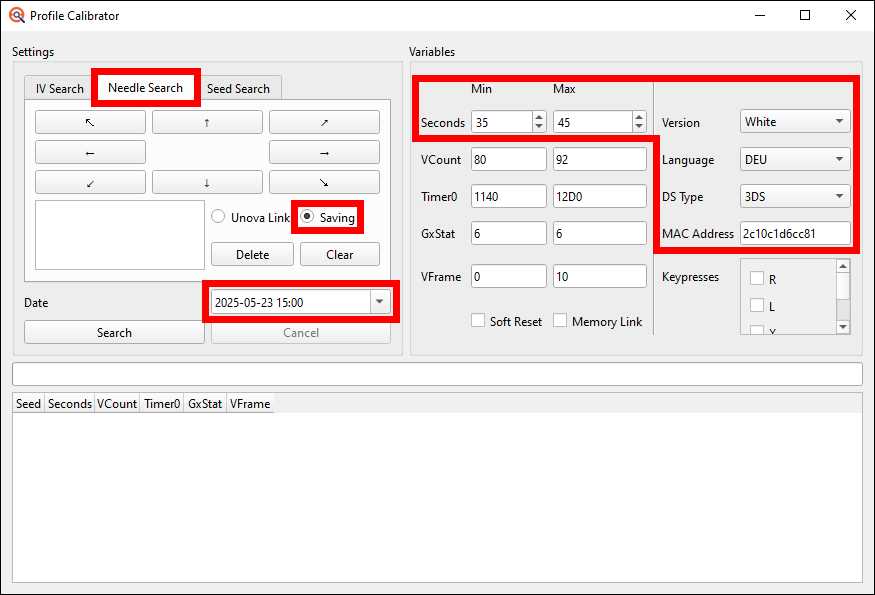
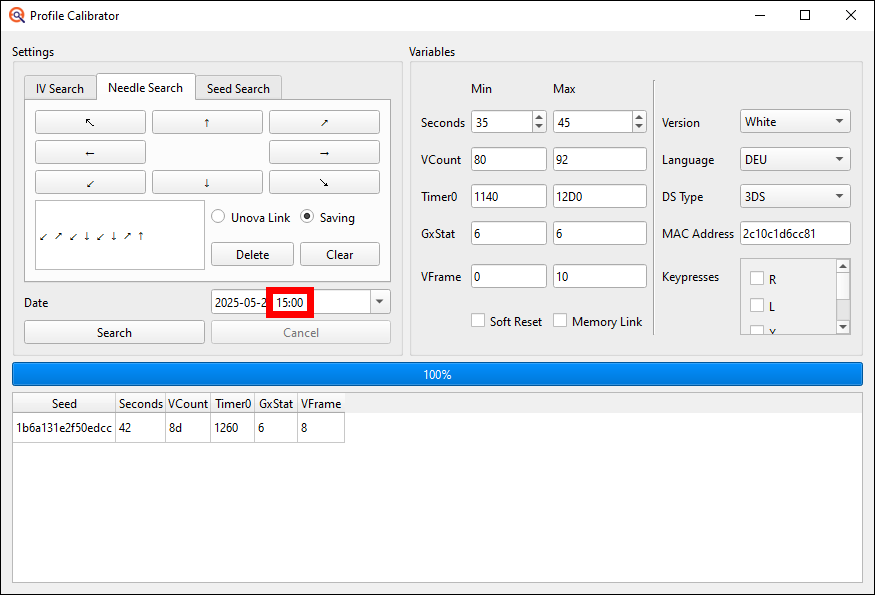
In the left half of the window, switch over to the Needle Search tab, select the Saving option and input the date and time you wish to use for this. I'll just put it to the 23rd of May 2025, 15:00 (aka 3pm) because that's the current date and time whilst I'm writing this guide.
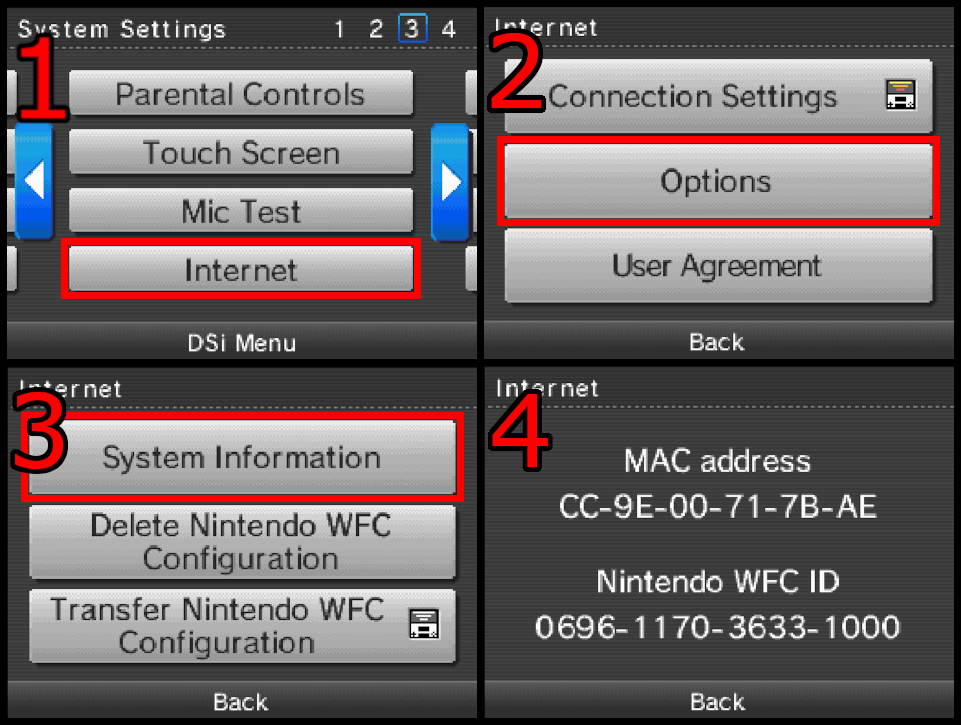
Then in the right half you start by selecting the game version, language, console you play on and add your console's MAC address which can be found in the internet settings.
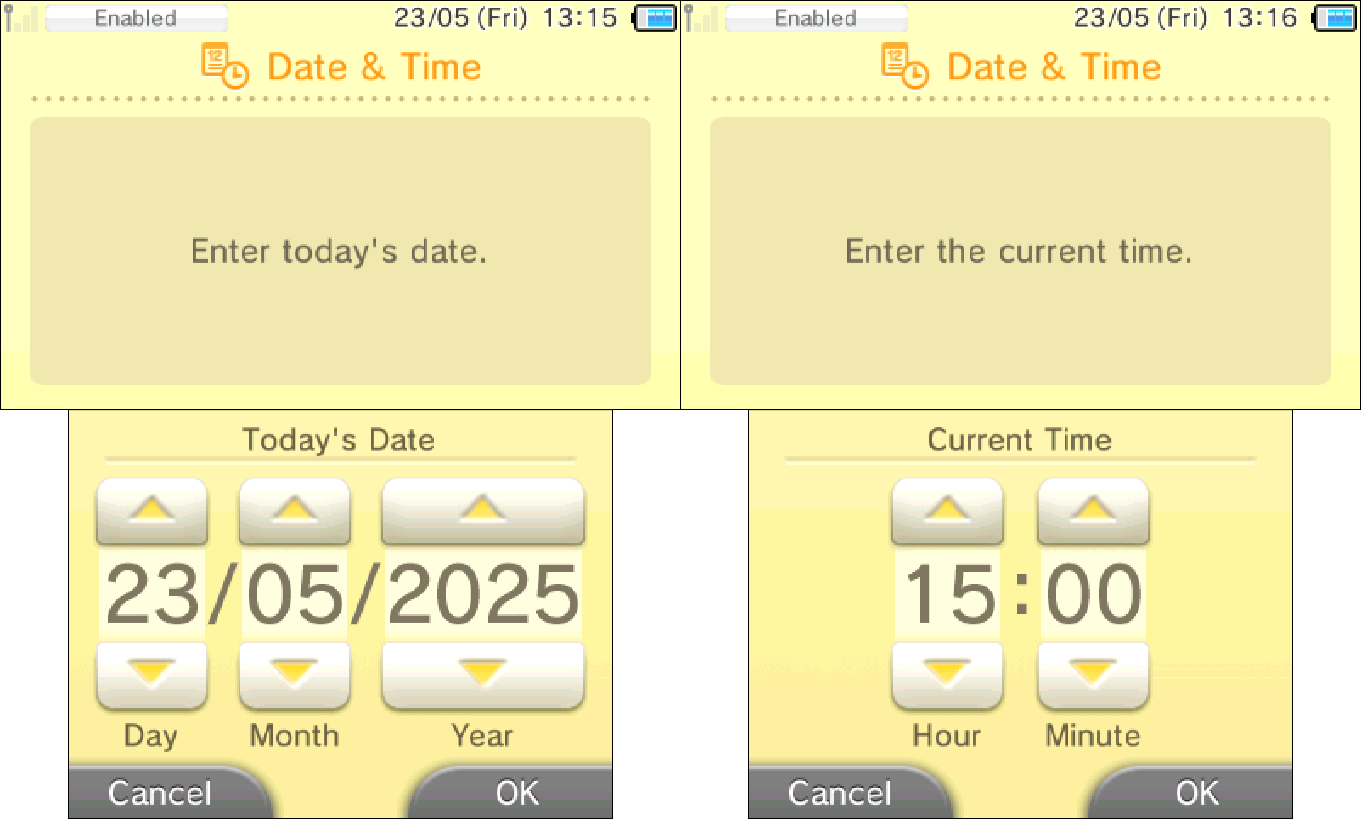
On DS and DS Lite you need to access it from within the game's menu and on DSi or 3DS models you can view it in your console's standard Wi-Fi settings (top left is DS/Lite, top right is DSi and bottom is 3DS/2DS). If your MAC address starts with one or multiple 0's, those will automatically be omitted by PokéFinder (e.g. a MAC address like 00-08-53-30-64-90 would become 853306490).
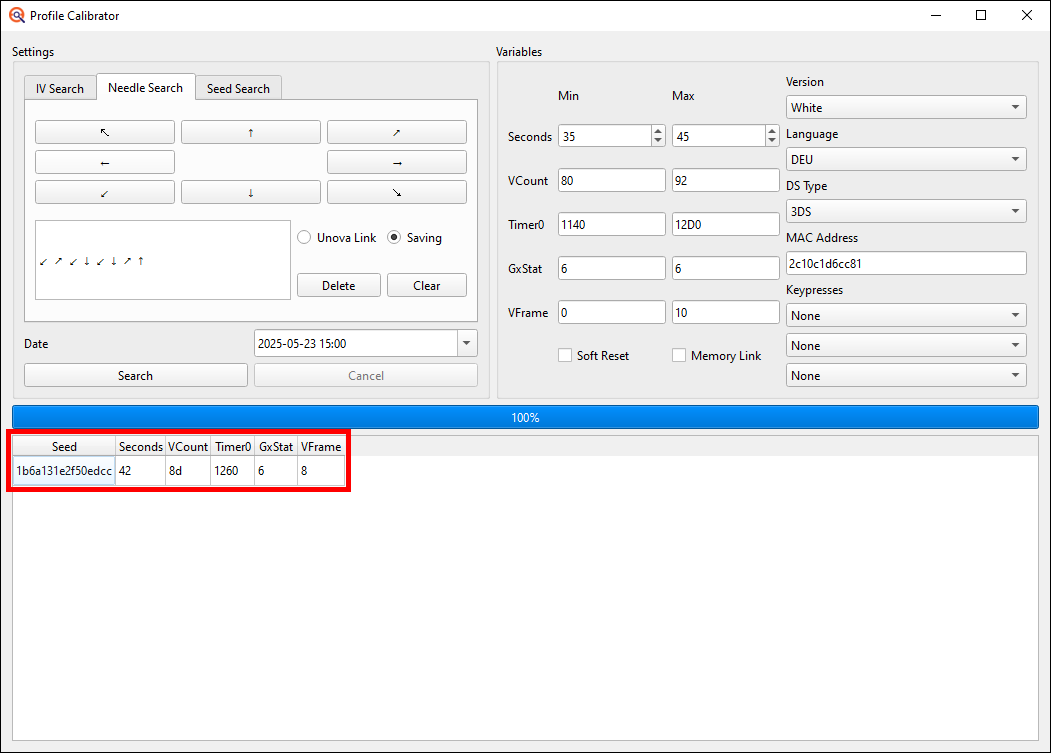
Set the seconds Min and Max to your EonTimer target seconds -5 and +5. So if you're on 3DS line models and used my recommended seconds, put it to Min 35 and Max 45 and on DS, Lite or i to Min 15 and Max 25.
Everything else you'll want to leave as it is by default (if you accidentally change something else, you can always just change game version and then change back to reset to the default values).
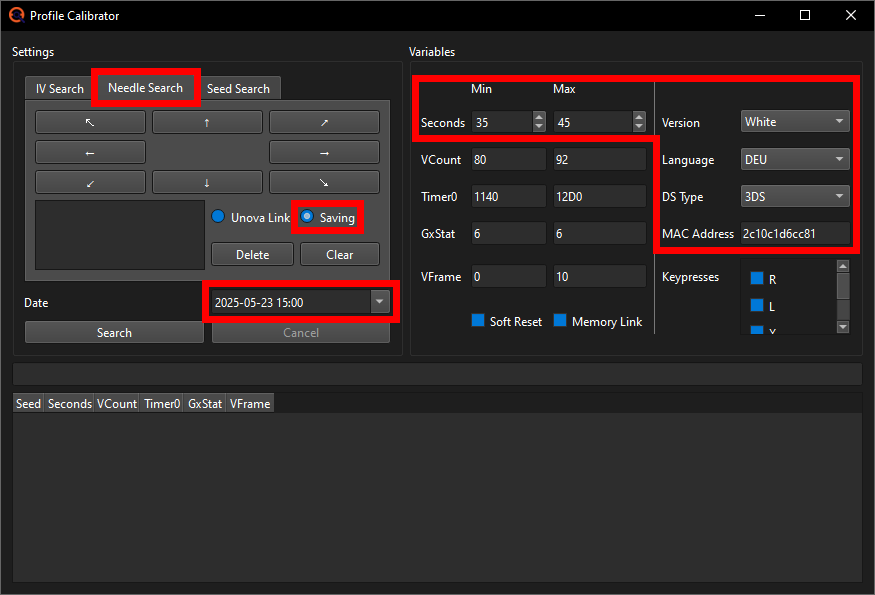
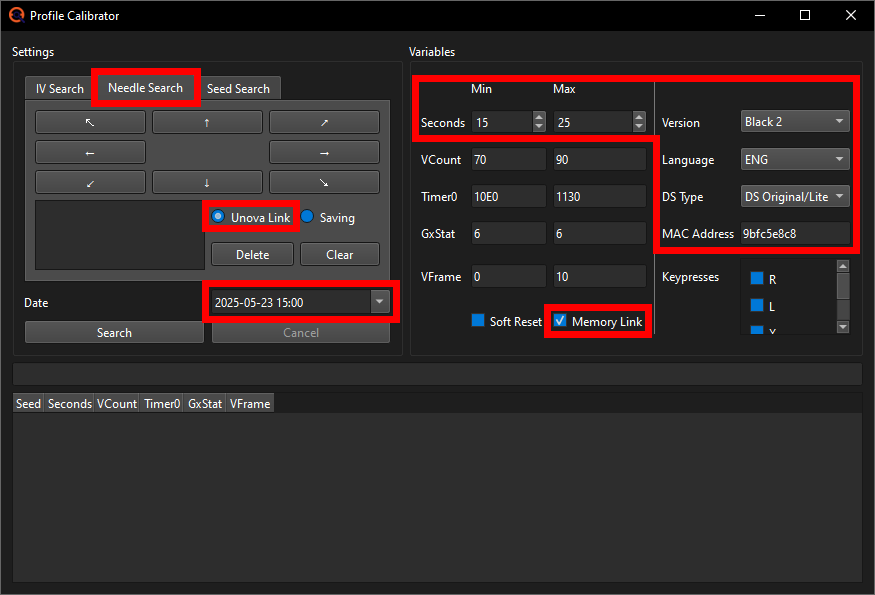
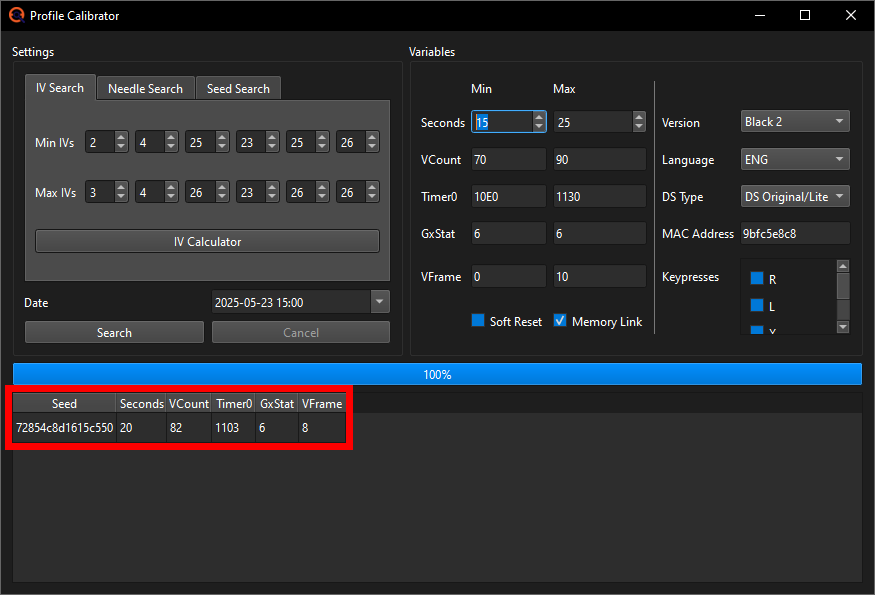
The Soft Reset checkbox is currently not working properly, so don't use it.
This method is exclusive to BW2 and much faster than the other two methods. Similarly to the Save Needle method, the Unova Link Needle Calibration also makes use of the little clock symbol, but this time when you're trying to establish an Infrared link between your current BW2 game and another BW2 game using Unova Link. You don't need to actually have another BW2 game for this, as simply starting the search is all we need to do.
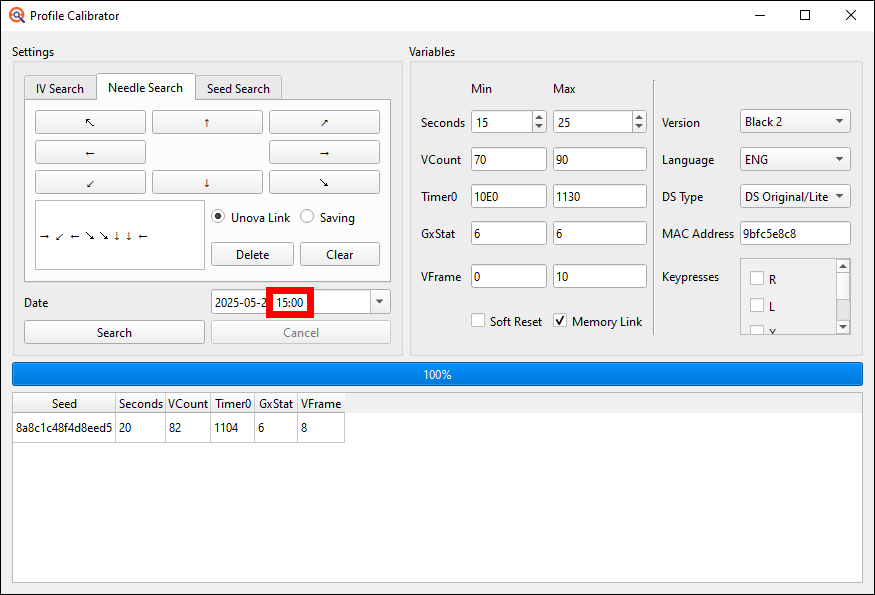
I will be using my English Black 2 game together with my Nintendo DS console for this example.
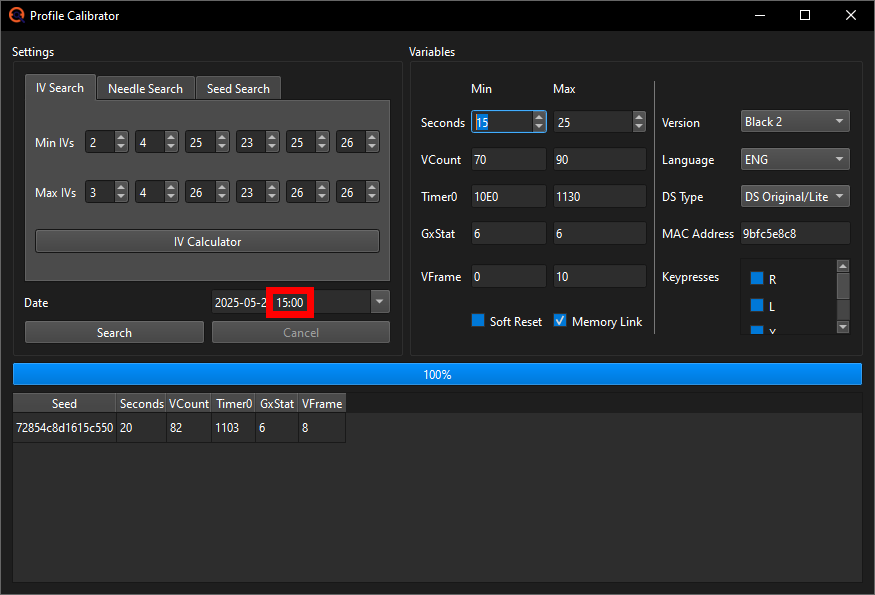
To start the Unova Link Needle Calibration, you open up PokéFinder, go to Gen 5 Tools at the top and open up the Profile Calibrator.
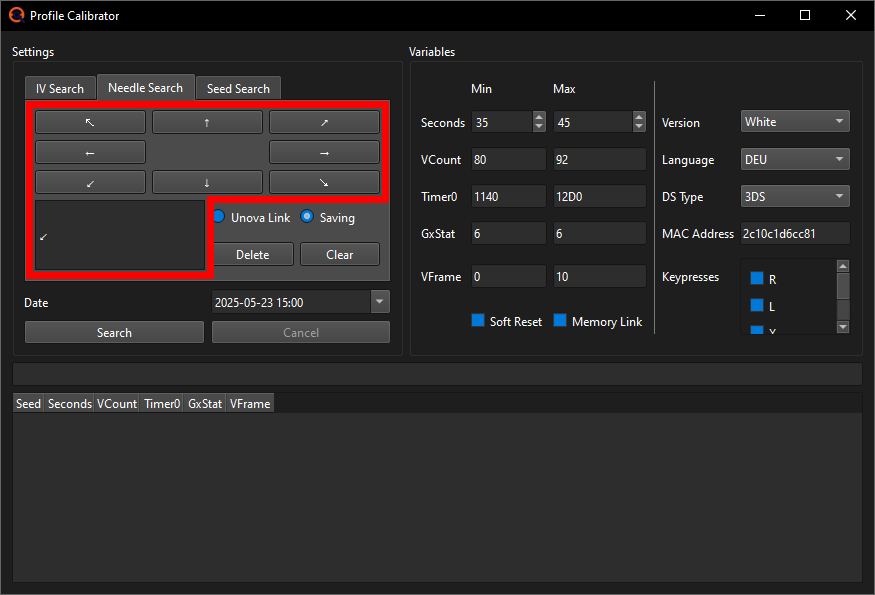
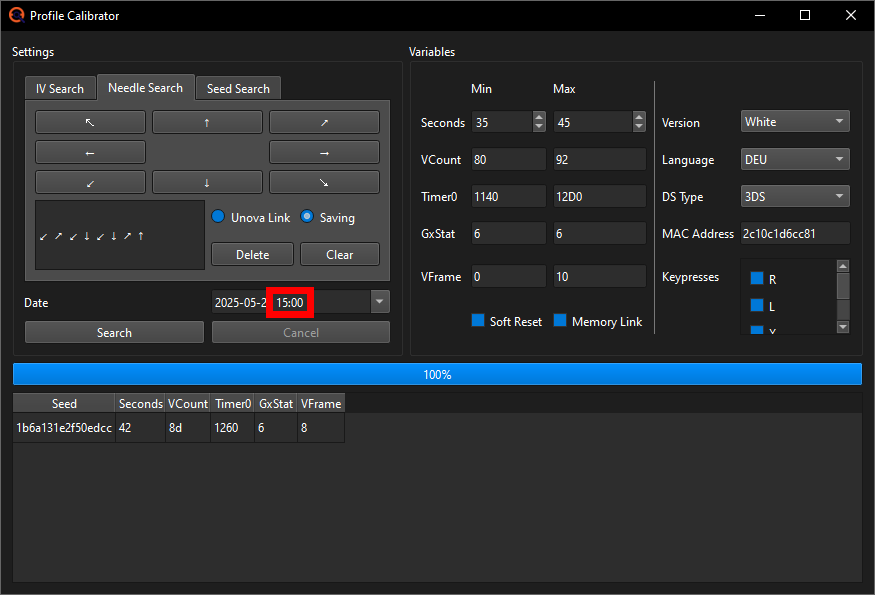
In the left half of the window, switch over to the Needle Search tab, make sure the Unova Link option is selected and input the date and time you wish to use for this. I'll just put it to the 23rd of May 2025, 15:00 (aka 3pm) because that's the current date and time whilst I'm writing this guide.
Then in the right half you start by selecting the game version, language, console you play on and add your console's MAC address which can be found in the internet settings of your console. On DS and DS Lite you need to access it from within the game's menu and on DSi or 3DS models you can view it in your console's standard Wi-Fi settings (top left is DS/Lite, top right is DSi and bottom is 3DS). If your MAC address starts with one or multiple 0's, those will automatically be omitted by PokéFinder (e.g. a MAC address like 00-08-53-30-64-90 would become 853306490).
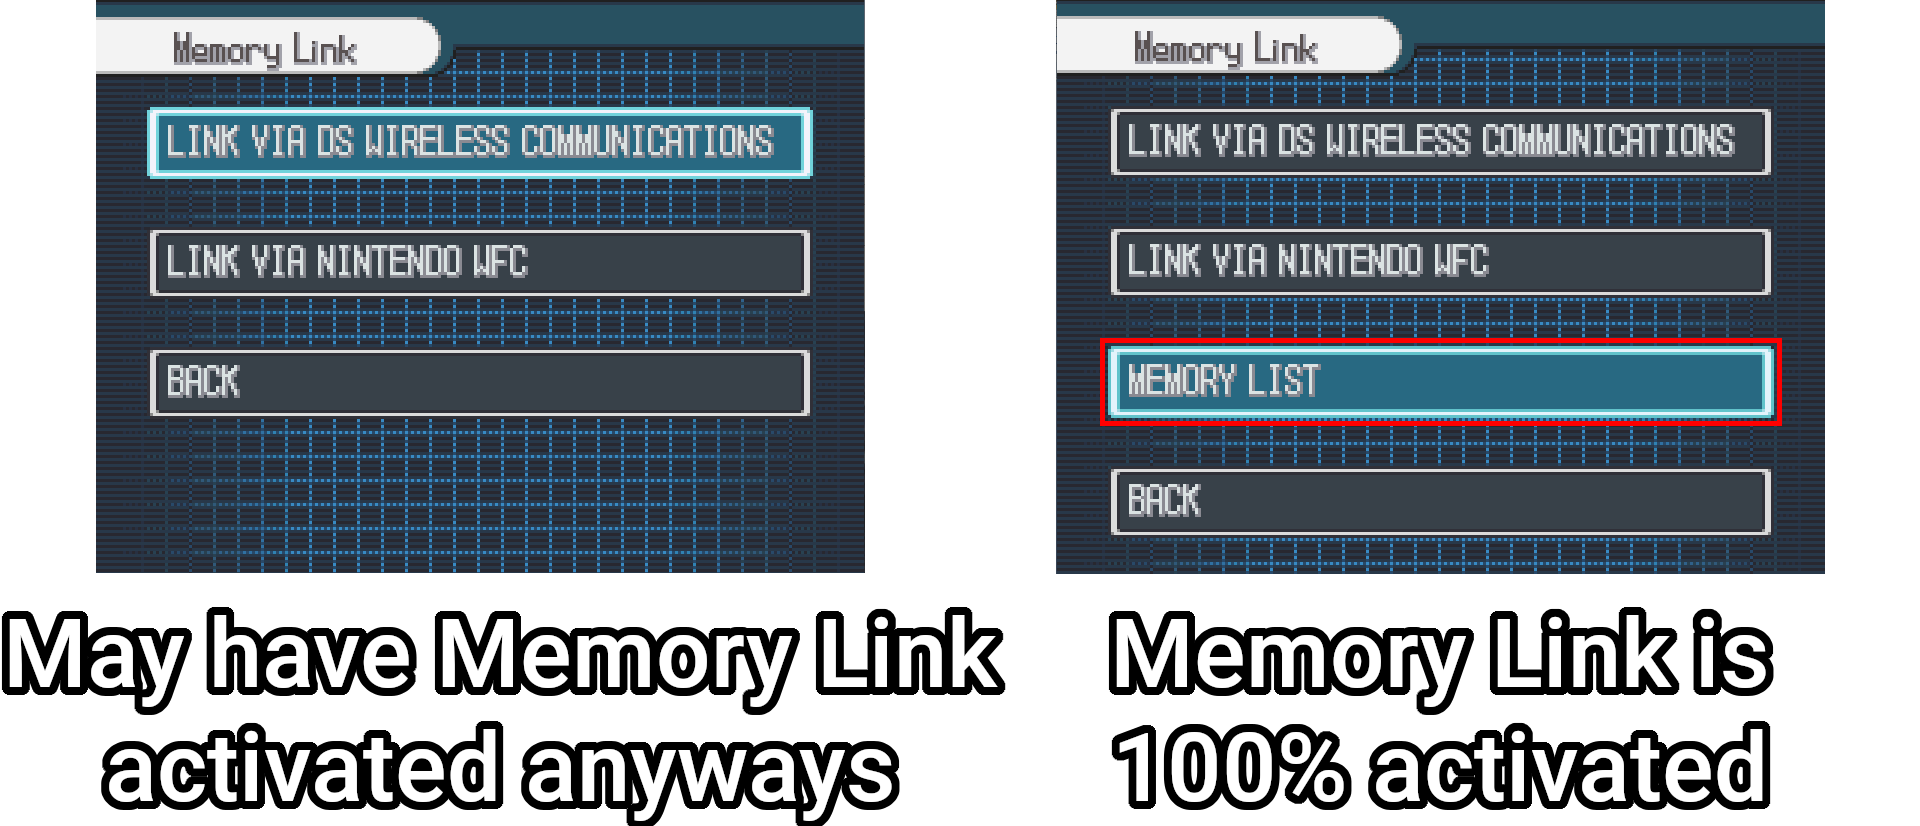
Also check the Memory Link checkbox if you have activated Memory Link on this current savefile.
This can, of course, only be the case on pre-existing savefiles, so if you just created a new one, you don't check the box. But if it is indeed an older savefile you'll want to check whether Memory Link has been activated or not by going to the Unova Link menu, then to the Memory Link option and once there checking if the option „Memory List" is there. If it is, Memory Link is guaranteed active and you need to check off the box for it, but if it isn't, that doesn't necessarily mean that Memory Link was not used yet.

I tested this myself and you can already do Memory Link with a Black or White 1 game that hasn't even received the starter yet as long as the game has any savefile present at all, even if it's got under a minute of playtime. If Memory Link was used with such an early savefile, there is no way I know of to tell it was used on the BW2 game's side, as the Memory List option does not appear. So should you not find any valid seeming results during Calibration of an older BW2 savefile without the Memory Link box checked off, try with it. My Black 2 has done Memory Link so I will check off the box.
Put the seconds Min and Max to your EonTimer target seconds -5 and +5. So if you're on DS, Lite or i and used my recommended seconds, put it to Min 15 and Max 25 and on 3DS line models to Min 35 and Max 45.
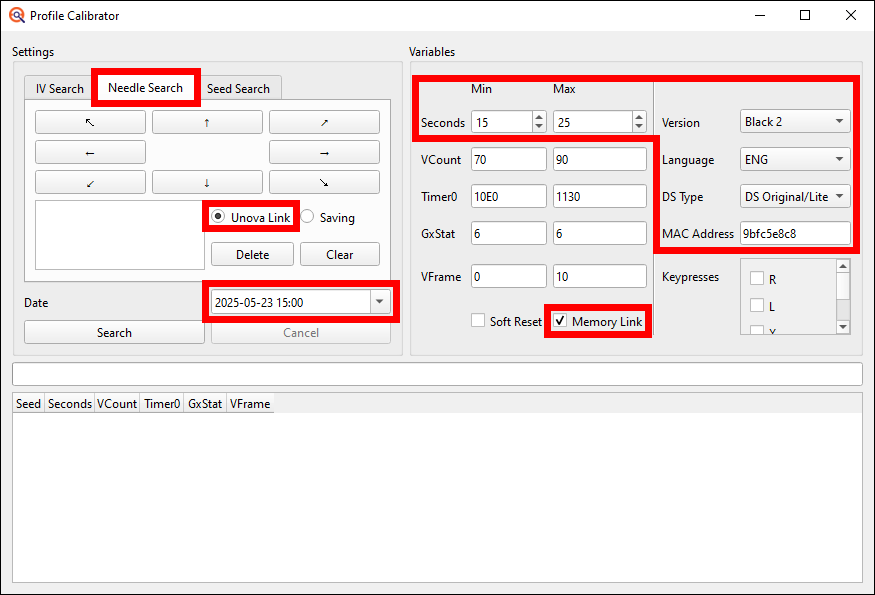
Everything else you'll want to leave as it is by default (if you accidentally change something else, you can always just change game version from BW1 to BW2 and then back or vice versa to reset to the default values).
The Soft Reset checkbox is currently not working properly, so don't use it.
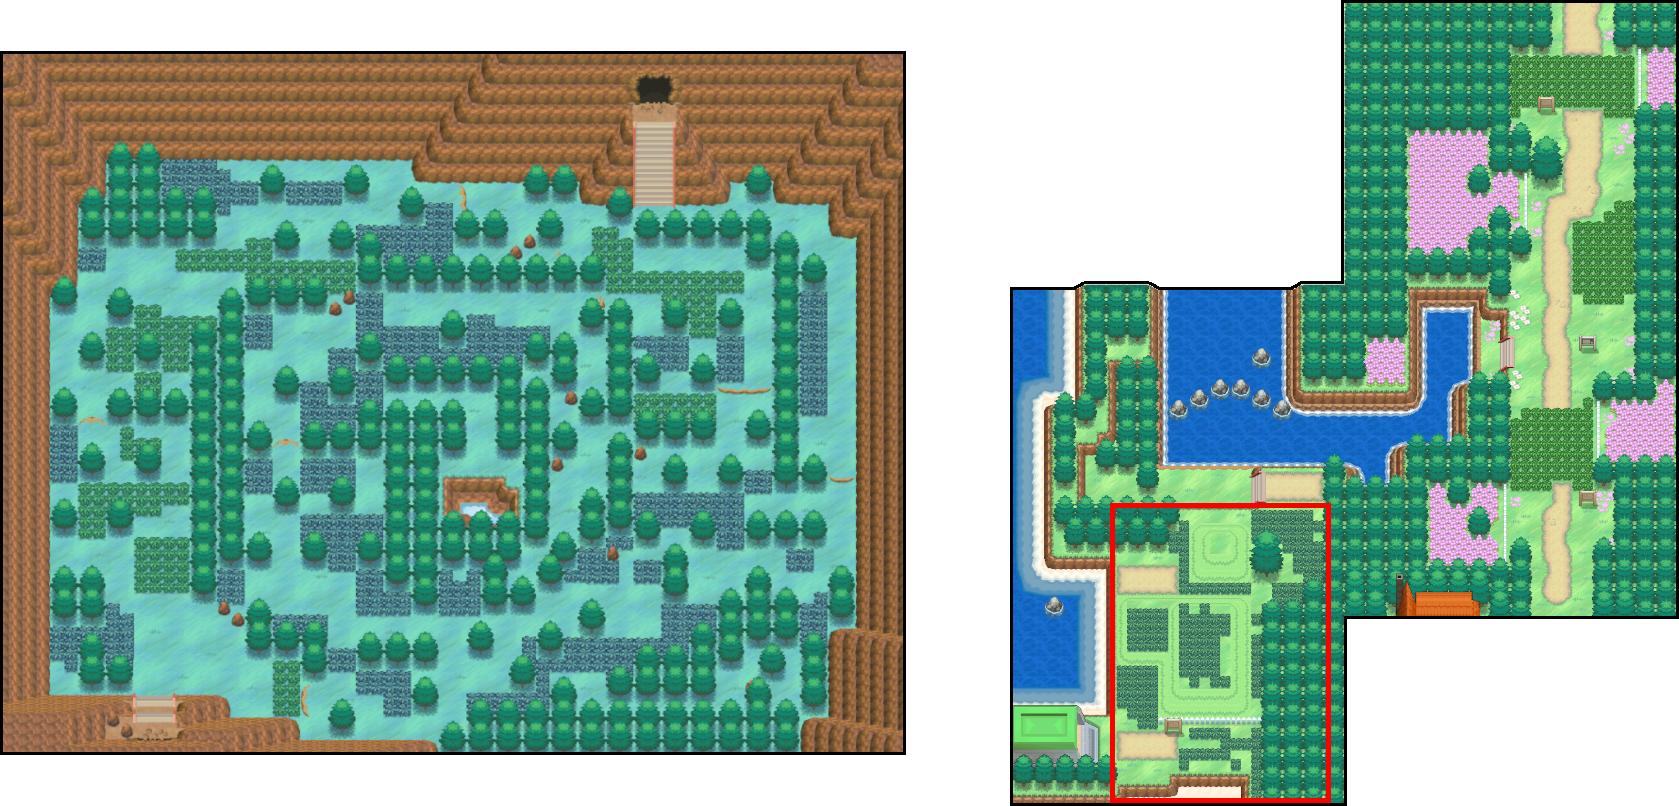
This method can be used in both BW1 and BW2 but is slower than the other methods, especially for BW2. Here you catch a Pokémon and then calculate its IVs to find your Calibration values. To make the IV calculation easier, you should be saved in an area with as high as possible level wild Pokémon. In BW1 I recommend the dark (not regular) grass in the crater within Giant Chasm and in BW2 I recommend the dark grass on Route 1.
There are also additional things you should prepare that the other two calibration methods do not need:
-
A Pokémon with Sweet Scent or at least 1 Honey item (can be obtained via the Honey Gather ability from Combee, which can be found in the grass on Route 12 in BW1 and BW2. Alternatively you can buy it in BW2's Join Avenue Market Shops that are level 2 or higher)
-
Pokeballs to capture Pokémon (Masterball preferred)
-
An empty slot in your party (optional, but helpful)
-
A few Rare Candies (optional, but having 2-3 is helpful)
Note: Why are Rare Candies useful?
If during IV Calibration you get 2 or more different results, you will need to level up your Pokémon to get a more precise IV range from the IV calculator. If you do this via battling against other Pokémon and gaining EXP, your Pokémon will also gain EVs which can increase stats and make the IV calculator's results inaccurate. Using Rare Candies on the other hand does not give your Pokémon any EVs, making them very useful for IV calculation.I will be using my English Black 2 game together with my capture card Nintendo DS console for this example so I can take high quality pictures of what's happening in-game.
To start the IV Calibration, you open up PokéFinder, go to Gen 5 Tools at the top and open up the Profile Calibrator.
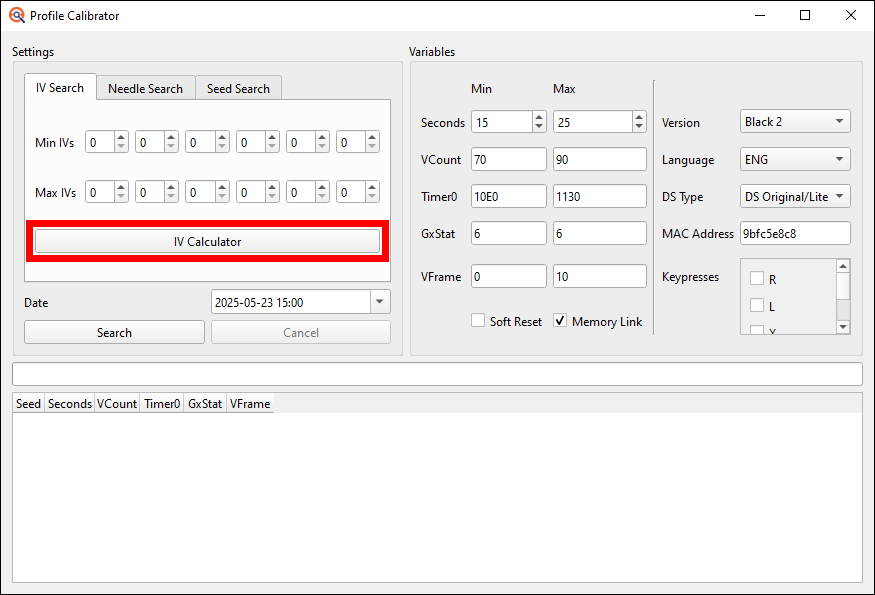
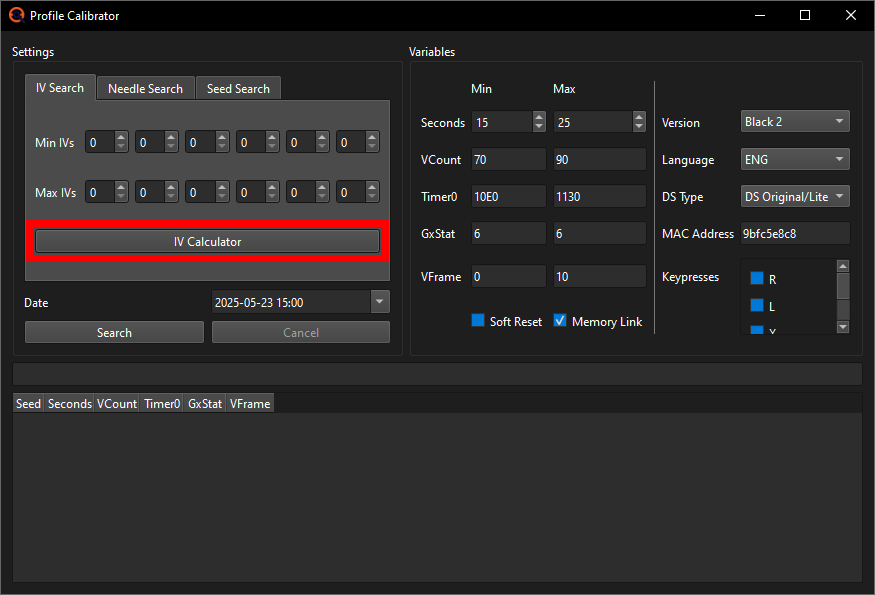
In the left half of the window, make sure the IV tab is selected and input the date and time you wish to use for this. I'll just put it to the 23rd of May 2025, 15:00 (aka 3pm) because that's the current date and time whilst I'm writing this guide.
Then in the right half you start by selecting the game version, language, console you play on and add your console's MAC address which can be found in the internet settings of your console. On DS and DS Lite you need to access it from within the game's menu and on DSi or 3DS models you can view it in your console's standard Wi-Fi settings (top left is DS/Lite, top right is DSi and bottom is 3DS). If your MAC address starts with one or multiple 0's, those will automatically be omitted by PokéFinder (e.g. a MAC address like 00-08-53-30-64-90 would become 853306490).
Also check the Memory Link checkbox if you have activated Memory Link on this current savefile (BW2 exclusive feature).
This can, of course, only be the case on pre-existing savefiles, so if you just created a new one, you don't check off the box. But if it is indeed an older savefile you'll want to check whether Memory Link has been activated or not by going to the Unova Link menu, then to the Memory Link option and once there checking if the option „Memory List" is there. If it is, Memory Link is guaranteed active and you need to check off the box for it, but if it isn't, that doesn't necessarily mean that Memory Link was not used yet.
I tested this myself and you can already do Memory Link with a Black or White 1 game that hasn't even received the starter yet as long as the game has any savefile present at all, even if it's got under a minute of playtime. If Memory Link was used with such an early savefile, there is no way I know of to tell it was used on the BW2 game's side, as the Memory List option does not appear. So should you not find any valid seeming results during Calibration of an older BW2 savefile without the Memory Link box checked off, try with it. My Black 2 has done Memory Link so I will check off the box.
Put the seconds Min and Max to your EonTimer target seconds -5 and +5. So if you're on DS, Lite or i and used my recommended seconds, put it to Min 15 and Max 25 and on 3DS line models to Min 35 and Max 45.
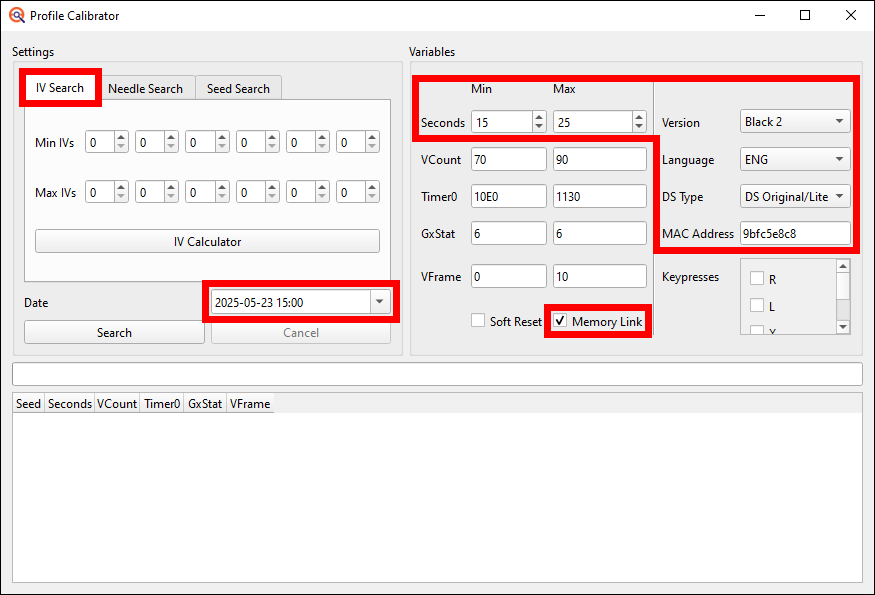
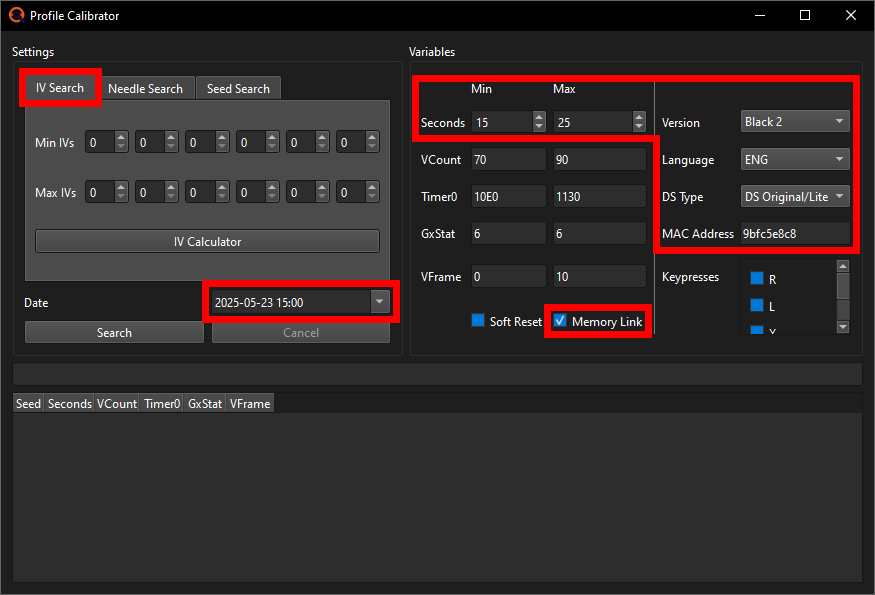
Everything else you'll want to leave as it is by default (if you accidentally change something else, you can always just change game version from BW1 to BW2 and then back or vice versa to reset to the default values).
The Soft Reset checkbox is currently not working properly, so don't use it.
First attempt
That finishes the PokéFinder setup; now you can start the first calibration attempt.
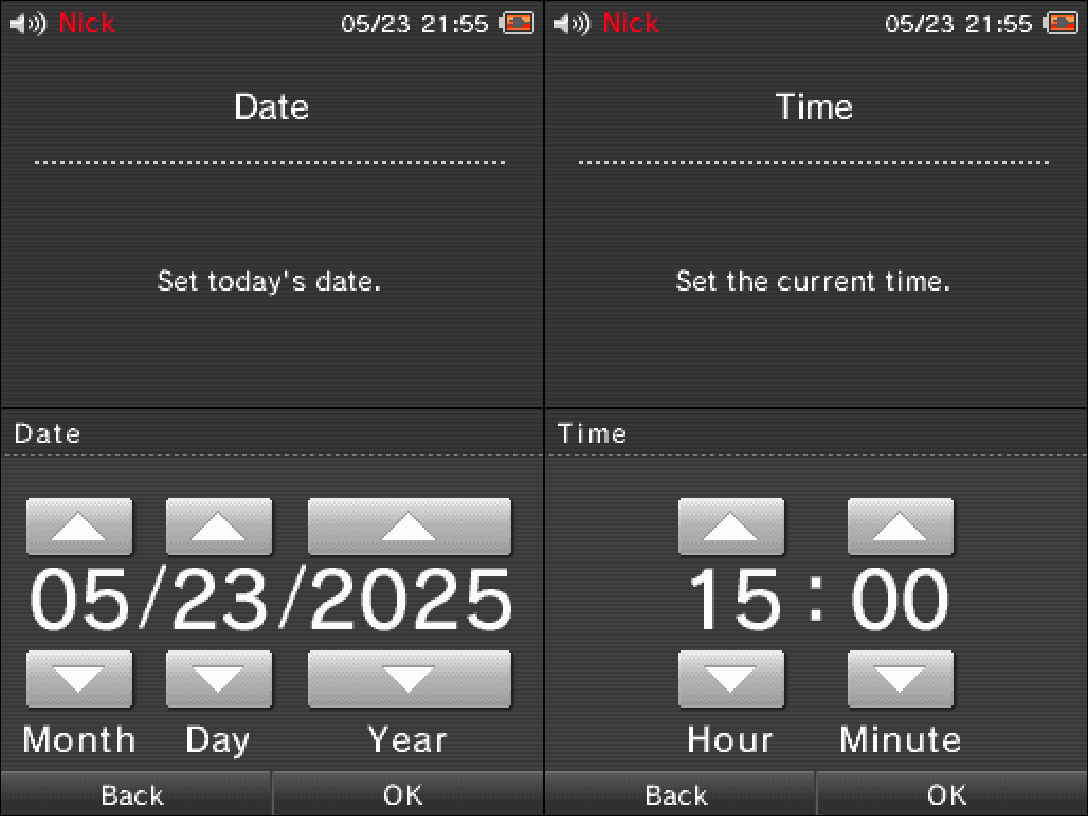
For that you go to your console's settings and change the date to match whichever date you put into the PokéFinder Calibration window. Next you go to the time settings and change the time according to the calibration window as well, but at the same moment that you confirm the time change, you start EonTimer by clicking the Start button.

Now you go back to the home menu (on DSi and 3DS line models you can either navigate back through the settings or use the Power Button to get back whilst on DS and Lite you have to shut off the console and turn it back on after).

Once there you wait for the timer to run out and on the 6th and final beep of EonTimer you start the game. Make sure not to press any buttons in between you starting the game and the star appearing on the top screen, since that will change the Seed you're on and just add an unnecessary extra step to this.
Once you see this star, you may start pressing buttons and get into the game. If you're far enough into the story to have received the C-Gear, you must deactivate it upon entering the game as it would otherwise advance the RNG and make Calibration impossible.
With this being the Save Needle Calibration method, we will make use of the clock symbol that appears whenever you save the game; the position the clock's hand starts at when saving is what you need to pay attention to.
Here's a GIF of the first needle I got during this Calibration followed by a picture of the starting position:
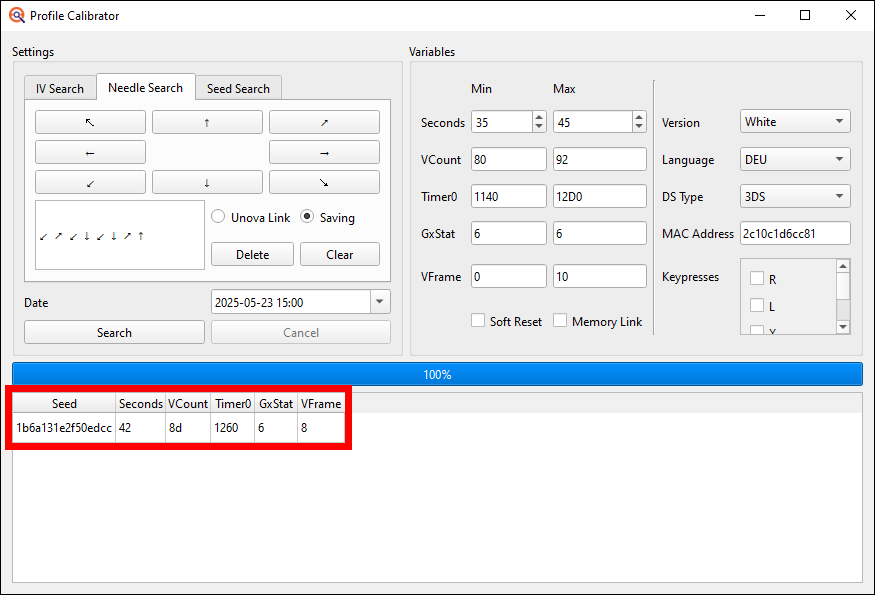
As you can see, the first needle starting position I got is a bottom left ↙ needle, which I add into PokéFinder's Calibration window by clicking on the bottom left needle button.
Now we continue on saving the game again until we have the starting position of 8 needles in a row. If you didn't see one of the needles starting positions, you cannot continue and have to go back to the home menu to try again, beginning with changing the time back and starting EonTimer.
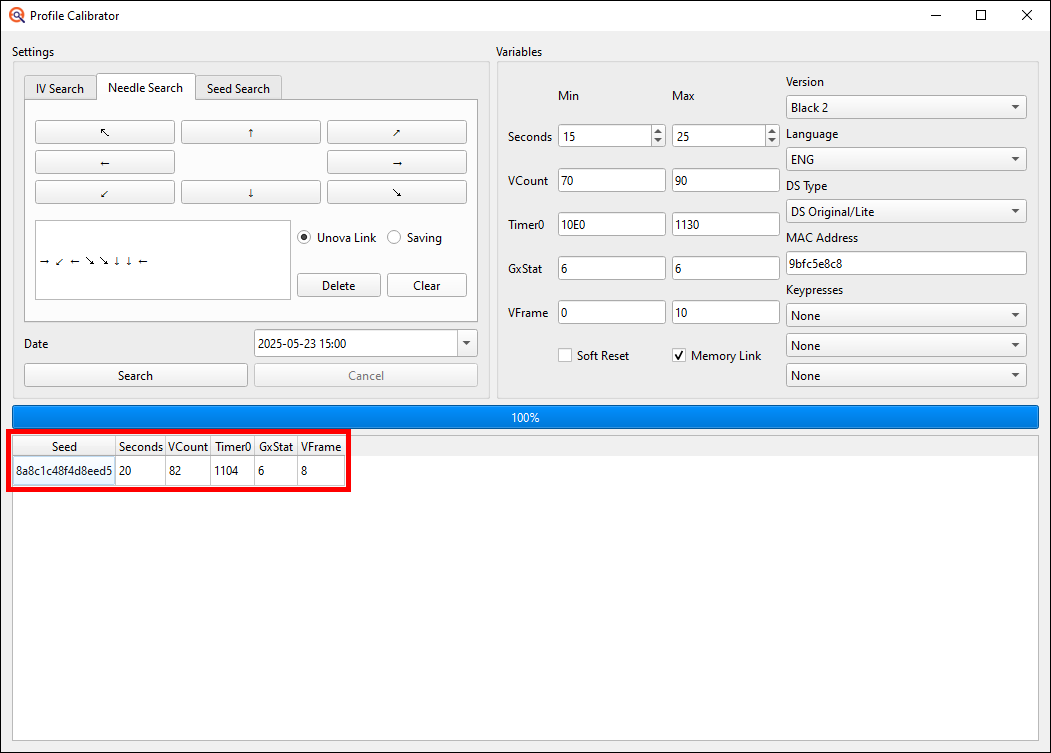
Once you are done with the 8 needles, press the Search button and see what result PokéFinder gives you.
In my case I got the following result:

There's a few things to watch out for here:
-
If your results Seconds value does not match your EonTimer's target second, make sure it's not too far off. On DS, Lite and i, the second should never be off by more than 2. Being off by 1 is already rare and being off by 2 near impossible but both have happened to people in the past. On 3DS line models being off by 1 or 2 is fairly common due to the console having an inconsistent boot-up time for DS games. Being off by 3 may also be possible in rare cases, but if you get a result that's 4 or more seconds off, it's most likely an invalid result.
-
Should you get more than 1 result you can simply add a 9th needle and press Search again and if that still isn't enough to narrow it down to 1, add a 10th etc until you're at exactly 1 result.
-
If you get no results at all or only get results that are too far off from your target second, make sure all the values in your PokéFinder and EonTimer are correct and match what's on your DS console (date, time, MAC address, game version, language, DS type, saving option selected and EonTimer calibration). Then just do another attempt. Should you get 0 results again, join im a blisy ._.'s RNG manip assistance Discord server and ask for help in the bw_b2w2 channel providing an explanation of the issue and full window screenshots of your PokéFinder Calibration window and EonTimer.
The result I got here looks good though, as it's the only one and the second I hit is 2 off from my target which is normal on 3DS. In the future however when we get to actually RNGing e.g. a shiny Pokémon, we will need to hit the exact target second and not 1-2 seconds late or early. For this we need to adjust EonTimer so that, in my example, I can hopefully hit the 40 seconds next attempt. To adjust EonTimer you simply take the second you hit instead of your target (42 for me instead of 40), put it into the Second Hit field and press the Update button.
This will change your Calibration value so that next time you'll be more likely to hit your actual target second.
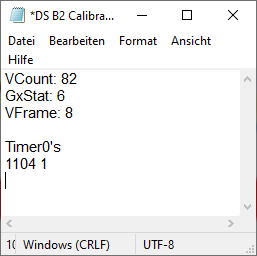
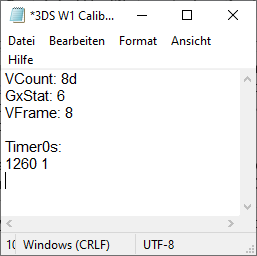
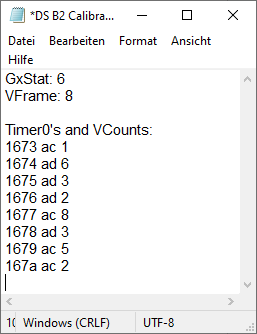
After this first attempt we will now write down the values we got somewhere (e.g. a standard text file):

That finishes the PokéFinder setup; now you can start the first calibration attempt.
For that you go to your console's settings and change the date to match whichever date you put into the PokéFinder Calibration window. Next you go to the time settings and change the time according to the calibration window as well, but at the same moment that you confirm the time change, you start EonTimer by clicking the Start button.
Now you go back to the home menu (on DSi and 3DS line models you can either navigate back through the settings or use the Power Button to get back whilst on DS and Lite you have to shut off the console and turn it back on after).
Once there you wait for the timer to run out and on the 6th and final beep of EonTimer you start the game. Make sure not to press any buttons in between you starting the game and the star appearing on the top screen, since that will change the Seed you're on and just add an unnecessary extra step to this.
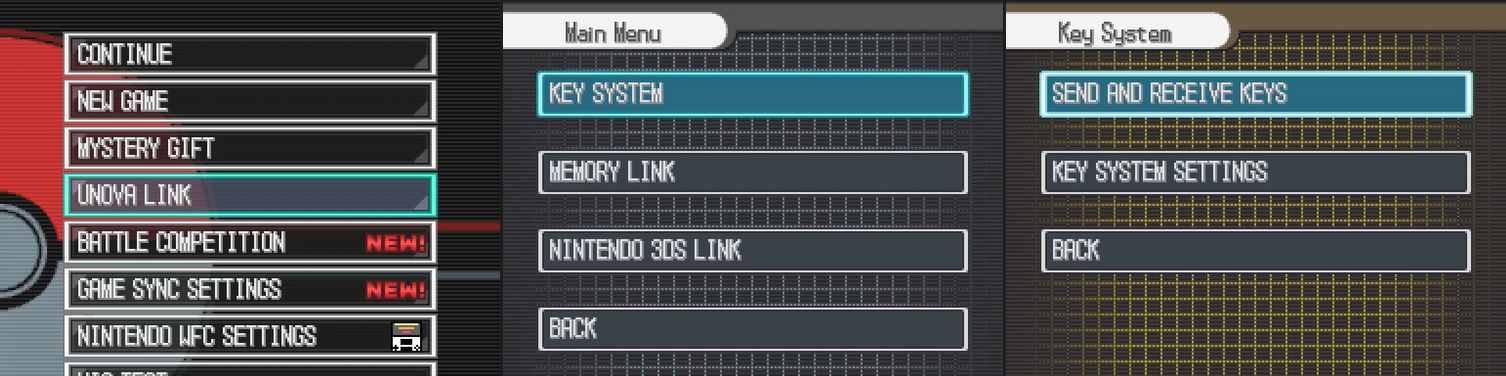
Once you see this star, you may start pressing buttons again. Navigate to the UNOVA LINK menu, go to KEY SYSTEM and then select SEND AND RECEIVE KEYS.
With this being the Unova Link Needle Calibration method, we will make use of the clock symbol that appears whenever you have the game try to establish an infrared link to another BW2 game to send or receive keys; the position the clock's hand starts at when activating the IR search is what you need to pay attention to. How long you have the search active for doesn't matter. You could cancel it immediately or have it go on for a minute straight; makes no difference for the calibration.
Here's a GIF of the first needle I got during this Calibration followed by a picture of the starting position:

As you can see, the first needle starting position I got is a right facing → needle, which I add into PokéFinder's Calibration window by clicking on the bottom left needle button.
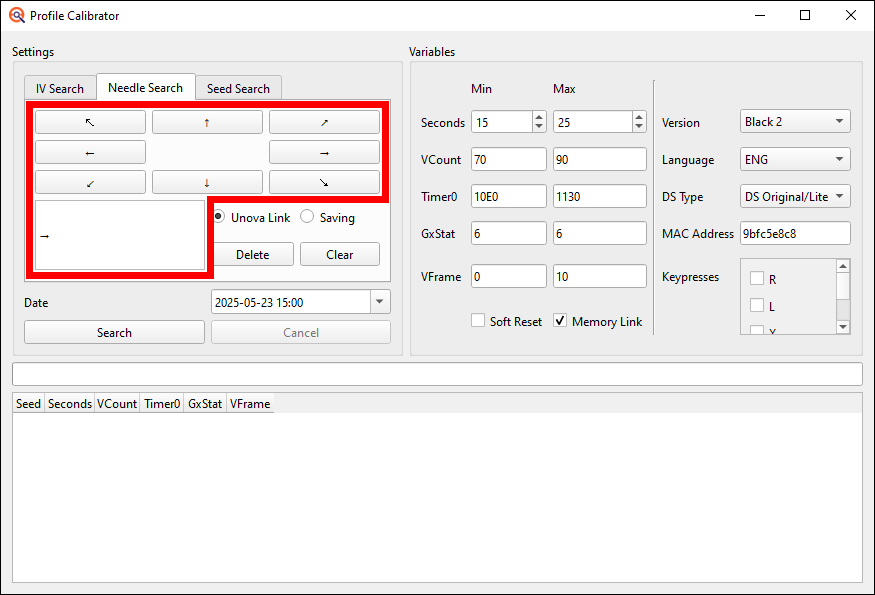

Now we continue on restarting the infrared connection via SEND AND RECEIVE KEYS until we have the starting position of 8 needles in a row. If you didn't see one of the needles starting positions, you cannot continue and have to go back to the home menu to try again, beginning with changing the time back and starting EonTimer.
Once you are done with the 8 needles, press the Search button and see what result PokéFinder gives you.
In my case I got the following result:


There's a few things to watch out for here:
-
If your results Seconds value does not match your EonTimer's target second, make sure it's not too far off. On DS, Lite and i, the second should never be off by more than 2. Being off by 1 is already rare and being off by 2 near impossible but both have happened to people in the past. On 3DS line models being off by 1 or 2 is fairly common due to the console having an inconsistent boot-up time for DS games. Being off by 3 may also be possible in rare cases, but if you get a result that's 4 or more seconds off, it's most likely an invalid result.
-
Should you get more than 1 result you can simply add a 9th needle and press Search again and if that still isn't enough to narrow it down to 1, add a 10th etc until you're at exactly 1 result.
-
If you get no results at all or only get results that are too far off from your target second, make sure all the values in your PokéFinder and EonTimer are correct and match what's on your DS console (date, time, MAC address, game version, language, DS type, saving option selected and EonTimer calibration). Then just do another attempt. Should you get 0 results again, join im a blisy ._.'s RNG manip assistance Discord server and ask for help in the bw_b2w2 channel providing an explanation of the issue and full window screenshots of your PokéFinder Calibration window and EonTimer.
The result I got here looks good though, as it's the only one and the second I hit is exactly the one I was aiming for in 20. Should you not have hit your target second here though you will want to adjust your EonTimer since in the future, when you get to actually RNGing e.g. a shiny Pokémon, you will need to hit the exact target second and not 1-2 seconds late or early.
To adjust EonTimer you simply take the second you hit instead of your target, put it into the Second Hit field and press the Update button. An example would be if I had hit 19 seconds instead of 20 I would input 19 into the Second Hit field and press Update which would change my EonTimer Calibration value from -95 to -66.

I won't be changing this for my next attempt though, since I hit exactly what I was aiming for.
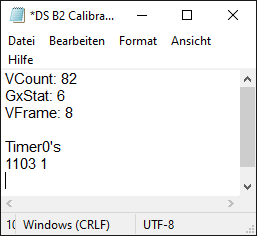
After this first attempt we will now write down the values we got somewhere (e.g. a standard text file):
That finishes the PokéFinder setup; now you can start the first calibration attempt.
For that you go to your console's settings and change the date to match whichever date you put into the PokéFinder Calibration window. Next you go to the time settings and change the time according to the calibration window as well, but at the same moment that you confirm the time change, you start EonTimer by clicking the Start button.
Now you go back to the home menu (On DS and Lite you have to shut off the console and turn it back on after. On DSi and 3DS line models you can either navigate back through the settings or use the Power Button to get back).
Once there you wait for the timer to run out and on the 6th and final beep of EonTimer you start the game. Make sure not to press any buttons in between you starting the game and the star appearing on the top screen, since that will change the Seed you're on and just add an unnecessary extra step to this.
Once you see this star, you may start pressing buttons and get into the game. If you're far enough into the story to have received the C-Gear, you must deactivate it upon entering the game as it would otherwise advance the RNG and make Calibration impossible.
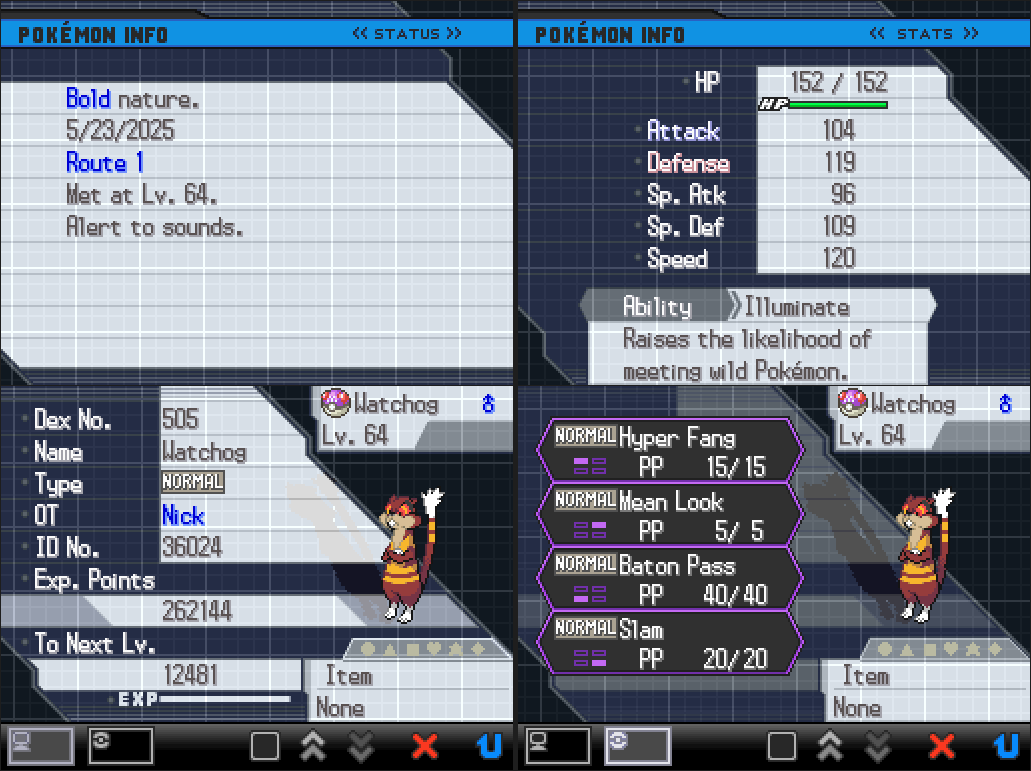
In-game you will want to go into your party menu/bag and use Sweet Scent as a field move/Honey from the bag to summon a wild Pokémon.

It doesn't matter how quickly or slowly you do this, just make sure to not move your player character as that can advance the IVrng and thus screw up this Calibration attempt. If you are doing this in the dark grass as I recommended, you may end up getting a double battle against 2 wild Pokémon. In that case you will need to kill the Pokémon on the left and catch the Pokémon on the right side of the field (preferably using a Master Ball so you don't have to waste time with failed catches).
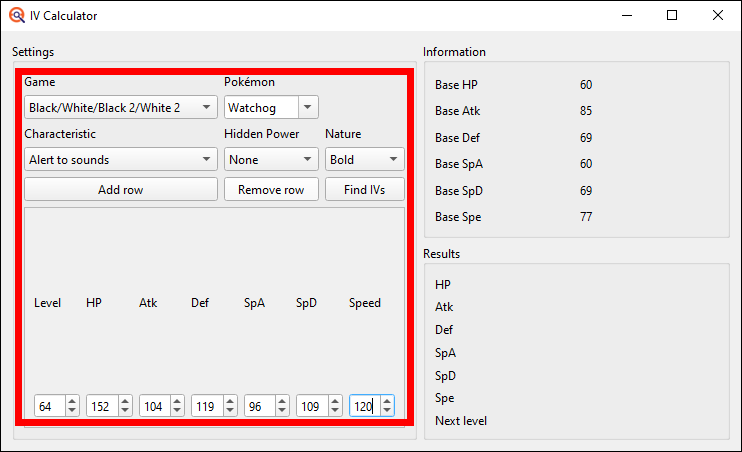
With the first caught Pokémon in our party, we open up the IV calculator in PokéFinder.
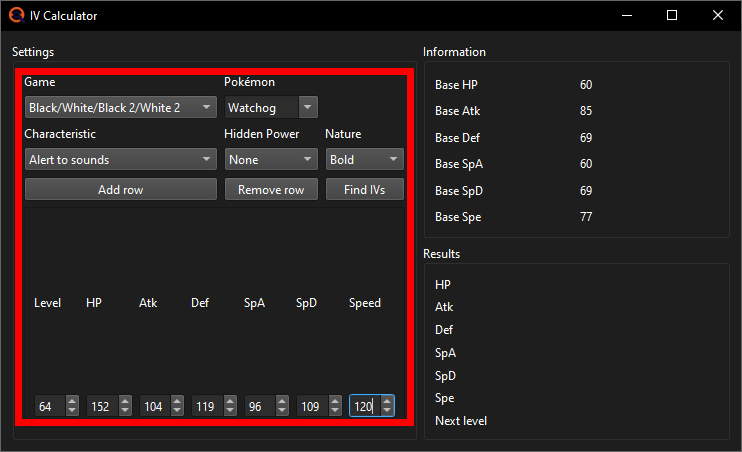
Once there, input the game you're playing, the Pokémon, its characteristic & nature and at the bottom its level and stats.
Note: The Characteristics of your Pokémon are not in PokeFinder?
For English language games, the names of 2 of the Characteristics were
changed in Gen 6. Currently PokeFinder only uses the Gen 6+ names for
these, even for older generations. Other languages may have a similar
issue, but I am not aware of any table that tracks every language's
Characteristics change, so if you're RNGing on a non-English game, you
may have to figure this out by yourself using a Pokémon wiki site of
that language for example.

Once all the data is in the fields, you can press the Find IVs button and it'll spit out the calculated IVs in the bottom right.
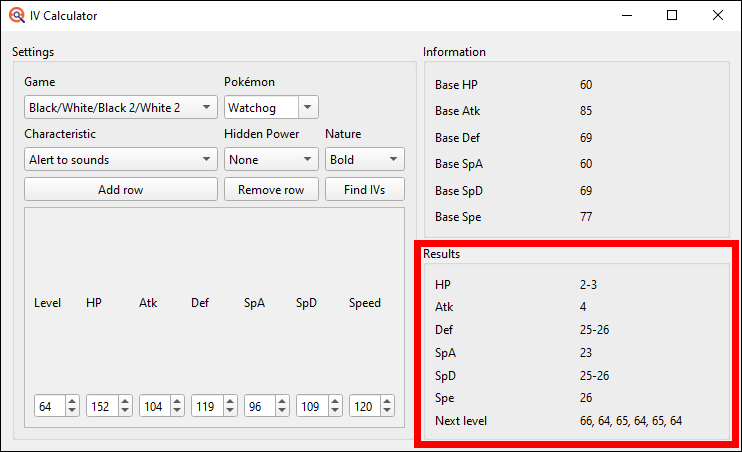
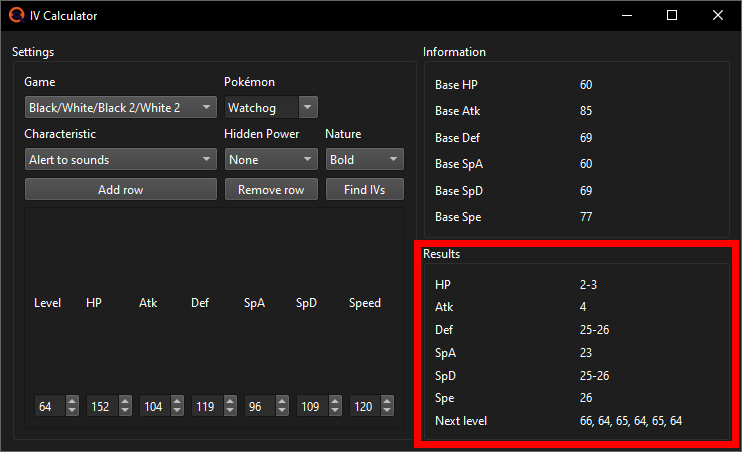
Should any of the results say Invalid instead of a number or number range, you input something wrongly. Double check all data is correct and without typos.
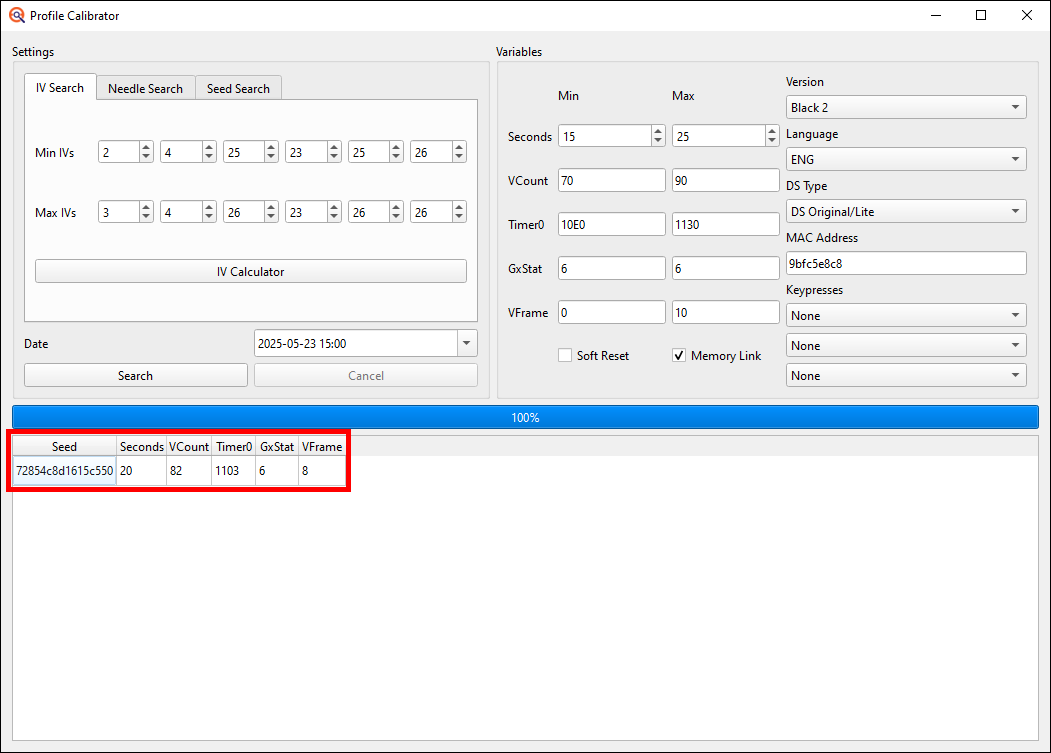
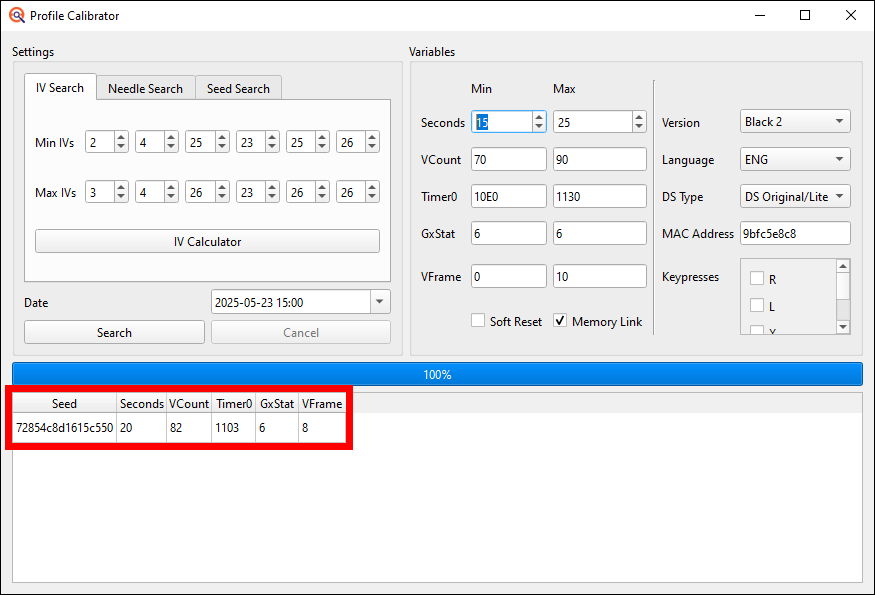
Pressing Find IVs will also automatically send the results over to the Calibration window which means all we have to do now is press the Search button and see what result PokéFinder gives us.
In my case I got the following result:
There's a few things to watch out for here:
-
If your results Seconds value does not match your EonTimer's target second, make sure it's not too far off. On DS, Lite and i, the second should never be off by more than 2. Being off by 1 is already rare and being off by 2 near impossible but both have happened to people in the past. On 3DS line models being off by 1 or 2 is fairly common due to the console having an inconsistent boot-up time for DS games. Being off by 3 may also be possible in rare cases, but if you get a result that's 4 or more seconds off, it's most likely an invalid result.
-
Should you get more than 1 result, you can level up the Pokémon using a rare candy, press the Add row button in the IV calculator, input all the next levels stats and press Find IVs again. Then in the Calibration window you press Search again and if that still isn't enough to narrow it down to 1, add another level etc until you're at exactly 1 result.
-
If you get no results at all or only get results that are too far off from your target second, make sure all the values in your PokéFinder and EonTimer are correct and match what's on your DS console (date, time, MAC address, game version, language, DS type, saving option selected and EonTimer calibration). Then just do another attempt. Should you get 0 results again, join im a blisy ._.'s RNG manip assistance Discord server and ask for help in the bw_b2w2 channel providing an explanation of the issue and full window screenshots of your PokéFinder Calibration window and EonTimer.
The result I got here looks good though, as it's the only one and the second I hit is exactly the one I was aiming for in 20. Should you not have hit your target second here though you will want to adjust your EonTimer since in the future, when you get to actually RNGing e.g. a shiny Pokémon, you will need to hit the exact target second and not 1-2 seconds late or early.
To adjust EonTimer you simply take the second you hit instead of your target, put it into the Second Hit field and press the Update button. An example would be if I had hit 19 seconds instead of 20 I would input 19 into the Second Hit field and press Update which would change my EonTimer Calibration value from -95 to -66.
I won't be changing this for my next attempt though, since I hit exactly what I was aiming for.
After this first attempt we will now write down the values we got somewhere (e.g. a standard text file):
Further attempts
Now with the first attempt done you go back to the home menu and
get ready to change the time and start up EonTimer again.
You'll want to do between 4-9 more such calibrations for a total
of 5-10 attempts to find what your most common Timer0 value
is.
This is important because later when you're trying to RNG e.g. a shiny, you will want the highest chances of hitting your target Timer0. If you were to only do 1 single Calibration for example, you may have just had bad luck and hit a Timer0 that, on average, you'd only get about 10% of the time, which also means you'd miss your target about 90% of the time. Some date/time combinations may have one Timer0 be much more common than it would be on most other date/time combinations. To prevent this from giving you a "bad" Timer0, that on most other date/time combinations you would barely ever hit, I recommend to change the target time just a little bit after every Calibration attempt. In my example I'll just put the clock in both PokéFinder and on my DS console forward by 1 minute each attempt so on attempt 2 I will target 15:01/3:01 pm, on attempt 3 15:02/3:02 pm and so on.
If even after adjusting EonTimer you still keep hitting 1-2 above or below your target second most of the time, don't keep adjusting every single attempt. Instead write down which second you hit every time, and then at the end of the 5-10 attempts, take the average, round it up/down and then use that average second hit to adjust your EonTimer. Especially on 3DS models you will most likely continue to not always hit your target second due to the varying loading times of those models.
Now with the first attempt done you go back to the home menu and
get ready to change the time and start up EonTimer again.
You'll want to do between 19-29 more such calibrations for a total
of 20-30 attempts to find what your most common Timer0 value
is on DS and DS Lite or 29-39 for a total of 30-40 more on DSi and
3DS.
This is important because later when you're trying to RNG e.g. a shiny, you will want the highest chances of hitting your target Timer0. If you were to only do 10 calibrations for example, you may have just had bad luck and like 7 times hit a Timer0 that, on average, you'd only get about 10% of the time, which also means you'd miss your target about 90% of the time. Some date/time combinations may have one Timer0 be much more common than it would be on most other date/time combinations. To prevent this from giving you a "bad" Timer0, that on most other date/time combinations you would barely ever hit, I recommend to change the target time just a little bit after every Calibration attempt. In my example I'll just put the clock in both PokéFinder and on my DS console forward by 1 minute each attempt so on attempt 2 I will target 15:01/3:01 pm, on attempt 3 15:02/3:02 pm and so on.

Another important thing to note is about the VCount. Whilst I did say earlier that this value stays consistent throughout your calibration, this isn't always true. In rare cases, you may get 2 different VCount values that are tied to some of your Timer0's. This has been reported with VCounts of AB & AC, AC & AD, BD & BE and 82 & 83 as of yet though I am sure there's more possible cases. It seems to be most common on DSi or 3DS, however the report with VCounts of 82 & 83 was from a DS Lite user so even if you’re playing on a DS or Lite, watch out for this (though getting one of the mentioned VCounts doesn't necessarily mean that you are affected by this). If this is the case for you, make sure to note down which Timer0 has which VCount assigned to it, as each Timer0 can only have 1 specific VCount value go with it. This will generally not impact your ability to RNG Manipulate, but it will make troubleshooting when something goes wrong a bit more annoying later.
Example of how such a Timer0 distribution with 2 VCounts could look like after 30 Calibration attempts:
If even after adjusting EonTimer you still keep hitting 1-2 above or below your target second most of the time, don't keep adjusting every single attempt. Instead write down which second you hit every time, and then at the end of the 5-10 attempts, take the average, round it up/down and then use that average second hit to adjust your EonTimer. Especially on 3DS models you will most likely continue to not always hit your target second due to the varying loading times of those models.
Now with the first attempt done you go back to the home menu and
get ready to change the time and start up EonTimer again.
If you're calibrating a BW1 game, you'll want to do between
4-9 more such calibrations for a total of 5-10 attempts.
If you're on BW2 instead, you should do 19-29 more such
calibrations for a total of 20-30 attempts on DS and DS Lite or
29-39 for a total of 30-40 more on DSi and 3DS.
This is important because later when you're trying to RNG e.g. a shiny, you will want the highest chances of hitting your target Timer0. If you were to only do 10 calibrations for example, you may have just had bad luck and like 7 times hit a Timer0 that, on average, you'd only get about 10% of the time, which also means you'd miss your target about 90% of the time. Some date/time combinations may have one Timer0 be much more common than it would be on most other date/time combinations. To prevent this from giving you a "bad" Timer0, that on most other date/time combinations you would barely ever hit, I recommend to change the target time just a little bit after every Calibration attempt. In my example I'll just put the clock in both PokéFinder and on my DS console forward by 1 minute each attempt so on attempt 2 I will target 15:01/3:01 pm, on attempt 3 15:02/3:02 pm and so on.
Another important thing to note is about the VCount. Whilst I did say earlier that this value stays consistent throughout your calibration, this isn't always true. In rare cases, you may get 2 different VCount values that are tied to some of your Timer0's. This has been reported with VCounts of AB & AC, AC & AD, BD & BE and 82 & 83 as of yet though I am sure there's more possible cases. It seems to be most common on DSi or 3DS, however the report with VCounts of 82 & 83 was from a DS Lite user so even if you’re playing on a DS or Lite, watch out for this (though getting one of the mentioned VCounts doesn't necessarily mean that you are affected by this). If this is the case for you, make sure to note down which Timer0 has which VCount assigned to it, as each Timer0 can only have 1 specific VCount value go with it. This will generally not impact your ability to RNG Manipulate, but it will make troubleshooting when something goes wrong a bit more annoying later.
Example of how such a Timer0 distribution with 2 VCounts could look like after 30 Calibration attempts:
If even after adjusting EonTimer you still keep hitting 1-2 above or below your target second most of the time, don't keep adjusting every single attempt. Instead write down which second you hit every time, and then at the end of the 5-40 attempts, take the average, round it up/down and then use that average second hit to adjust your EonTimer. Especially on 3DS models you will most likely continue to not always hit your target second due to the varying loading times of those models.
Creating a Profile
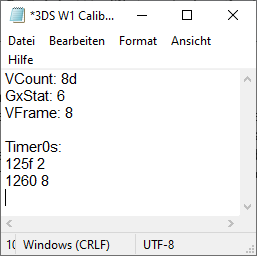
At the end of my 10 calibrations, my Timer0 distribution looked like this:

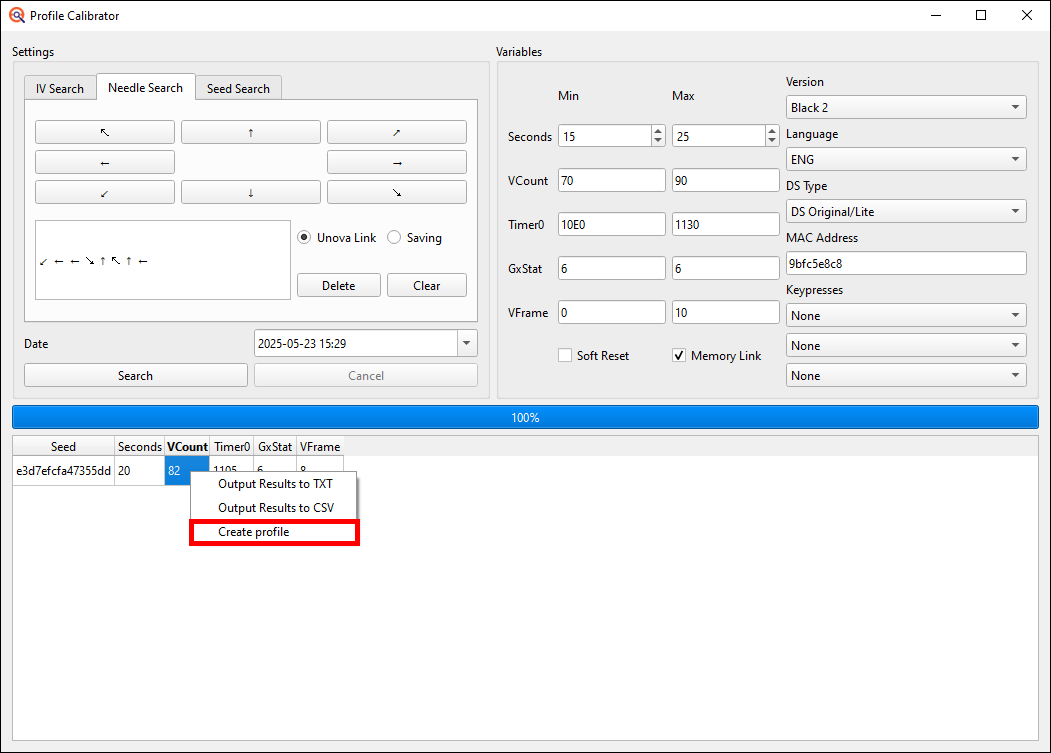
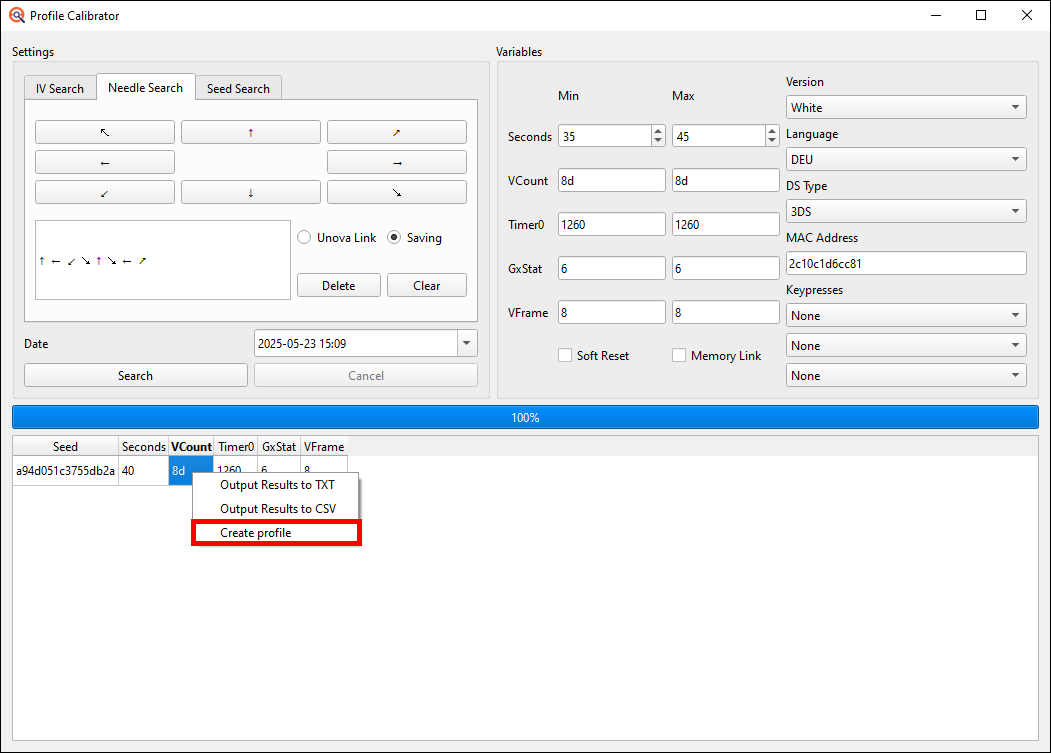
I hit 125f 2 times and 1260 8 times. Now in the PokéFinder calibration window we can right click into the last result we got, making a small popup window appear, and there we select the Create Profile option.

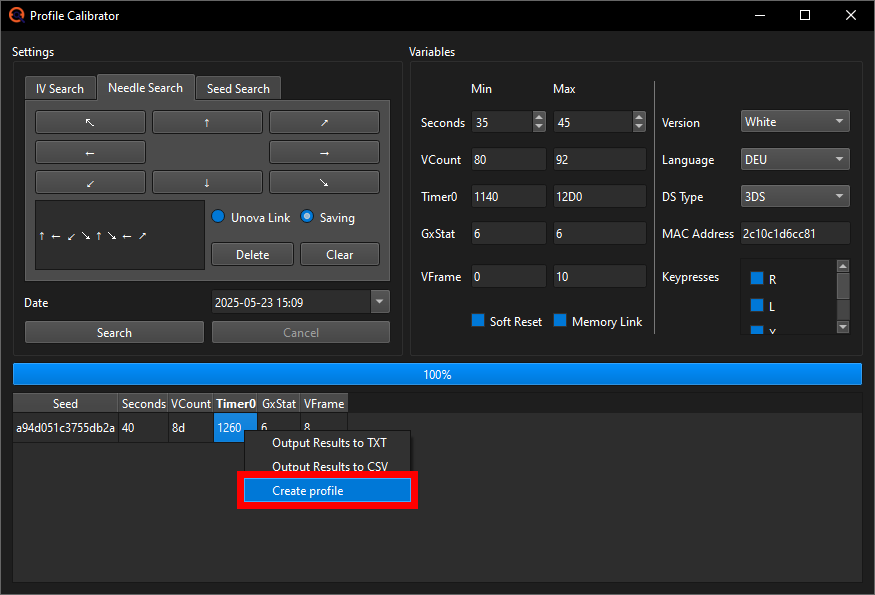
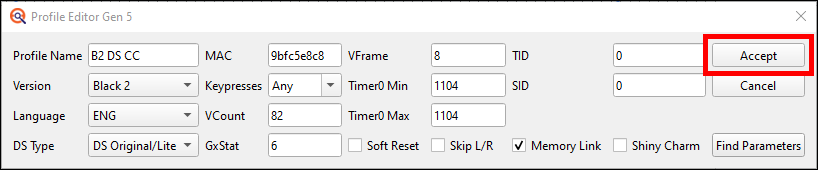
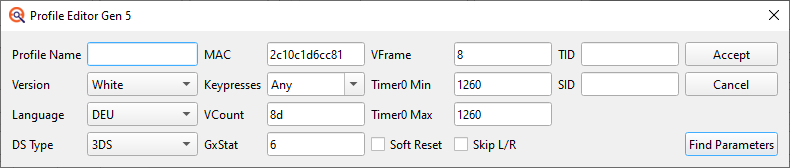
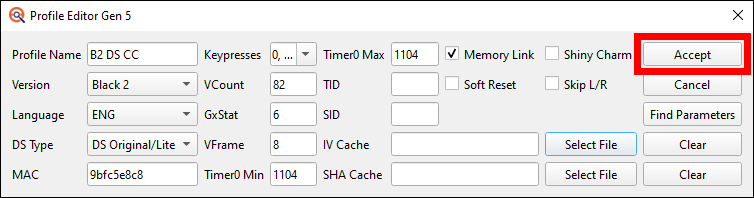
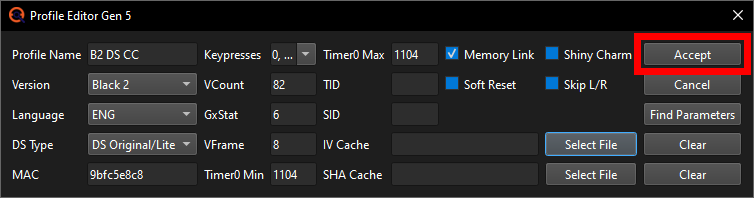
A smaller window will pop up with all the latest results' values and your game version, language, console type and MAC address already filled out. If your latest attempt resulted in your less common Timer0, you may want to change both the Min Timer0 and the Max Timer0 to your more common value.
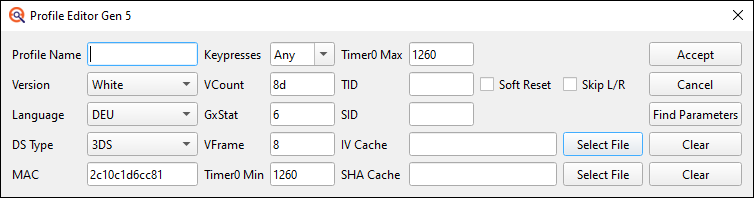
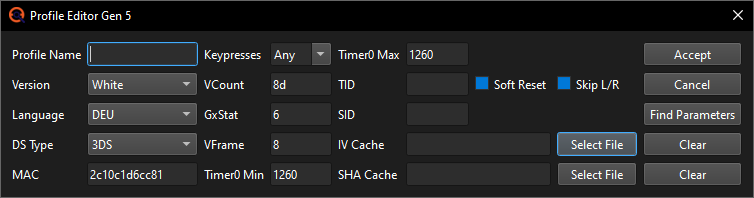
Now you just input a name for the Profile into the name field (I named mine W1 3DS CC because it's for my Pokémon White 1 on my Capture Card 3DS) and if you know them already, set your TID/SID to the proper values. If you do not know them yet/want to create a new savefile with a new TID/SID pair soon, just leave the fields empty for now. The TID and SID ONLY affect which advances will yield a shiny later and have NO EFFECT on which Pokémon you encounter, what stats they have or anything else.
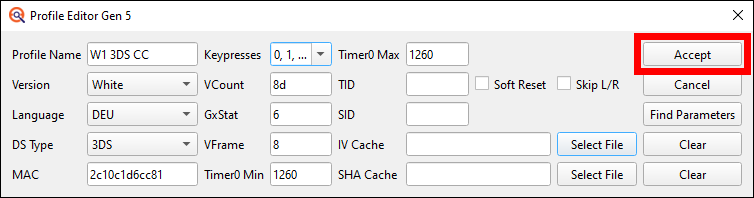
Then change the Keypresses to not include 6, 7 and 8 Keypresses. This isn't mandatory, but pressing 6, 7 or 8 different buttons on your DS during startup is sometimes not humanly possible and you should be able to find target Seeds without too many advances for almost anything you'd want anyways without those high Keypress amounts. Unchecking those 3 Keypress options will also shorten search times later. You could also remove more, like 4 and 5, but I find those still feasible and having more Keypresses will make finding e.g. 5/6IV wild or static shiny targets easier later (if you just care for getting shinies and don't care for IVs or Natures at all, you can disable all but 0 Keypresses).
The Skip L/R checkbox is for if your console's L or R buttons are broken, as if that box is checked off, PokéFinder will no longer give any results with L or R as the required Keypresses.
The IV Cache and SHA Cache you can ignore for now; more on those in future static and wild RNG guides.
Finally click on Accept and the Profile is saved.
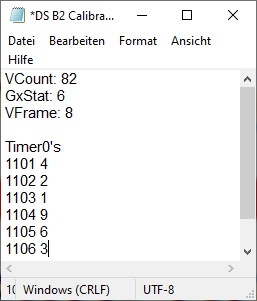
At the end of my 30 calibrations, my Timer0 distribution looked like this:
I hit 1104 9 times making it my most common Timer0. Now in the PokéFinder Calibration window we can right click into the last result we got, making a small popup window appear, and there we select the Create Profile option.
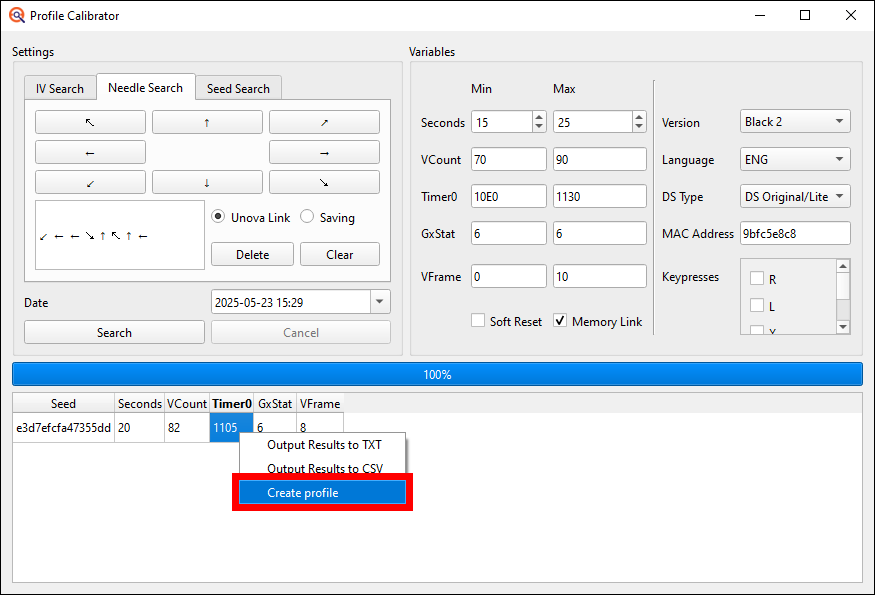
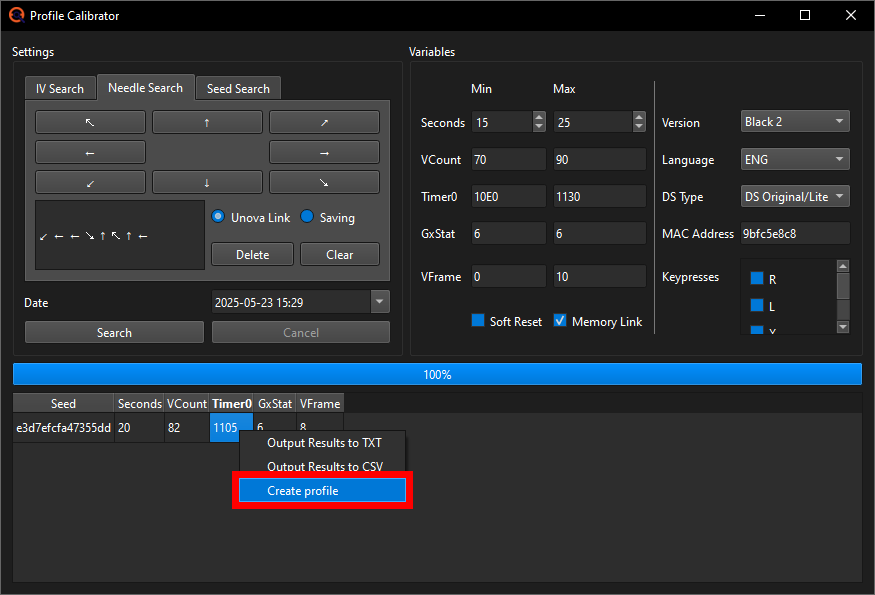
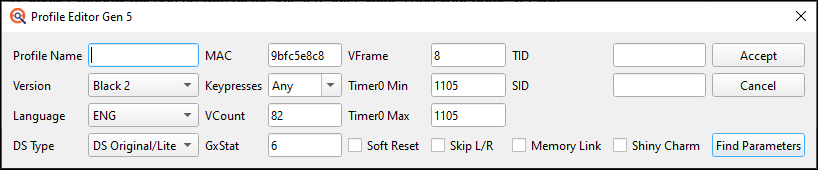
A smaller window will pop up with all the latest results' values and your game version, language, console type and MAC address already filled out. If your latest attempt did not result in your most common Timer0, you may want to change both the Min Timer0 and the Max Timer0 to your most common value; in my case I got 1105 last but knowing 1104 is more common I will change it to that (if you did get 2 different VCounts make sure to also change the VCount to the one that belongs with your most common Timer0).
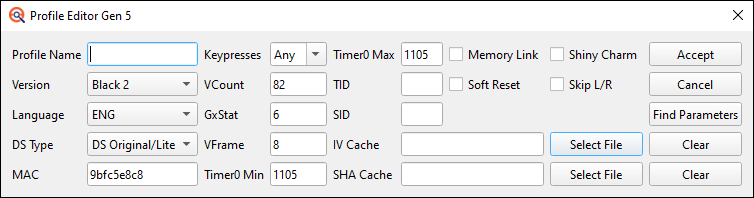
Now you just input a name for the Profile into the name field (I named mine B2 DS CC because it's for my Pokémon Black 2 on my Capture Card DS) and if you know them already, set your TID/SID to the proper values. If you do not know them yet/want to create a new savefile with a new TID/SID pair soon, just leave the fields empty for now. The TID and SID ONLY affect which advances will yield a shiny later and have NO EFFECT on which Pokémon you encounter, what stats they have or anything else.
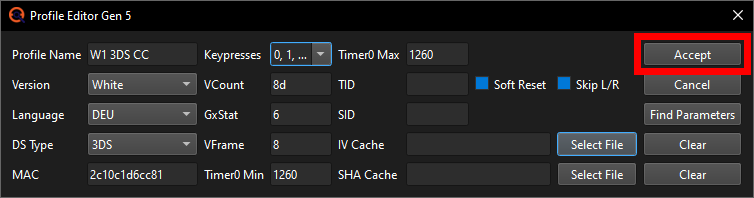
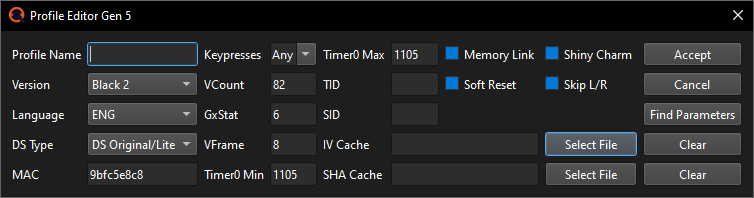
Check off the Memory Link and Shiny Charm checkboxes if you have done Memory Link or have received the Shiny Charm and change the Keypresses to not include 6, 7 and 8 Keypresses. This isn't mandatory, but pressing 6, 7 or 8 different buttons on your DS during startup is sometimes not humanly possible and you should be able to find target Seeds without too many advances for almost anything you'd want anyways without those high Keypress amounts. Unchecking those 3 Keypress options will also shorten search times later. You could also remove more, like 4 and 5, but I find those still feasible and having more Keypresses will make finding e.g. 5/6IV wild or static shiny targets easier later (if you just care for getting shinies and don't care for IVs or Natures at all, you can disable all but 0 Keypresses).
The Skip L/R checkbox is for if your console's L or R buttons are broken, as if that box is checked off, PokéFinder will no longer spit out any results with L or R as the required Keypresses.
The IV Cache and SHA Cache you can ignore for now; more on those in future static and wild RNG guides.
Finally click on Accept and the Profile is saved.
At the end of my 30 calibrations, my Timer0 distribution looked like this:
I hit 1104 9 times making it my most common Timer0. Now in the PokéFinder Calibration window we can right click into the last result we got, making a small popup window appear, and there we select the Create Profile option.
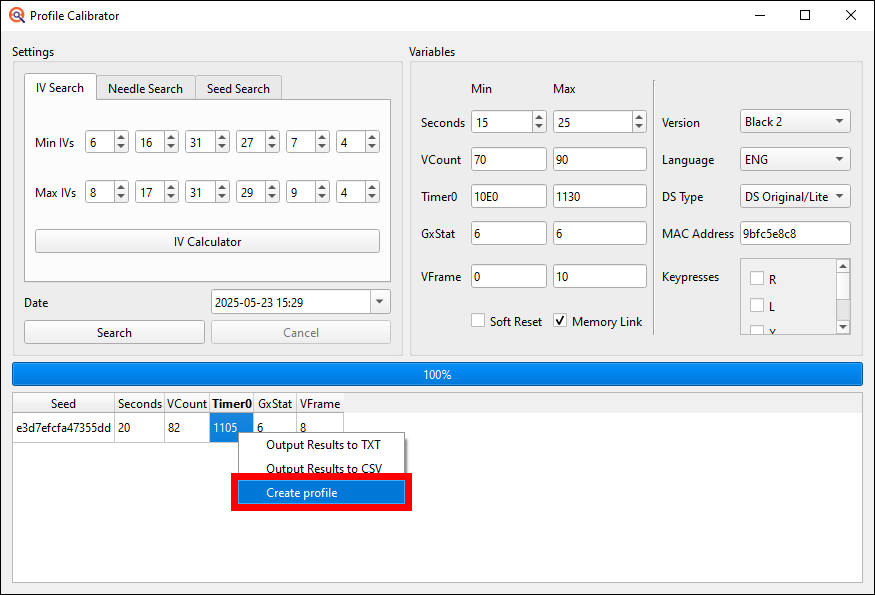
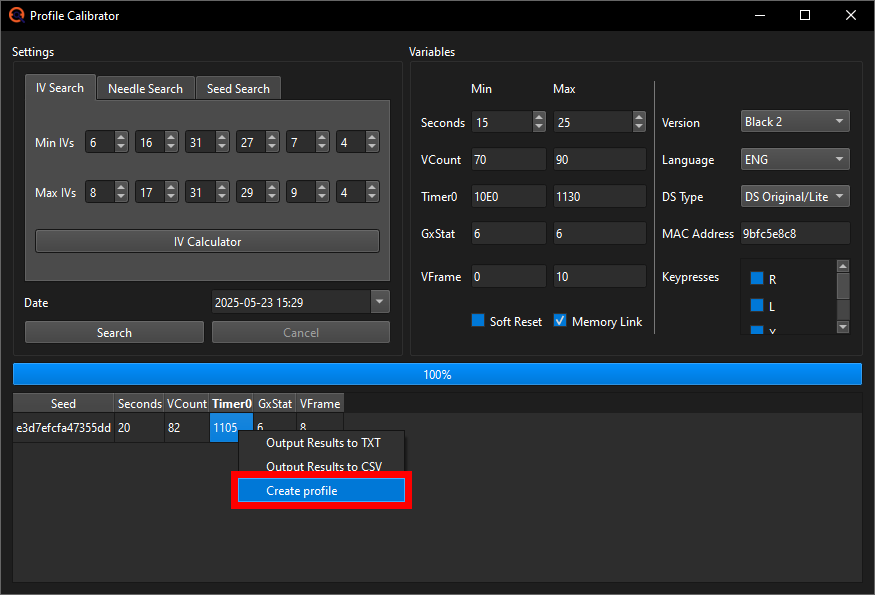
A smaller window will pop up with all the latest results' values and your game version, language, console type and MAC address already filled out. If your latest attempt did not result in your most common Timer0, you may want to change both the Min Timer0 and the Max Timer0 to your most common value; in my case I got 1105 last but knowing 1104 is more common I will change it to that (if you did get 2 different VCounts make sure to also change the VCount to the one that belongs with your most common Timer0).
Now you just input a name for the Profile into the name field (I named mine B2 DS CC because it's for my Pokémon Black 2 on my Capture Card DS) aand if you know them already, set your TID/SID to the proper values. If you do not know them yet/want to create a new savefile with a new TID/SID pair soon, just leave the fields empty for now. The TID and SID ONLY affect which advances will yield a shiny later and have NO EFFECT on which Pokémon you encounter, what stats they have or anything else.
Check off the Memory Link and Shiny Charm checkboxes if you have done Memory Link or have received the Shiny Charm (BW2 exclusive) and change the Keypresses to not include 6, 7 and 8 Keypresses. This isn't mandatory, but pressing 6, 7 or 8 different buttons on your DS during startup is sometimes not humanly possible and you should be able to find target Seeds without too many advances for almost anything you'd want anyways without those high Keypress amounts. Unchecking those 3 Keypress options will also shorten search times later. You could also remove more, like 4 and 5, but I find those still feasible and having more Keypresses will make finding e.g. 5/6IV wild or static shiny targets easier later (if you just care for getting shinies and don't care for IVs or Natures at all, you can disable all but 0 Keypresses).
The Skip L/R checkbox is for if your console's L or R buttons are broken, as if that box is checked off, PokéFinder will no longer spit out any results with L or R as the required Keypresses.
The IV Cache and SHA Cache you can ignore for now; more on those in future static and wild RNG guides.
Finally click on Accept and the Profile is saved.
Next steps...
Now you're ready to start RNG Manipulation in Generation 5! To get your TID and SID, you should go to the TID/SID RNG guide next. This is only required for getting shinies, so if you only care to get perfect IV Pokémon that are not shiny, you can skip that guide and go directly into the Static or Wild (coming soon™) Manip guides.
Thank you for reading and have fun RNGing!
Get the Pokemon you wanted? Consider supporting us on Ko-fi & keep us ad free!