R/S Safari Zone & Map Refreshing
Overview
While learning RNG Manips in Ruby & Sapphire, you may have noticed that, generally, the process is the same for everything. Save the game, reset, try and get your target.
But there's certain areas in the game that you cannot do this in, most notable of which is the Safari Zone! The Safari Zone has a bunch of Pokemon that are exclusive to it, so if you want to catch 'em all, you'll have to manip here at some point.
You might think the technique to Manip here would be to save outside the Safari Zone & run to your desired location. However, running over grass tiles & randomly moving NPCs will cause you to have inconsistent results insofar as your calibration goes.
We have a solution, though! And it's a tough one-- Pathing & Movement techniques. In this guide I'll cover all of the ways you can prevent NPCs interfering with your RNG Manip in order to make moving from one area to another consistent.
This tutorial will serve as a basic use case for these techniques, which will let you hit target Pokemon that would otherwise seem unfeasible to RNG Manip, or difficult to get in cases where you cannot save.
It is required reading for Advanced, which will make heavy use of these techs.
Recommended Setup
Hardware Requirements
-
Pokemon Ruby or Sapphire with a Dead Internal Battery (any language)
GameBoy Advance, Gameboy Player, Nintendo DS / DS Lite, GBA Emulator, or Pokemon Box Ruby & Sapphire. -
Windows 10/11 PC
In-Game Requirements
-
A Pokemon with Sweet Scent
-
PokeBlock Case (required to enter Safari Zone)
-
At least one free space in your party.
-
5-10 Rare Candies. (Not 100% Needed, but helpful).
-
Check which bike you need
-
Repel
Tools Used
Video Examples
- N/A
Pick your target
The first thing we have to do is pick our target Pokémon. Open the Ten Lines website, and select the Calibration tab.
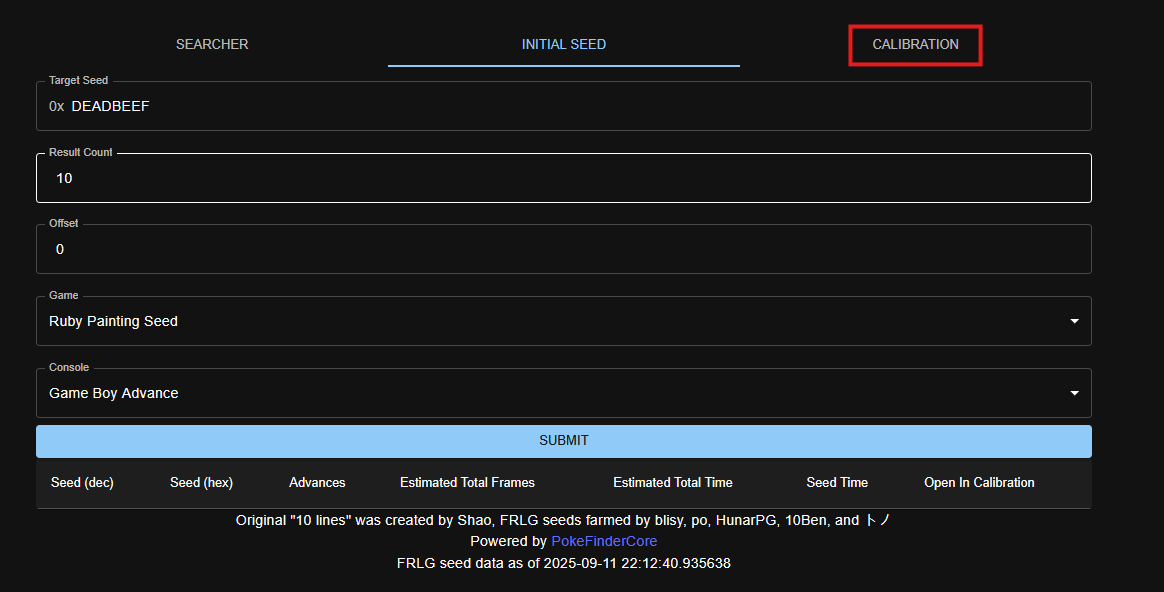
ou will be on a new tab. Here, we've got some settings to fill out.
For Game, select Ruby Painting Seed or Sapphire Painting Seed, whichever you're playing. Painting Seed refers to a more difficult technique, that will be covered in Advanced, but I will cover how to use this website without doing that.
For Console, select whichever you're playing on. I am on a GBA for this tutorial, but the process is the same across all systems.
For Target Seed we'll put 5A0, this is the default seed for Ruby & Sapphire with a Dead Battery.
Seed+- & Offset should be set to 0.
Leave Minimum Advances alone, but change Maximum Advances to 100,000.
Input your Trainer ID & Secret ID into their respective fields. If you don't have yours, I covered how to manip it here.

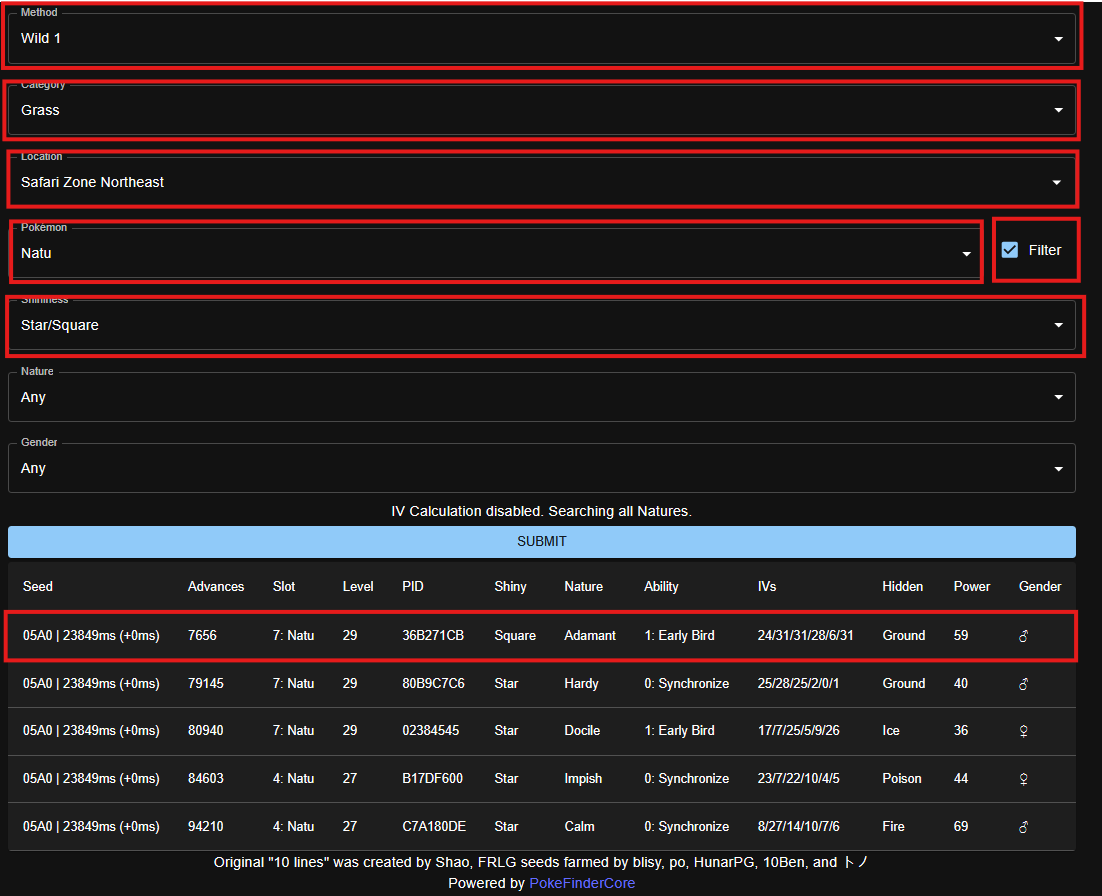
For Method, choose Wild 1.
Set Category to Grass.
For the Location, you should select the one that has the Pokemon you want to RNG Manip.
The Safari Zone also has several zones, it's not just one location in Ten Lines. Below is a visual of which zone is which. This is DIFFERENT from how they're named in Emerald.

After your location is selected, select which Pokemon you want from the
dropdown menu. Also check the Filter box next to it, which makes Ten
Lines only search for that species.
Select the IVs & Nature, you want. And also select if you want a
Shiny.
I will just be going for a simple Shiny Natu in the NorthEast.
Shiny is set to Star/Square, which will show every potential Shiny. Star vs. Square doesn't matter in any game other than Sword & Shield, but Pokémon transferred from Gen 3 up to those games will retain their Star/Square Shiny status.
Once your fields are set, click Submit. You should get several
results, and have a window that looks like this:
Note: You need more time!
Picking a Target for the most part, is the same as it was in the Basic Wild tutorial. However, because we are going to be traveling across the Safari Zone, we cannot aim for very low Advances. For example, a Wild Advance of around 1000 is generally possible in normal routes.
But here, unless we're going for the SouthEast, we can't aim that low.
Just something to keep in mind!
Once your target is selected, we're going to have to learn about how to handle NPCs while moving from one area to another!
Map Refreshing
So, how do NPCs even affect RNG Manips anyway? And, why haven't they before?
NPCs can cause unwanted, extra, inconsistent RNG advances if they are
the type that either
- Looks around randomly
- Moves around randomly
These are the ONLY types that do anything to influence the RNG.
Generally, when you do an RNG Manip, you bring up the Start Menu. This prevents NPCs from moving completely, and so if there is one in your vicinity, they can't do anything.
However, in this case, and in some cases we'll tackle in advanced, we are moving from one location to another, and during this time, these NPCs will move randomly. Unless every step we took was frame perfect, the RNG will be at slightly different positions each time the NPCs load, so their movements will cause us to be slightly earlier or later in the RNG sequence.
Note: Random objects are NPCs
To get the player to be able to interact with them, gamefreak coded some objects as NPCs that turn randomly. So your path may look safe but in reality you should be map refreshing.
These include Cut trees, Rock Smash Rocks, Strength Boulders, Pokeball
items, Invisible Kecleons, and Voltorb / Electrode Pokeballs.
You can eliminate Pokeball items, Kecleons, and Voltorb / Electrodes by
picking up / battling them, but the others will always be along a given
route.
This can make calibration extremely difficult. However, there is a technique that lets us move while preventing NPCs from doing so, which is called Map Refreshing.
If you bring up the start menu, then go into a sub menu, like the party or bag, when you unpause the game you can take a few actions safely before the NPCs will move again.
Outside Buildings:
- 2 Steps Running
- 1 turn + 1 Step running
- 1 turn
- 1 step walking
Inside Buildings:
- 1 turn
- 1 step walking
All of these actions have to be done within a couple seconds of closing the menu before you bring up the pause menu again, but the timing is fairly lenient. You have 31 Advances after you unpause to take your action / actions.
This is around half a second of leeway before NPCs can move. I suggest practicing these movements in a place where there's several visible NPCs who move randomly, and if they don't move at all, you know you're doing it right!
Now I'll showcase what each movement looks like. Click the tab to see whichever example you'd like.

The areas I showcase in these gifs are outside the Lilycove Pokemon
Center for the outdoor movements, and inside the Lilycove contest hall
for indoor movements.
These are great practice areas with tons of moving NPCs and space.
Whenever you do a map refresh & then move, the NPCs should not do
anything. That's how you know you're doing it right.
Once you feel confident in your ability to execute, we can move on to planning the path!
Planning the Path
There's a few things we need to do before we go onto our first actual attempt, and they're about planning our path through the Safari Zone.
We want to do 3 things
-
Take the shortest path from start->finish. This is to make it so we can take as much time as we need in traversal.
-
Avoid grass, as wild encounters can cause extra advances.
-
Learn where all the NPCs are. This will allow us to know where we have to Map Refresh, and where we can move normally.
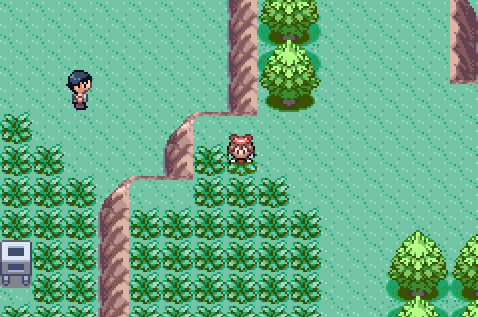
To do this, just walk around and observe the areas of the Safari Zone where you plan to catch your target.
The South East, however, is an Area you'll always be in, because that's where the entrance is. There's two moving NPCs here.
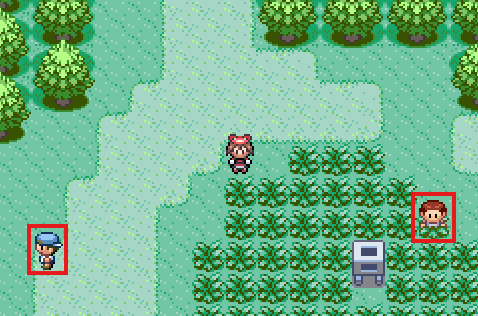
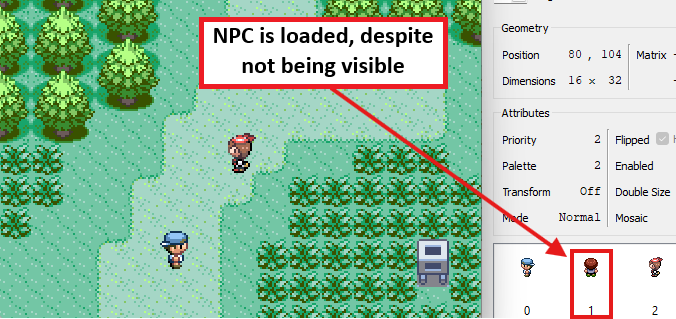
NPCs will unload when you're 2 tiles away from them, but they can spawn back in if there's a tile they could move to.
So it's a safe bet to be 3 or more tiles away from their initial
position, vertically or horizontally. Here's an example from mGBA (a GBA
Emulator) showing that the NPCs sprite is still loaded, but he's not
visible in-game.
So we know in this area we'll have to Map Refresh. But once we get to the north a bit, we can walk normally.
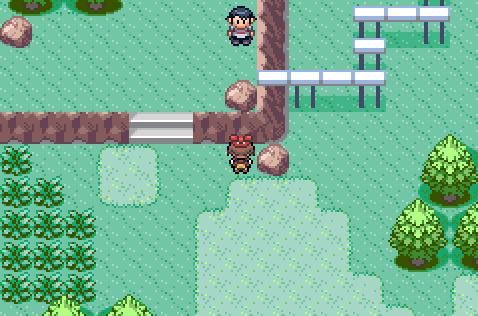
This entire area is safe, which is nice, because we'll have to acro bike across this obstacle. We can tell just because of how far the NPCs would be, we don't need to check in emulators for everything.
Continuing on, there's no randomly moving NPCs until we get to our target grass patch.
Because I'm entering from the left of this area, I'll start Map Refreshing early enough to where he can never move.
At this point I practice the route to make sure I've got the movement down, and that no NPCs will ever move.
If you're not going for the exact same path as me, you'll have to plan your own route, but this is the one I've come up with. Be sure to practice WITH Eon Timer RUNNING! I have about a 2 minute timer, and by the time I get to the final spot here I've got 20 seconds or so left before Eon Timer finishes.
It's also okay to not be perfect as long as the NPCs do not move. At one point during this path, I do 1 step running instead of 2 before pausing. This is inefficient, but NPCs won't move so it's okay. You also can wait as long as you need in the Start Menu or Party Menu. NPCs cannot move while they're up. So if you're stressed and need to wait an extra second, it's okay as long as you have the time.
Note: The timer is too tight
If you find that you cannot finish your path before your Eon Timer runs out, you either have to pick a new target advance, or find a shorter path to your target.
One example of a way to save time you can see in my full path. I avoid doing the 1 Turn + 1 Step running movement option, because I find it a bit difficult. This causes me to waste some time by doing the turns individually. Learning to be better at those could reduce how strict my timer is.
There are other ways around this, but they'll be in our Advanced courses.
With the path planned and practiced, we're ready for our first attempt.
First Attempt
I'll keep this brief, because otherwise it should be the same as a normal wild encounter, and you should be familiar with that process from our Beginner Courses.
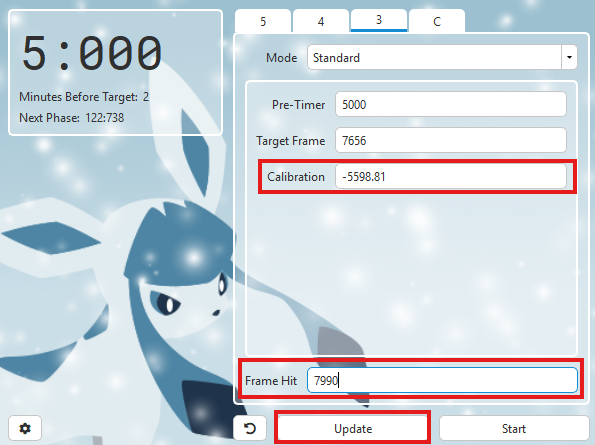
Set up Eon Timer as you normally would with your target Advance in the Target Frame box.
Also don't forget to put a Pre-Timer you use one. I will not be doing so in this guide.
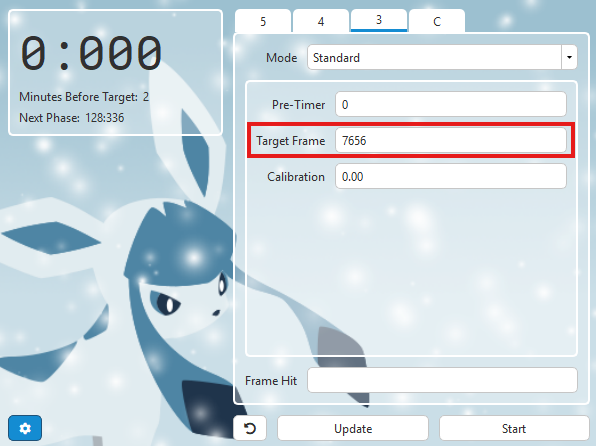
Your Eon Timer should look something like this, but with your target advance instead. By this point in the tutorials, you should be comfortable setting Eon Timer up on your own.
Also make sure to double check your console in Eon Timers settings!
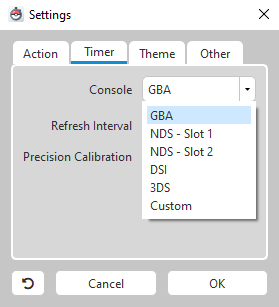
I selected GBA, since I am doing this on a Gameboy Player.
Soft reset your GBA when you start Eon Timer (or reset when the
pre-timer finishes, if you're using it) and mash through the intro
sequence until you're in the Safari Zone Lobby.
Walk forward to enter the Safari Zone, and once you're inside it
immediately bring up the Start Menu. Use a repel from your bag to
make sure the final step into the grass doesn't trigger an encounter.
Do a Map Refresh & begin your path!
Be cognizant of your timer, but once you've finished your path, sit in your Party Menu until the timer runs out, and then hit Sweet Scent.
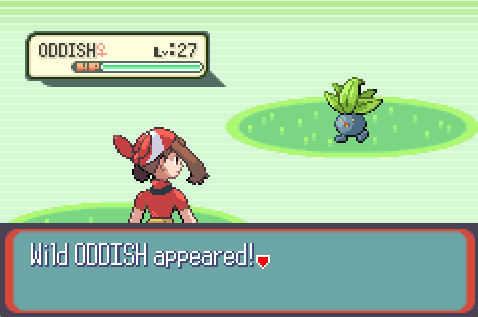
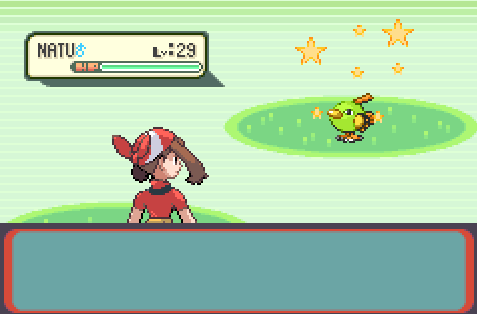
As usual, my first attempt resulted in Pokemon who is not my target. The Safari Zone can be a bit frustrating, because these Pokemon can run away randomly. If that happens, just start your manip over again!
In any case, once you've caught a Pokemon, we can move onto calibration!
Safari Zone Adjustment
To figure out which Advance we hit, we're going to have to figure out its IVs and use that to search.
First, though, let's set up Calibration for a search.
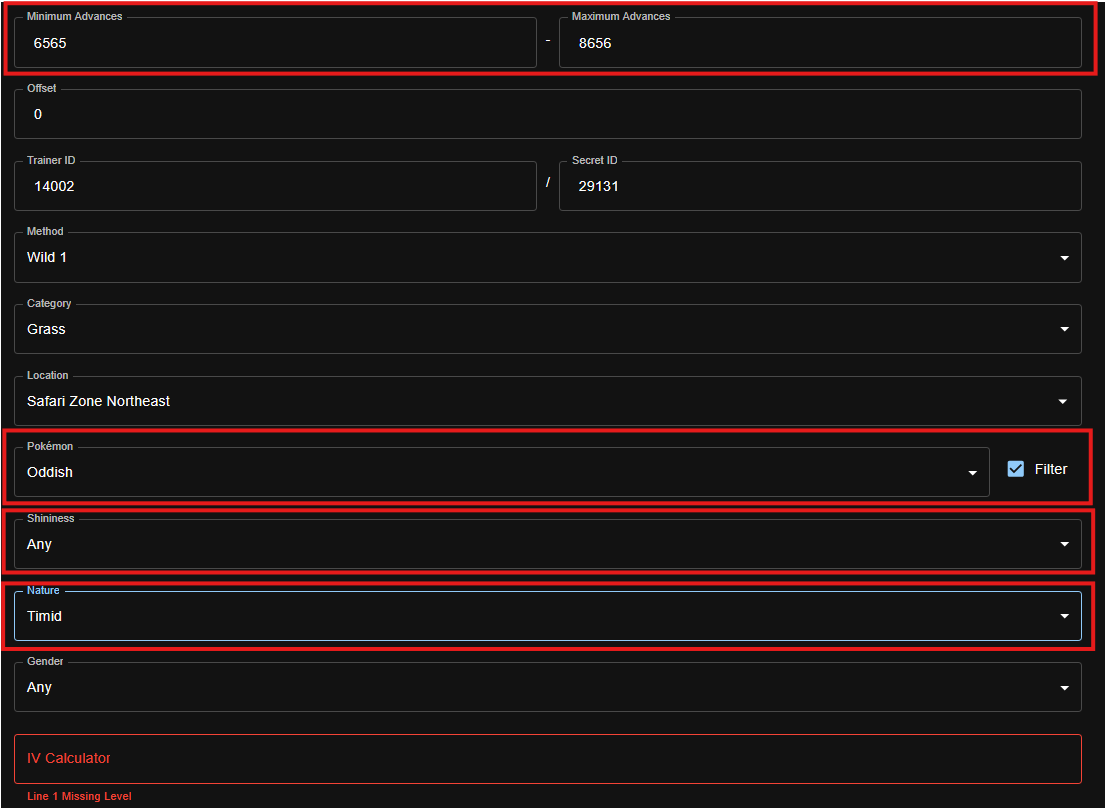
We'll leave Game, Console, Seed, Seed+/-, Offset, and Method alone, but we are going to change Minimum Advances. To be about 1000 advances before our target.
In my case, I am aiming for 7656. So I set it to 6656. Also set
Maximum Advances to 8656. This will generate Pokemon spreads from
1000 Advances before your target, and 1000 after it.
Select which Pokemon you received. In my case it's Oddish. Also be
sure to keep the Filter Box checked so Ten Lines only searches for that
species.
All IVs should be 0 to 31, and the shininess of the drop down should say Any. Set Nature to what the Pokemon you received had. In my case it's Timid.
You may also input a Gender, if your Pokemon can be multiple different ones.
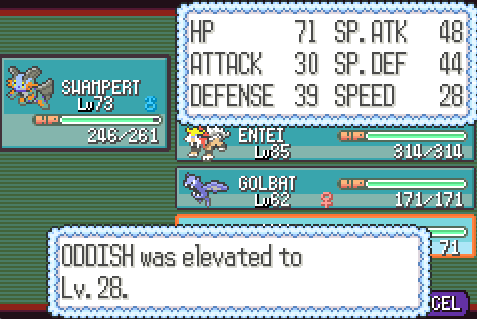
Once you select a Nature, the IV Calculator function will appear.
The IV Calculator wants you to input your Pokemons level, then stats. If it is highlighted red at all, that means you've made a typo or forgot to enter something.
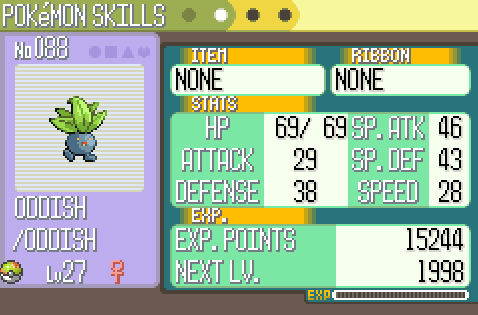
If you have Rare Candies to raise the Pokemon's level, we can make the IV Ranges even more Precise. We aren't keeping this Pokemon, so it's safe to use them to gain info. They will come back when we soft reset!
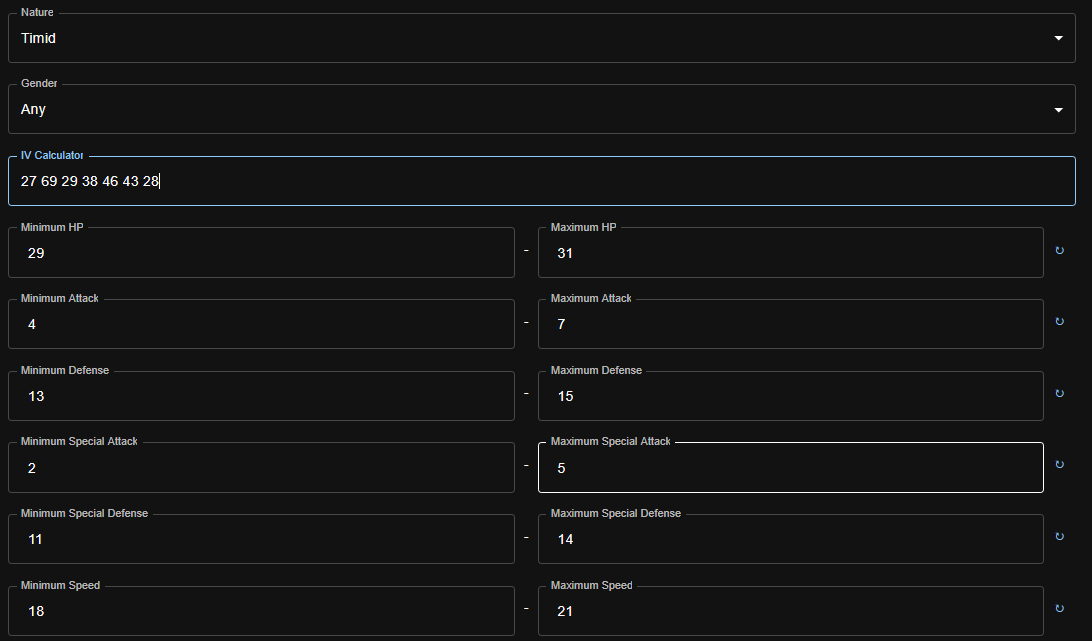
To account for the extra level, push the Enter/Return button on your keyboard, and a new row to enter the information for its next level will appear.
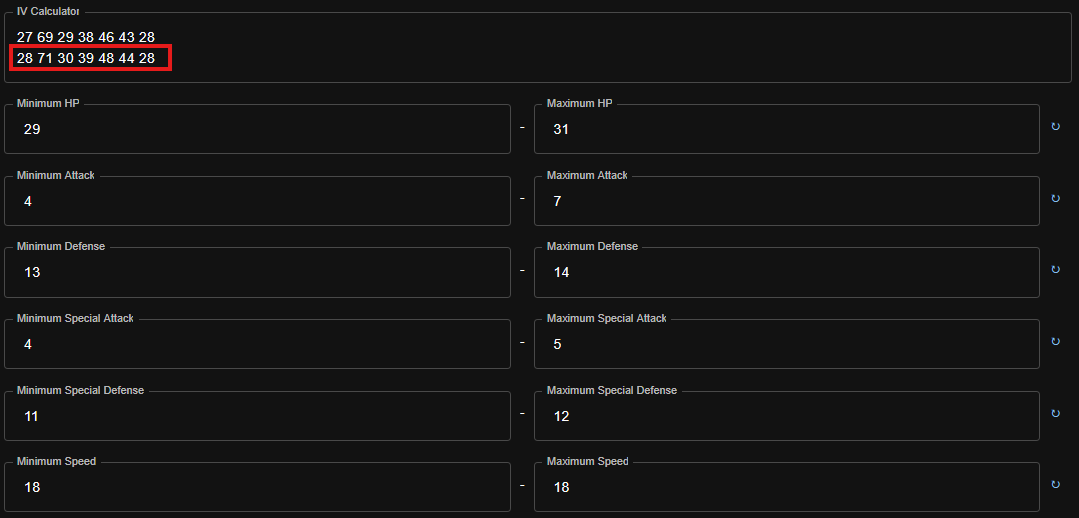
Once you finish entering them, the IV Filters in Calibration will be populated with a range of potential stats of your Pokemon.
At this point, hit Submit. You should only get one result. If you get more than that, you can narrow down the results further by doing more levels in the IV Calculator.

This is the Oddish I hit! I was about 350 Advances late. I'll update Eon Timer accordingly, and try again.
Reminder: If you hit 0 results, check Wild Methods 2 & 4, your Pokemon could be hiding there!
At this point it's rinse and repeat. Eventually, with enough tries, you'll hit your target Pokemon! This particular Natu took me 6 attempts.
Generally, the hard part of this Manip is learning how pathing works & how to do map refreshing. They are techniques that are only really used in Ruby & Sapphire. (although there are some use cases in FR/LG & Emerald, but they are few and far between)
It also might seem like a lot to do this just for some shinies which could be easily obtained in Emerald with battle record, but the real purpose of this is to set you up for our Advanced courses, which will make heavy use of Map Refreshing.
Next Steps...
At this point you're all done with the Intermediate course! Next up is Advanced. In there we'll cover some complex, multi step Manips that will focus on not only getting SHINY Pokemon, but Pokemon with good stats. So if you like competitive play & you feel like you've mastered the basics, check out our Egg RNG and Painting RNG guides!
Get the Pokemon you wanted? Consider supporting us on Ko-fi & keep us ad free!