R/S Trainer ID & Starter Manip
Overview
Ruby & Sapphire are the best place to begin your RNG Journey within Generation 3, thanks to this combined manip. In this guide I'll be covering how to manip your Trainer ID and Secret ID, which determine when your shiny targets are available, and we will follow that up with a Shiny Starter manip, so you can be sure you did the Trainer ID manip correctly.
Even if your main goal is not to use RNG Manips to shiny hunt, this will still serve as a way to teach you the fundamentals you'll need to understand any Manip you want to do in the future.
Recommended Setup
- Pokémon Ruby or Sapphire with a Dead Internal Battery (any language)
- GameBoy Advance, Gameboy Player, Nintendo DS / DS Lite, GBA Emulator, or Pokémon Box Ruby & Sapphire.
- Windows 10/11 PC
Tools Used
Video Examples
- im a blisy ._.
- Papa Jefe
- Dislcaimer: These video examples showcase the same process, but with different tools
The Guide
Trainer ID Setup
Before we can start any manips, we have to know what Trainer ID and Secret ID we want. What we're going to do is pick a specific target advance to make shiny.
Which one you pick is up to personal preference– It's all about IVs, Nature, & Gender. Also, the higher advance you pick, the longer the wait you will have. Be careful not to go for too short of a wait, though, as you need enough time to be able to reset the game and press A at the correct time. I would not pick a target below 1000.
To pick your target, go to the Ten Lines website, and click Calibration.
You will be on a new tab. Here, we've got some settings to fill out.
For Game, select Ruby Painting Seed or Sapphire Painting Seed, whichever you're playing. Painting Seed refers to a more difficult technique, that will be covered in Advanced, but I will cover how to use this website without doing that.
For Console, select whichever you're playing on. I am on a Nintendo DS for this tutorial, but the process is the same across all systems.
For Target Seed we'll put 5A0, this is the default seed for Ruby & Sapphire with a Dead Battery.
Seed+- & Offset should be set to 0.
Initial Advances and Max Advances cover your starting point & how many advances you want generated after that, respectively. Leave Minimum Advances alone, but change Maximum Advances to 100,000.
Trainer ID & Secret ID are something we'll be manipulating in this guide, so for now leave them blank.
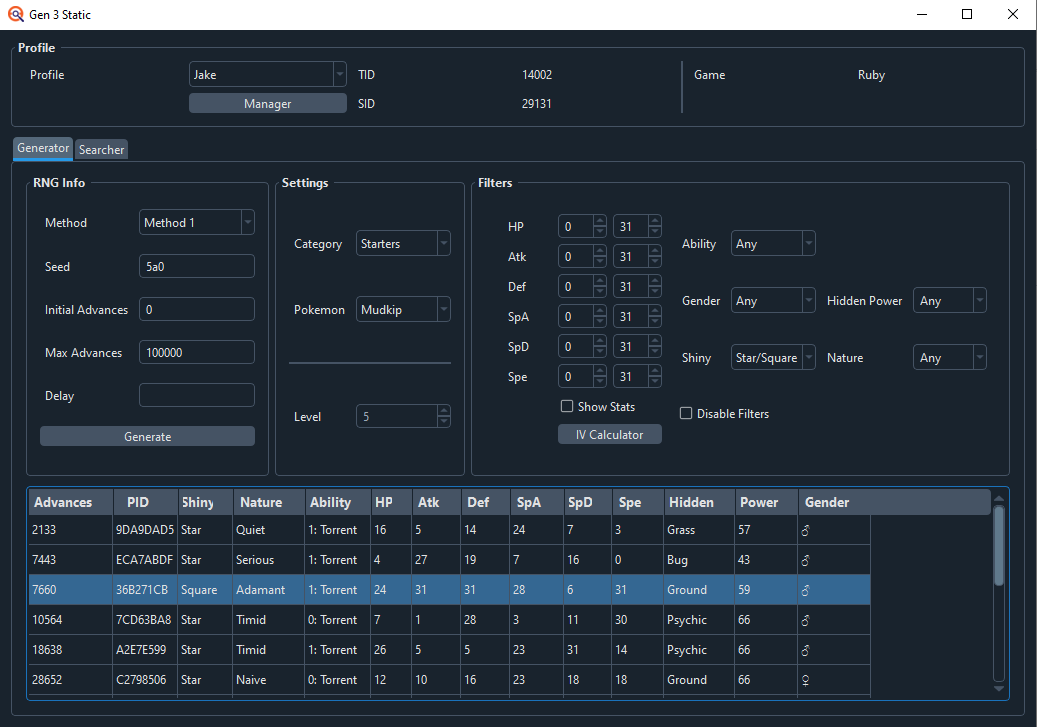
Save the Category as Starters, and pick one of the three Hoenn Starter Pokémon. I'll choose Mudkip.
Lastly we have what IVs & Nature you want. Make sure to leave the Shiny dropdown as Any. Also, the more picky you are with this info, the less options you will have. I recommend aiming for no more than 3 Perfect IVs with the desired nature.
Once you've filled everything out, click Submit. If you get no results, lower some of your IV Ranges, or remove them entirely.
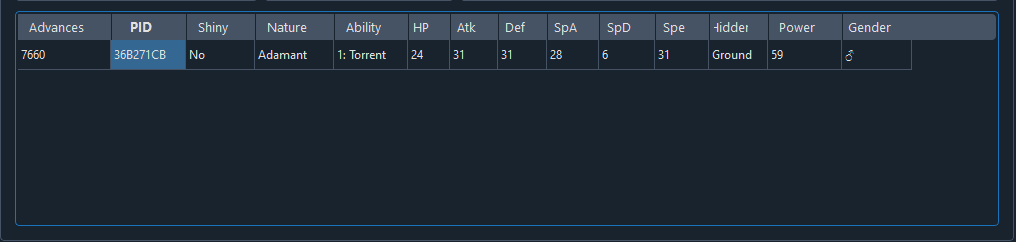
I aimed for a Mudkip with Perfect Attack, Defense, and Speed, with an Adamant Nature. Here is how my window looks:
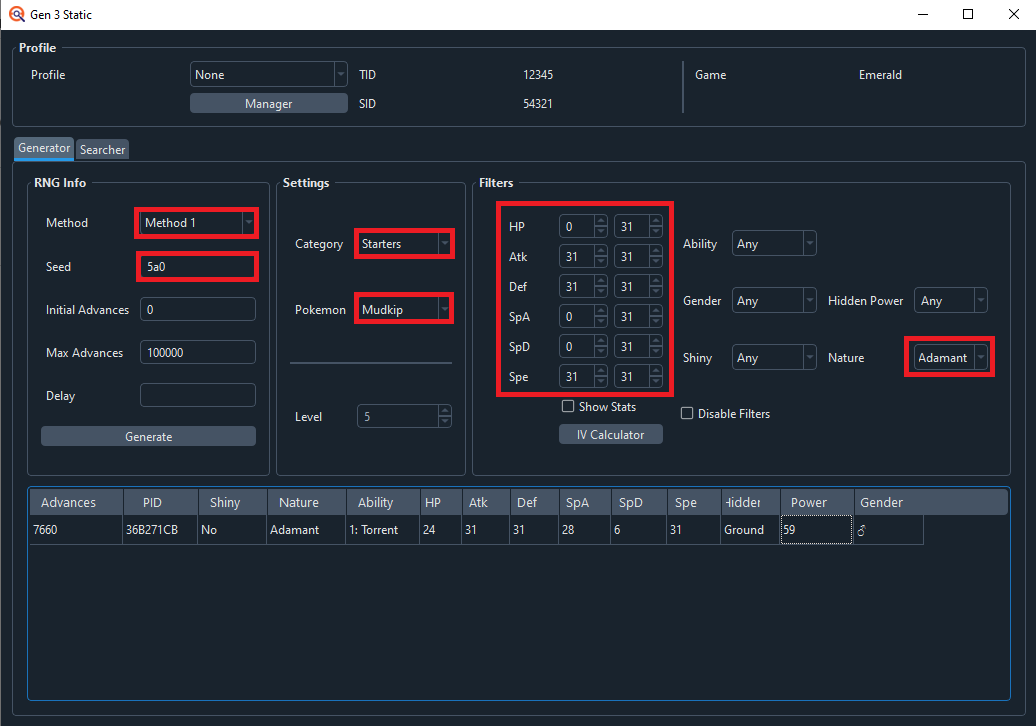
You may have more results than I do. If that's the case, pick whichever one you want. Once you've made your selection, highlight the PID and use your computer's copy command.
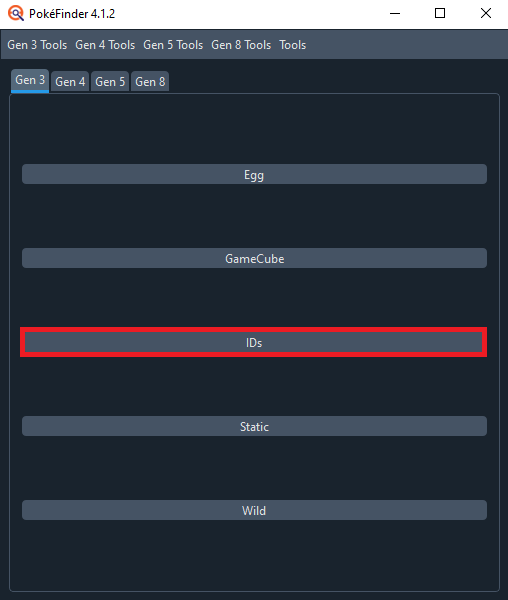
Now, we'll go to Lincolns TID/SID Generator.
For Initial Seed, set that to 5A0.
We also want to set Initial Advances to 5000 here. This is because during the TID Manip, we have to do the entire intro of the game, and 5000 Advances is about the fastest you can do that section in.
Max Advances should be set to 15,000.
Select the PID bubble. Then, box to the right of the PID bubble, paste the PID we copied from Gen 3 Calibration.
When we click Generate here, it will use that PID we pasted to generate multiple different Trainer ID and Secret IDs that will make any Static Encounter, Gift Pokémon, Legendary, or Roamer Shiny if we receive/encounter it on the advance we picked.
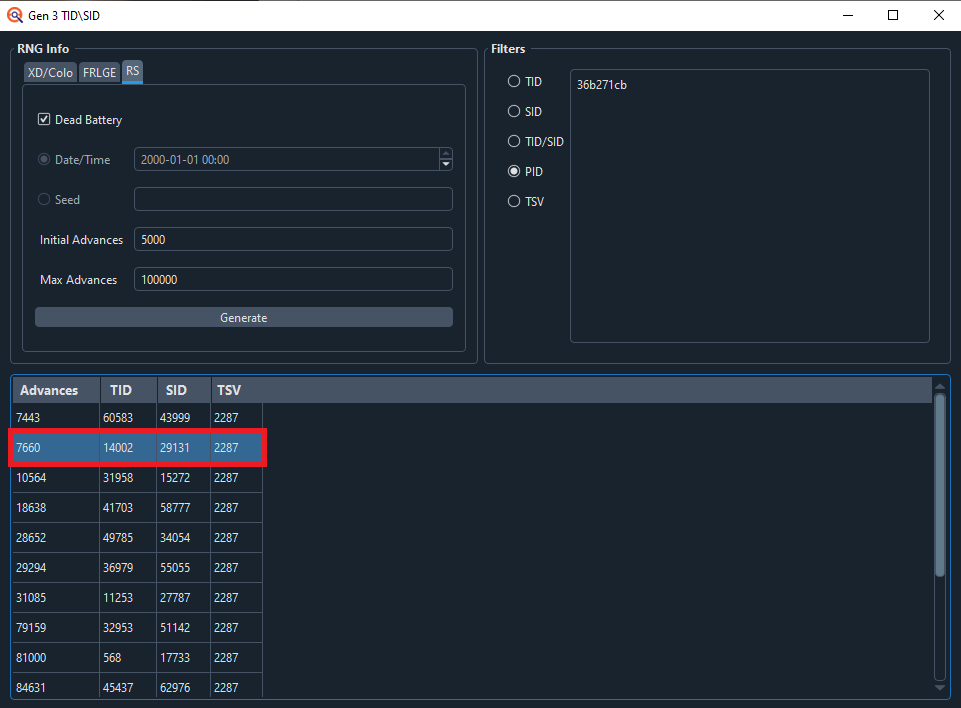
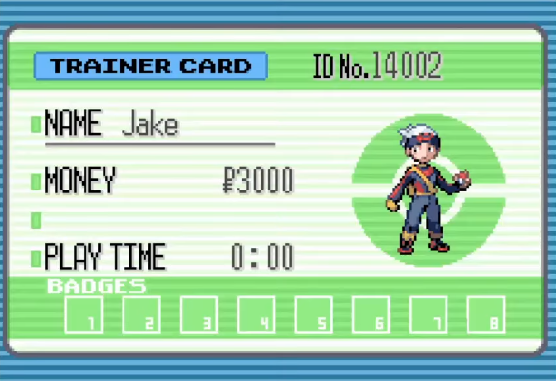
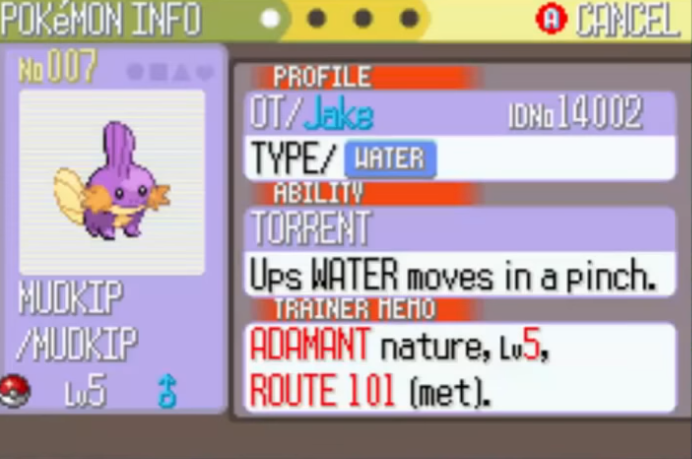
I will be aiming for Advance 7660, which is a Trainer ID of 14002 and a Secret ID of 29131. At this point, our prep is complete. You should have a Trainer ID and a Starter Pokémon you are aiming for ready. So it's time to move on to the TID Manip.
Trainer ID Manip
To get started with the manip, we’re going to boot up our copy of Ruby or Sapphire, and open the Eon Timer 3.0 App on our computer.
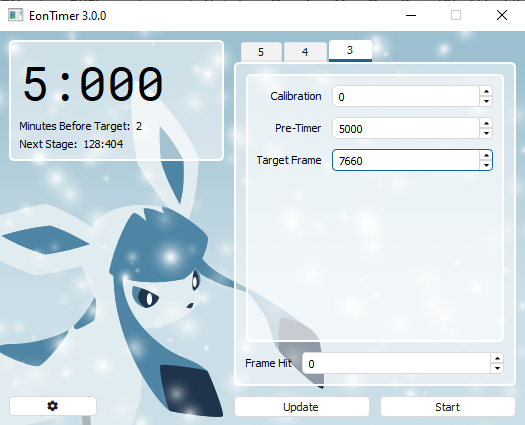
In Eon Timer, click the 3 tab, and make sure the Calibration Box is set to 0.
Also, make sure to put your Target Advance from the IDs section into the Target Frame box in Eon Timer. Mine was 7660.
Pretimer is optional.
When set to 0, clicking Start on EonTimer will immediately start the countdown to your target TID. This requires you to soft reset your game at the same time as clicking Start on Eon Timer.
Setting this to 5000 will create a 5 second countdown, which you will soft reset the game to, then the countdown for the TID Begins. I’ll be using this method for the remainder of the guide.
Your timer should look something like this:
You should also click the gear icon, and make sure your console setting is correct. regular GBA and GBA Games on the DS have slightly different frame rates.
GBA: 59.7275 fps
NDS - Slot 2: 59.6555 fps
Having it set incorrectly will make longer timers inconsistent relative to the actual game. If you’re playing on unofficial hardware or emulator, stick with GBA as this is usually the default.
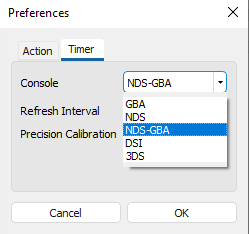
You don’t need to touch Refresh Interval or Precision Calibration. Now it’s time to attempt the manip.
Start Eon Timer, and when the pretimer countdown hits 0, soft reset the game. You’ll notice Eon Timer starts beeping as it approaches 0. By default, it beeps 6 times. The goal is to Soft Reset on the 6th beep itself.
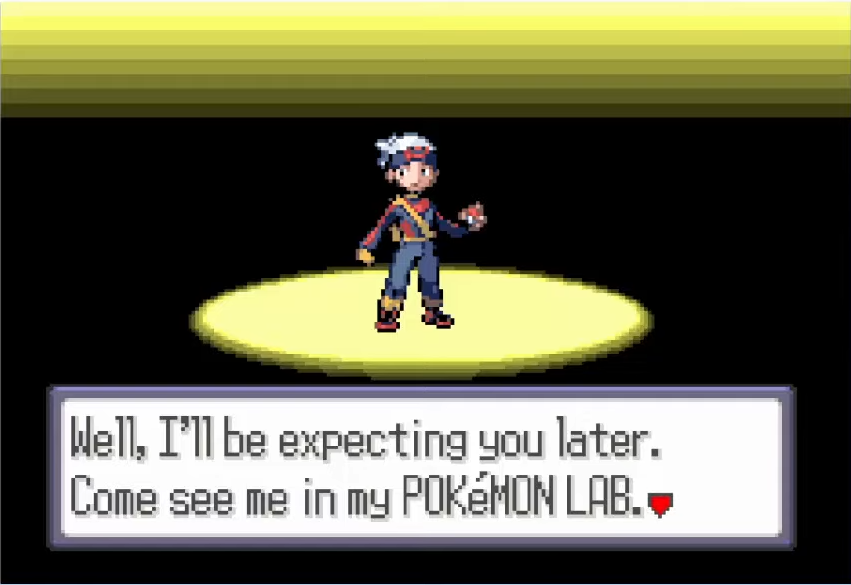
At this point, play through the intro where you pick your gender and name yourself until you’re at the final text box, pictured below.
While here, we just wait for Eon Timer to finish counting down. Once it gets near the end, it’ll beep 6 times again. The goal is to Press A here on the 6th Beep.
Once the overworld loads, open up the start menu and click your Trainer Name to check your ID on the Trainer Card.
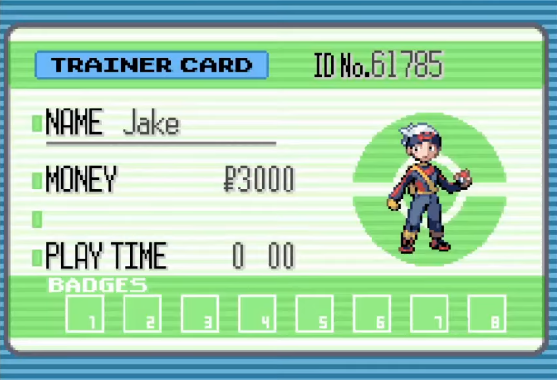
And as you can see here, it’s not the one I wanted. You also probably didn’t get it. What’s going on here? Well, as mentioned in the Introduction page, the gen 3 games move at around 60 frames per second, and different manips have different offsets and delays. This is no different, so I’ll show you how to account for your own personal timing, and any delay incurred by the game itself in the next section.
Trainer ID Adjust
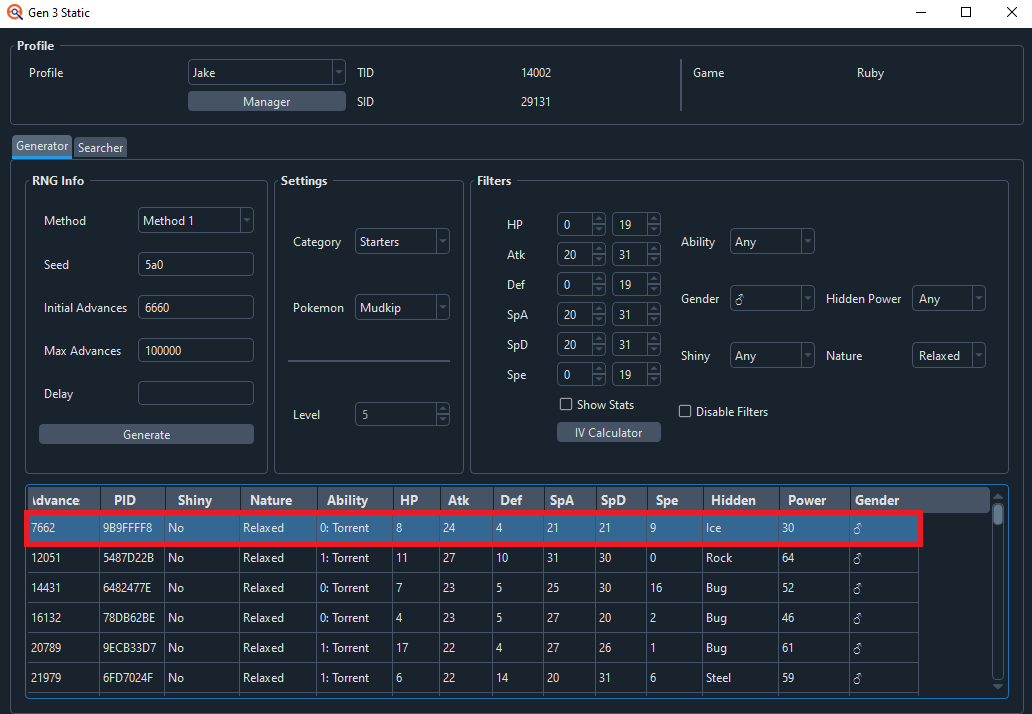
The first thing we’re going to do post attempt is head to Lincolns TID/SID Generator again. We can leave everything the same as our setup. But we’re going to click the TID bubble, and unclick the PID one.
Then, we’ll type out what TID we just got in-game, and hit generate. You should only get 1 result using these parameters.
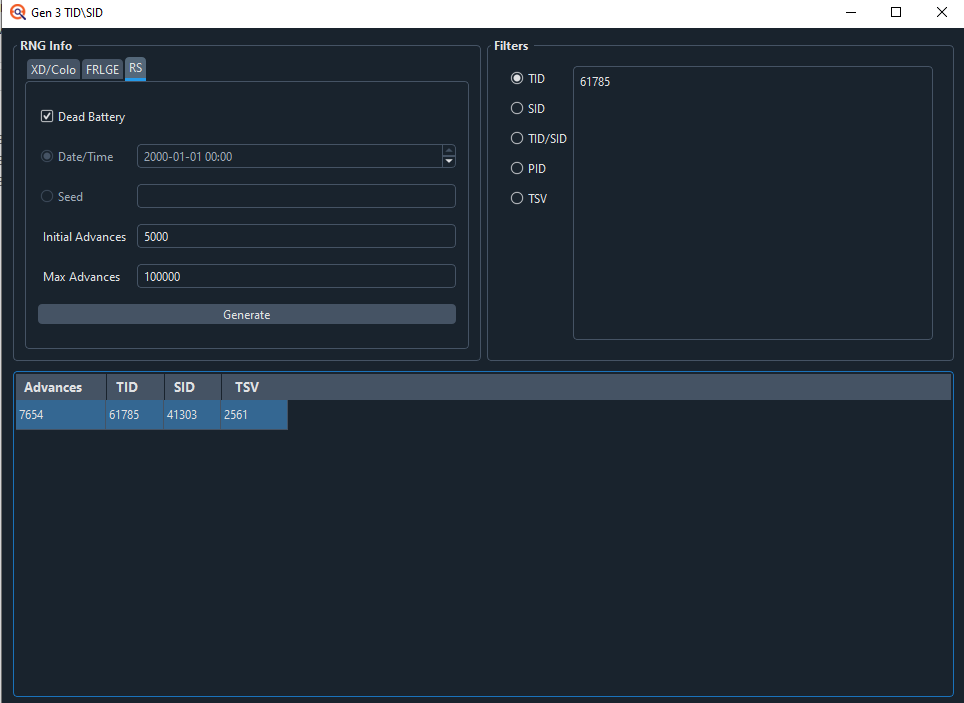
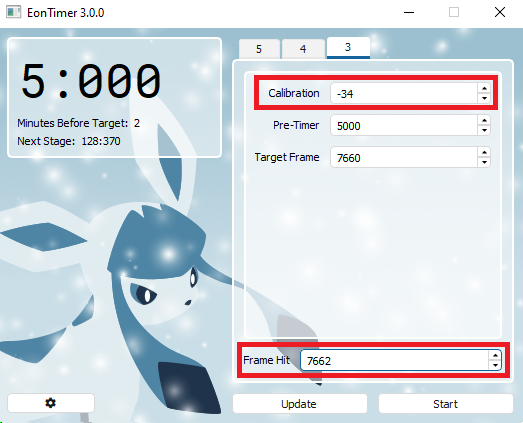
You can see the TID I got was after 7654 advances, which is slightly before 7660. The way we adjust for this is simple– In Eon Timer, paste 7654 from the advances column into the Frame Hit box, and click update.
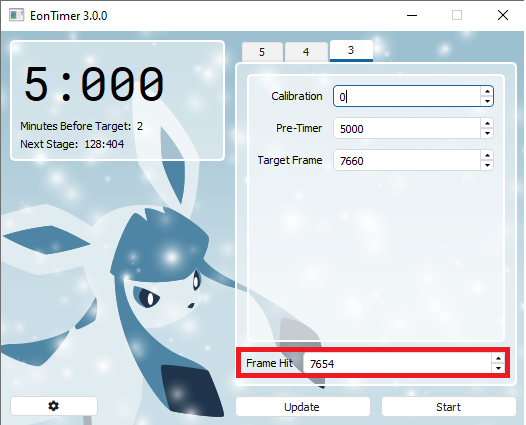
After you click update, the Calibration box will be changed. This value is updated automatically, no need to worry about it.
With the update done, you hit Start on Eon Timer and try again, with the exact same procedure as described in the Trainer ID Manip section.
This is a precise endeavor, the timing is 1/60th of a second, remember. So have patience, and with enough attempts you will get the ID you want.
Once you do, it’s time to use that Trainer ID to get a shiny starter!
Starter Setup
The process for the Starter Manip is very similar to the Trainer ID Manip. Time your button press with Eon Timer, if you miss, calibrate and try again. The main difference will be in how you identify your miss. We'll have to use the Starter Pokemons stats!
Let's search for our Shiny Target that we picked out earlier. The settings of the Calibration Tab will be identical to what we did in Trainer ID Manip, except for two things.
First, enter your Trainer ID & Secret ID you just RNG Manip'd into their respective boxes.
We also want to change the Shiny drop down to Star/Square instead of Any. Then, let’s hit Submit.
You’ll notice that, yes, the target I selected showed up (Adamant Mudkip with 3 Perfect IVs), but there’s many other targets available to me as well! This is because a Trainer ID and Secret ID do not only make the one target you picked out shiny. They will make THOUSANDS of shinies available to you.
And you can see, on the typical 5A0 seed for Ruby & Sapphire, I have 3 that are available to me in under two minutes.
So, pick any of these targets to be your first. I’ll be aiming for advance 7660, as it has 3 Perfect IVs & an Adamant Nature, which are great for Mudkip.
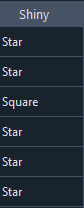
You may be wondering what the Star/Square Distinction is in the Shiny Column. This is for Pokémon Sword and Shield. That game has two distinct shiny animations, and this column tells you if it will be the animation with stars, or with squares. It makes no visual difference in any other game.
Okay, at this point, we have the ability to search for a target, we know our Trainer ID should theoretically produce a shiny, so let’s confirm we’re correct.
Starter Manip
To get started with the starter manip, you want to play through the intro until you are in front of Professor Birch's bag, and save the game.

Then, in Eon Timer, put the number from the Advances Column into the Target Frame box. In my case, it is the same number I used for my Trainer ID Manip. Also, change the value in the Calibration box to be 0 again.
For every type of Manip, the amount of calibration will be different, because the game delays generating whatever you’re manipping differently, based on what it’s generating.Your Eon Timer should look something like this, but with your target advance instead.
We are once again all set to begin. Start Eon Timer, and when the pretimer finishes on the 6th beep, soft reset the game.
Then, get all the way up until the Yes/No box on the starter you intend to choose, and hover over Yes while you wait for the timer to count down. Pictured below

When the timer finishes counting down, hit A to start the battle with Poochyena.
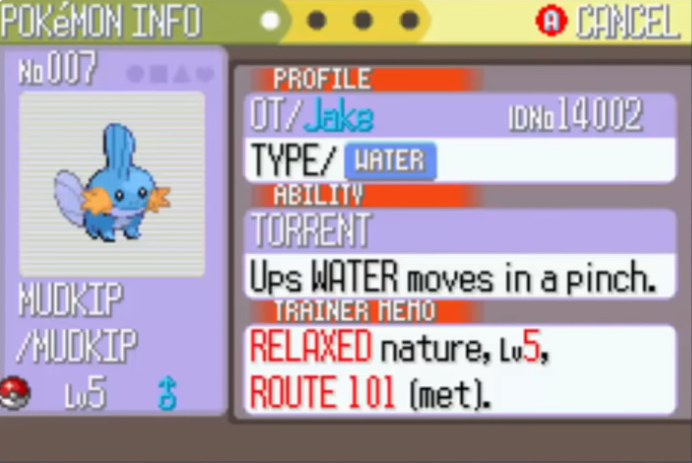
We can check the summary screen and see that we missed our target once again. Just like with the Trainer ID Manip, we are going to have to learn how to calibrate missing our target.
Starter Adjust
To figure out which Mudkip we hit, we’re going to have to figure out its IVs and use that to search.
First, though, let’s set up Calibration for a search.
We’ll leave Game, Console, Seed, Seed+/-, Offset, and Method alone, but we are going to change Minimum Advances. To be about 1000 advances before our target.
In my case, I am aiming for 7660. So I set it to 6660.
Then, set Shininess back to Any. All IVs should also be 0 to 31. Set Nature to what the starter you received had. In my case it’s Relaxed.
Once you select a Nature, the IV Calculator function will appear.
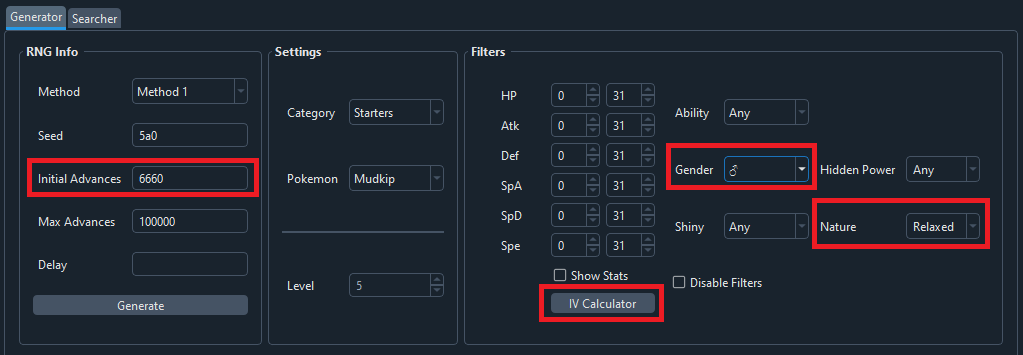
The IV Calculator looks for Level, then HP, Attack, Defense, Special Attack, Special Defense, and Speed. In that order. So enter the stats of your starter as they appear.
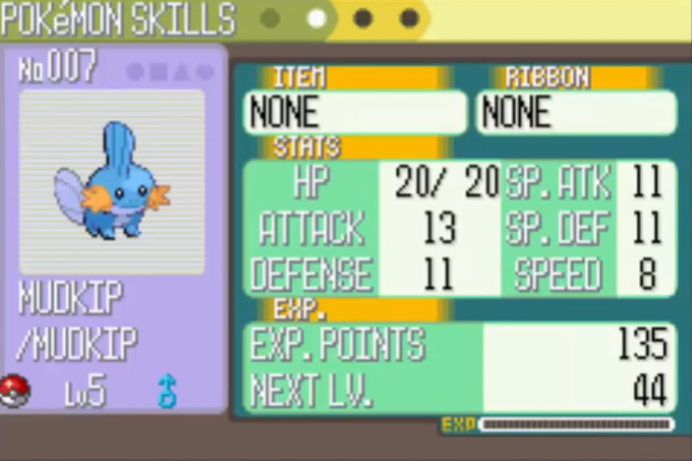
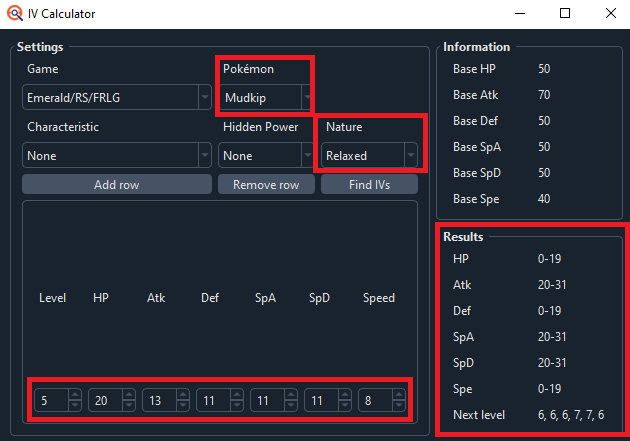
Once you finish entering them, the IV Filters in Calibration will be populated with a range of potential stats of your stater.
At this point, hit Submit. You will likely get a few different results, however, one should be much closer than the rest. In my example, 7662 is only 2 Advances away from my target. The next closest would be a whopping 5000 Advances away.
Despite each advance only being 1/60th of a second, that adds up to about 83 seconds. There is no way I could be over 1 minute late. So, by process of elimination, 7662 is where I landed.
Aside from just distance, you can also use Gender to determine where you landed. You'll notice the Mudkip I have is Male, and so is the target I received according to Ten Lines.
Now we need to update Eon Timer. In the Frame Hit box, put the Advance that you determined you landed on, and click update. The calibration will change, and you can try again.
Now repeat the process from Starter Manip until you get your desired Pokémon.
If you find yourself dancing around your target, being 1 or 2 advances late or early repeatedly– that’s okay. The timing is strict, do not worry about it. Just keep practicing and you will eventually succeed.
Next Steps
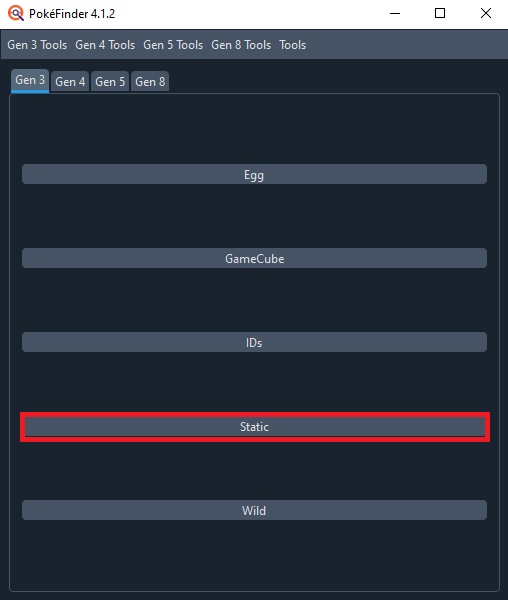
If you enjoyed this process and want to do more RNG Manips, I would suggest moving on to Static RNG. It is the same type of RNG Manip as the Starter Pokémon, but with a couple of different targets available to choose from.
Alternatively, if you want to jump straight into doing some Wild Pokémon RNG, that’s a feasible path as well. It is slightly more difficult to determine where you land during this manip, but the timing is not any more difficult.
Get the Pokemon you wanted? Consider supporting us on Ko-fi & keep us ad free!