R/S Static Encounter Manip
Overview
After setting up your Trainer ID and Secret ID and successfully RNG Manipping your Starter Pokémon, Manipping a Static encounter is the next logical step. This is, largely, the same process as the Starter Pokémon, but with more variety in situations and circumstances.
This pool of Pokémon includes all of the Legendary Pokémon and
various overworld encounters, like Kecleon or Electrode.
NOTE: This guide will NOT INCLUDE ROAMING Latios & Latias. They will have
a separate guide in the Intermediate section for them.
Recommended Setup
Hardware Requirements
-
Pokémon Ruby or Sapphire with a Dead Internal Battery (any language)
GameBoy Advance, Gameboy Player, Nintendo DS / DS Lite, GBA Emulator, or Pokémon Box Ruby & Sapphire. -
Windows 10/11 PC
In-Game Requirements
-
Save at the location directly in-front of whichever Pokémon you wish to capture or receive.
-
At least one free space in your party.
-
Pokeballs to capture it, if it's a capture.
-
Pokémon to aid in capture, such as a false swipe user or a spore user.
-
5-10 Rare Candies. (Not 100% Needed, but helpful).
Tools Used
Video Examples
The Guide
Pick your target
The first thing we have to do is pick our target Pokémon. Open the Ten Lines website, and select the Calibration tab.
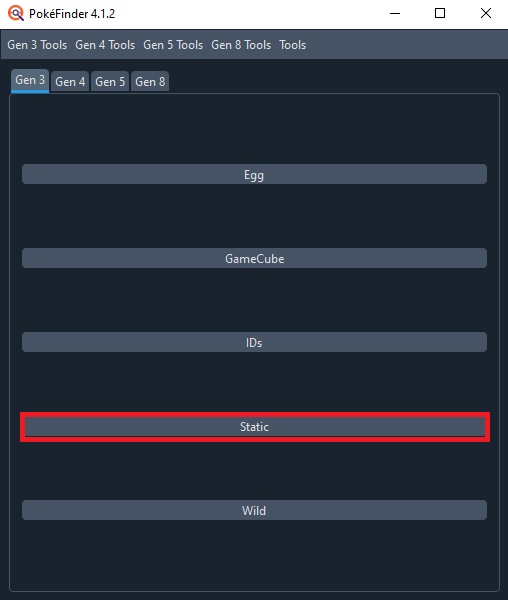
You will be on a new tab. Here, we've got some settings to fill out.
For Game, select Ruby Painting Seed or Sapphire Painting Seed, whichever you're playing. Painting Seed refers to a more difficult technique, that will be covered in Advanced, but I will cover how to use this website without doing that.
For Console, select whichever you're playing on. I am on a Nintendo DS for this tutorial, but the process is the same across all systems.
For Target Seed we'll put 5A0, this is the default seed for Ruby & Sapphire with a Dead Battery.
Seed+- & Offset should be set to 0.
Leave Minimum Advances alone, but change Maximum Advances to 100,000.
Input your Trainer ID & Secret ID into their respective fields. If you don't have yours, I covered how to manip it here.

Note: What is Offset?
Offset, sometimes called Delay, in Ruby, Sapphire, Emerald, Fire Red, and Leaf Green is how many RNG Advances occur after you press A to encounter or receive your Pokémon, but before the Pokémon is generated.
In the past, we would consult a list that told you what this value was
for various encounters. We no longer do this, and no guide here will
reference such lists. This is for two main reasons.
- Attempting to hit your target Pokémon, missing it, and calibrating your miss is an integral part of the RNG Process. Figuring out a specific legendaries Offset will only take one of these. Because we teach RNGing this way, Offset no longer serves a purpose.
- Many people would refrain from performing certain manips if they did not know a Pokémon's Offset. Such hesitance is bad, we do not want people thinking they CANNOT do a manip without an arbitrary list somewhere, when they absolutely can.
In short, Offset is a social construct we as a community have moved past the need for.
Set Method to Static 1.
For Category & Pokemon, select whatever your target is. The categories are self explanatory.
In this example, I will be using Regirock, who is in the Legends Category.
However, I will provide info for every Static encounter in Ruby & Sapphire so you can apply it to your specific situation.
Select the IVs & Nature you'd like, and also select if you want a Shiny.
I will just be going for a simple Shiny.
Shiny is set to Star/Square, which will show every potential Shiny.
Star vs. Square doesn't matter in any game other than Sword & Shield,
but Pokémon transferred from Gen 3 up to those games will retain their
Star/Square Shiny status.
For these Pokémon Shininess occurs on the same Advances as the
Starter Pokémon we RNG'd in the previous
guide.
Once all your fields are set, click Submit. You should get
several results, and have a window that looks like this:
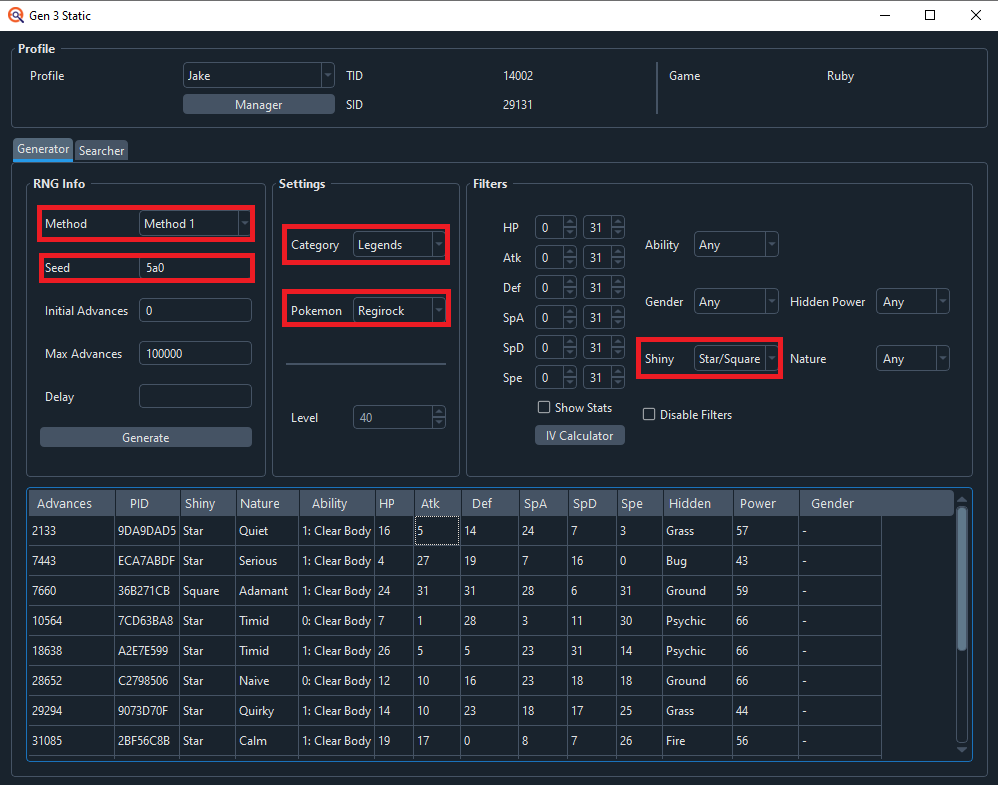
If you get no results, that means no Pokémon within 100,000 Advances exists, which is about a 26 minute period of time. There are ways to circumvent this issue, but they are difficult techniques covered in our Advanced section.
In the meantime, if you have no results, loosen your restrictions on what you want. Accept some worse IVs, or a Worse Nature, etc.
I will be aiming for 7660, the same as I did for the Starter
Pokémon. This is one of Ruby & Sapphires main benefits.
With a Dead Internal Battery, and the ability to RNG Manip your
Trainer ID and Secret
ID,
you can pick a very early Advance for your Shiny and hit it over
& over again on different Pokémon. This allows you to learn the basics
of RNG Manips through repetition, while getting a bunch of shinies!
Note: But, aren't all these Pokémon clones?
Many people discount / belittle this type of RNG Manip because it produces a lot of PID Clones and can produce True Clones as well. But, what are these things, what's the difference between them, and does it even matter?
A PID Clone is often described as RNG Manipping two different
species of Pokémon on the same RNG Advance. This means the two
Pokémon will have the same Nature, IVs, and Shiny Status,
for the most part.
A True Clone is RNG Manipping the same species of Pokémon on the
same RNG Advance. This means the two Pokémon Nature, IVs,
Ability, Gender, and Shiny Status, for the most part.
While rare, sometimes a Pokémon the same RNG Advance will spawn
with a different Method. This keeps the Pokémons PIDs the same,
but their IVs will be different. Is this a clone? Are the other ones
clones? Does it even matter?
Well, that's entirely personal. Not only is it possible for this to
happen entirely naturally, it's actually very likely to. If you're
playing without Manips on Emerald or Dead Battery Ruby &
Sapphire, the game's RNG is not functioning properly anyway. You
can and will hit the same RNG Advance, randomly, without knowing
it.
No Official legality checks have ever cared about these types of
"clones", and neither has anything in-game. So they are all 100% safe to
transfer.
I have had a lot of fun playing the game this way, doing many shiny only
nuzlockes or playthroughs. But, if you find this gets stale, do not
worry, late into the Intermediate and Advanced guide sections,
we will be covering ways around this.*
With our target picked out, we can move onto the Static Manip!
Static Manip
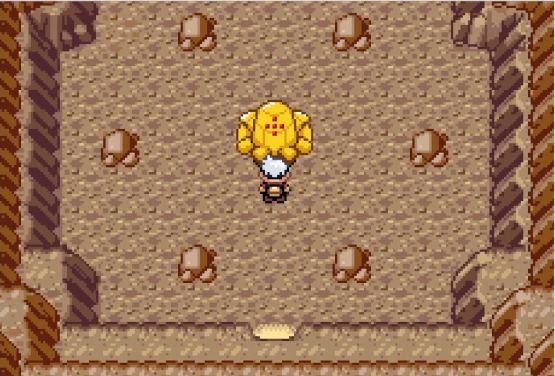
To get started with the Static Manip, you want to save in-front of whichever Pokémon you want to receive. Here I am in front Regirock.
Note: Castform, Kyogre, Groudon, Lileep, & Anorith
These five Pokémon have slightly unique save positions and requirements than the rest of the Static encounters.
Castform: Castform is given to you after you defeat Team Aqua or
Magma in the Weather Institute, directly after a battle. Make sure to
enter this battle with a party of 6 Pokémon, that way, after the battle,
the Scientist who gives Castform to you will not do so because your
party is full. We want to do this so we can receive Castform later,
without the battle interfering with the RNG Manip. Once you do this,
return to the Scientist with a party of 5 Pokémon and save in-front of
him to perform the Manip.
Kyogre & Groudon: These Legendaries have text which is triggered by
a Step Forward rather than an A Press. Save one step away from
this tile.
Lileep & Anorith: The two fossils are generated when you receive
them from the Scientist, not when you give them to him. So first you
must give him your fossil, then walk out of the building so he finishes
reviving them, and walk back to him and save the game.
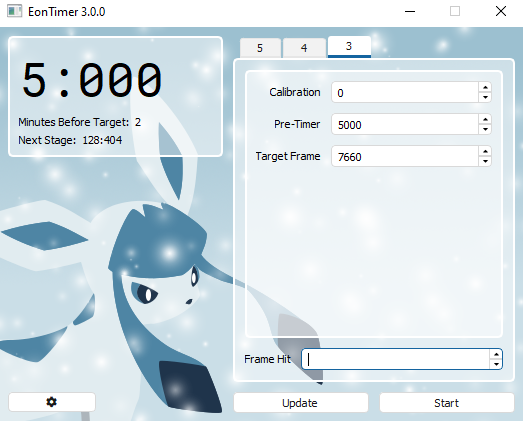
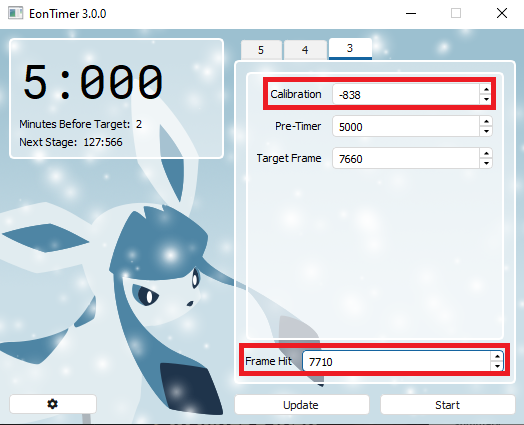
Then, in Eon Timer, put the number from the Advances Column into the Target Frame box in EonTimer. In my case, it is 7660. Also, make sure the value in Calibration is 0.
For every type of Manip, the amount of calibration will be different, because the game delays generating whatever you're manipping differently, based on what it's generating.Your Eon Timer should look something like this, but with your target advance instead.
Pretimer is optional.
When set to 0, clicking Start on EonTimer will immediately start the countdown to your target Advance. This requires you to soft reset your game at the same time as clicking Start on Eon Timer.
Setting this to 5000 will create a 5 second countdown, which you will soft reset the game to, then the countdown for your Target Advance Begins. I'll be using this method for the remainder of the guide.
You should also click the gear icon, and make sure your console setting is correct. regular GBA and GBA Games on the DS have slightly different frame rates.
GBA: 59.7275 fps
NDS - Slot 2: 59.6555 fps
Having it set incorrectly will make longer timers inconsistent relative to the actual game. If you’re playing on unofficial hardware or emulator, stick with GBA as this is usually the default.
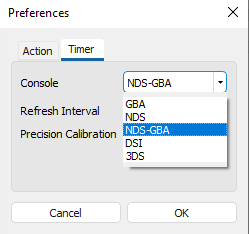
You don’t need to touch Refresh Interval or Precision Calibration. Now it’s time to attempt the manip.
We are almost ready to begin. You need to know two more things.
-
WHEN to press A to encounter the Pokémon. Usually it's the final text box before receipt / encounter.
-
IF there is text at all.
Here is a list so you can be certain of when to Press A, and if there is text.
List: Final A Press Locations
-
Treecko: Do you choose this POKéMON? YES/NO
-
Torchic: Do you choose this POKéMON? YES/NO
-
Mudkip: Do you choose this POKéMON? YES/NO
-
Lileep: The fossil was an ancient POKéMON. LILEEP, it was!
-
Anorith: The fossil was an ancient POKéMON. ANORITH, it was!
-
Castform: It might be an odd way of thanking you, but take this POKéMON.
-
Wynaut (Egg): Good! I hope you'll walk plenty with this here EGG!
-
Beldum: Take the POKé BALL? YES/NO
-
Kecleon: The startled POKéMON attacked!
-
Voltorb: Press A in front of it
-
Electrode: Press A in front of it
-
Regirock: Press A in front of it
-
Regice: Press A in front of it
-
Registeel: Press A in front of it
-
Latias (Southern Island): Press A in front of it
-
Latios (Southern Island): Press A in front of it
-
Kyogre: XXX's BLUE ORB suddenly began glowing!
-
Groudon: XXX's RED ORB suddenly began glowing!
-
Rayquaza: Press A in front of it
List compiled by ZSpica
If the Pokémon you are aiming for says Press A in front of it, click the "No Text Box" Tab.
At this point, we're ready! Click Start Eon Timer, and when the pretimer finishes on the 6th beep, soft reset the game.
If your Pokémon HAS text boxes in the list above, talk to whatever NPC / Encounter you're in and get to the final box of dialogue. Then, wait there until Eon Timer finishes counting down. Pictured Below is what waiting for Groudon looks like:

Then, when Eontimer gets near the end of its countdown, it will beep 6 times. The goal is to press A on the 6th beep to start the encounter.
At this point, we're ready! Click Start Eon Timer, and when the pretimer finishes on the 6th beep, soft reset the game.
If your Pokémon DOES NOT have dialogue, press Start to bring up the Menu. This will freeze any NPCs nearby, who may cause extra unwanted RNG Advancements. Dialogue boxes do this naturally, so those Static Pokémon do not need this extra step. Pictured below is how I wait for Regirock.
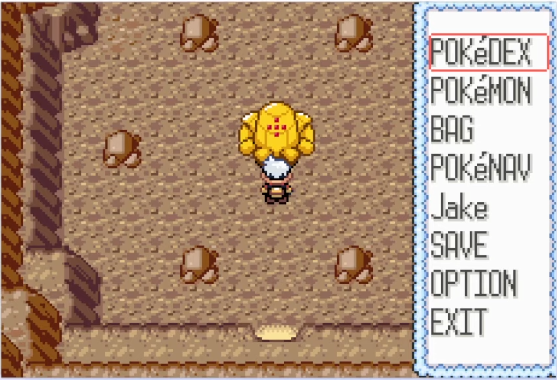
Then, when Eontimer gets near the end of its countdown, it will beep 6 times. On the 3rd beep Press B to Close the Menu, and on the 6th beep, when the timer finishes, Press A to start the encounter.
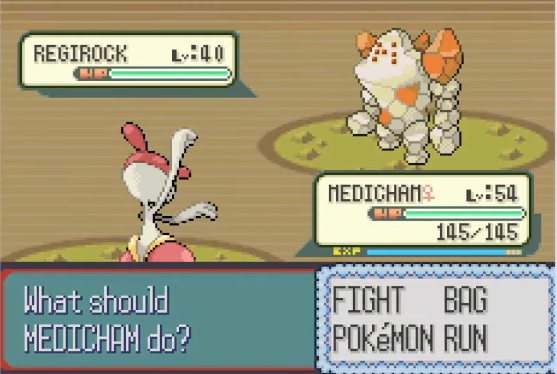
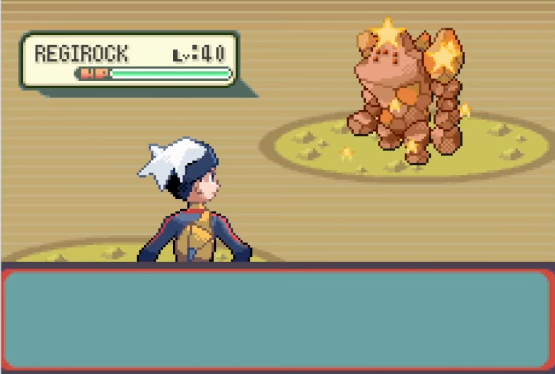
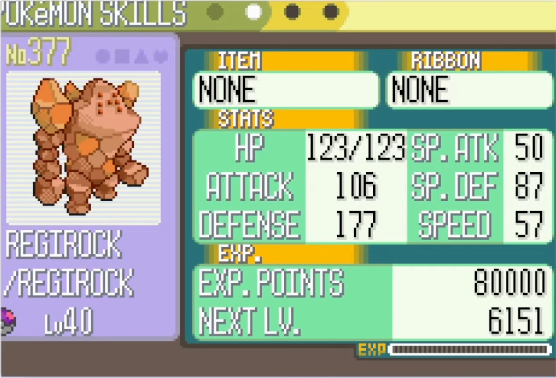
And we can see it's not shiny like I wanted. It's likely you also missed your target. We're going to have to check the Pokémons summary screen to figure out what RNG Advance we landed on. To do that, we'll have to catch it if it's an encounter.
It's worth mentioning, if you are aiming for a Shiny and didn't get one, just use the Masterball for a catch if you have it. You will not be keeping the Pokémon, so it just speeds the process up.
Once you can view the Pokémons summary screen, we can move onto how to adjust.
Static Adjustment
To figure out which Advance we hit, we're going to have to figure out its IVs and use that to search.
First, though, let's set up Calibration for a search.
We’ll leave Game, Console, Seed, Seed+/-, Offset, and Method alone, but we are going to change Minimum Advances. To be about 1000 advances before our target.
In my case, I am aiming for 7660. So I set it to 6660.
Also set Max Advances to 1000 above your target. In my case, this would be 8660
This will generate Pokémon spreads from 1000 Advances before your target, and 1000 after it.
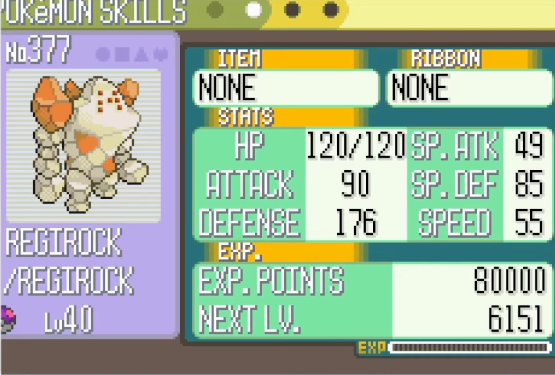
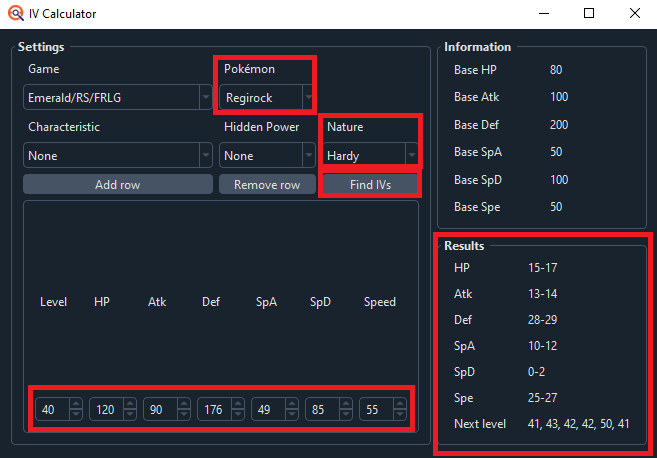
Then, set Shininess back to Any. All IVs should also be 0 to 31. Set Nature to what the Pokemon you received had. In my case it's a Hardy Regirock, who has no Gender.
Once you select a Nature, the IV Calculator function will appear.
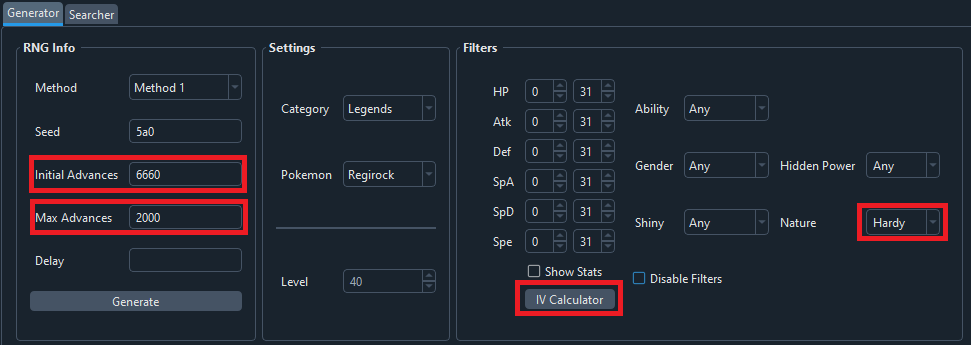
The IV Calculator wants you to input your Pokemons level, then stats. If it is highlighted red at all, that means you've made a typo or forgot to enter something.
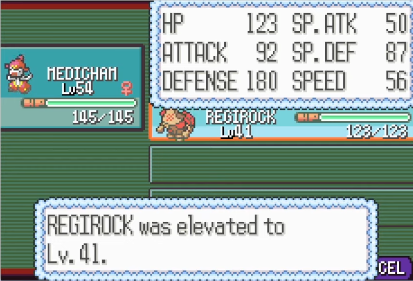
If you have Rare Candies to raise the Pokémon's level, we can make the
IV Ranges even more Precise. We aren't keeping this Pokémon, so it's
safe to use them to gain info. They will come back when we soft reset!
To account for the extra level, click the Enter/Return button on your keyboard, and a new
row to enter the information for your Pokemons next level will appear.
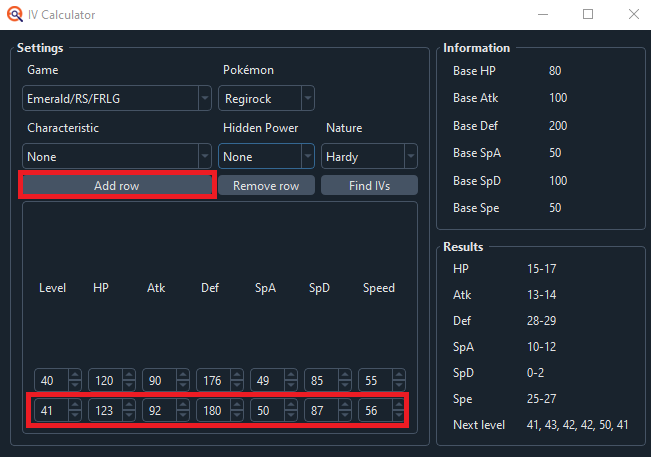
Once you finish entering them, the IV Filters in Calibration will be populated with a range of potential stats of your Pokemon.
At this point, hit Submit. You should only get one result. If you get more than that, you can narrow down the results further by doing more levels in the IV Calculator.
If you do not have ANY rare candies and have more than one result, it's generally fine to assume you hit the closest Advance to your target. In my case, I only got one possibility near me.
If you have no results at all, expand your search range by decreasing Initial Advances by 1000, and increasing Maximum Advances by 1000, and click Submit again. Do this until you get at least 1 result.
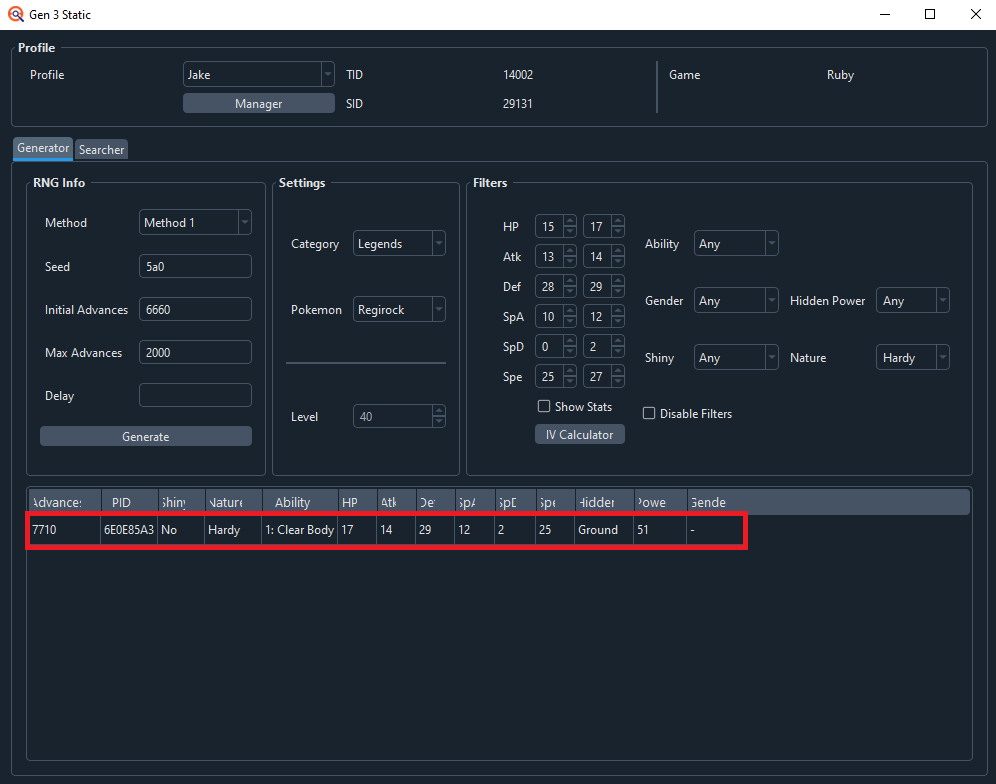
Now we need to update Eon Timer. In the Frame Hit box, put the Advance that you determined you landed on, and click update. The calibration will change, and you can try again.
Now repeat the process from Static Manip until you get your desired Pokémon.
Eventually, with enough attempts, you will land on the Pokémon you are aiming for. The Regirock for this guide took me 3 attempts, including the first adjustment run.
Note: Some tips!
If on the attempt after your adjustment run, you find you're only one or two Advances off, try not adjusting. 1 Advance is only 16 milliseconds, well within the margin of human error.
Alternatively, if you find yourself dancing around it, consistently being 1 Advance early or late several times, try adjusting anyway. Sometimes breaking out of the cycle, even if it makes you more late or early, can help!
Lastly, have patience! This is a skill to hone, maybe it takes you 10, 15 tries now. But a couple weeks from now, maybe 5! Hope you're having fun!
Next Steps...
If you enjoyed this process and want to do more RNG Manips, I would suggest moving on to Wild RNG. While the general process and structure of the manip (Wait for timer, push button at right time) is not different, finding what Advance you landed on is slightly more challenging. Once you have Wild RNG Mastered, you'll be able to take on some more advanced manip challenges.
Get the Pokemon you wanted? Consider supporting us on Ko-fi & keep us ad free!