FR/LG Wild Encounter Manip
Overview
This guide will cover beginner-level Wild RNG manipulation in FireRed and LeafGreen. The focus will be on acquiring Shiny Pokemon, without concern for competitive Natures or IVs.
Wild RNG requires the use of Sweet Scent, which causes a Wild Pokemon to immediately spawn. This works in tall grass, caves, or surfing on water.
In general, higher level areas will be easier for beginners. Low-level Pokemon will produce many duplicate search results, making it more difficult to identify the seed and advance hit. However, any area in the game that spawns Wild encounters is usable.
We will be going for Shiny Mankey on Route 4, which is a rare spawn that can be level 10 or 12.
You must know your Secret ID to find viable targets, which would be done during the Shiny Starter RNG process. If you are on a completed save and DO NOT know your Secret ID, there are methods to deduce it using a previously caught Shiny, using glitches to read it from a Pokemon, or view it via extracting Save Data and using a tool like PkHex.
Recommended Setup
Hardware Requirements
-
Pokemon Fire Red/Leaf Green (any language)
-
GameBoy Advance, Nintendo DS or DS Lite, Nintendo 3DS w/ open_agb_firm
-
Windows / Mac OS / Ubuntu PC
In-game Requirements
- Save in the grass/cave/water where target Pokemon appears.
-
Any Pokemon with the move Sweet Scent.
-
At least one free space in your party.
- Pokeballs to capture it, if it's a capture.
-
Pokémon to aid in capture, such as a false swipe user or a spore user.
-
Master Ball (optional, but recommended for quick capture/stat calculation)
- At least one Rare Candy (5+ is helpful, but not required)
List: Earliest available Sweet Scent users in FireRed & LeafGreen
-
Bulbasaur: Chosen as Starter
a. Learns Sweet Scent at Level 25
b. Don't evolve to Ivysaur, who learns at Level 29
-
Oddish: First Available at Route 24 (FireRed Only)
a. Caught at Level 12-14
b. Learns Sweet Scent at Level 7
-
Bellsprout: First Available at Route 24 (LeafGreen Only)
a. Caught at Level 12-14
b. Learns Sweet Scent at Level 30
c. Don't evolve to Weepinbel, who learns at Level 33
Tools Used
Video Examples
The Guide
Finding a Shiny Target
To get started, open Lincoln's Ten Lines Calibration here
Select your Game, and then leave the Sound, L, A, and Held Button settings on the default values of Mono, L=A, A, and None. Make sure to select your System, as the boot-up times and frame-rates are slightly different based on the console, and the tool accounts for those.
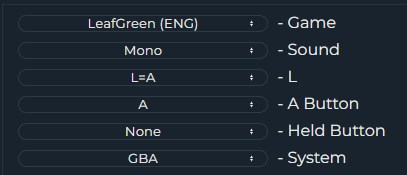
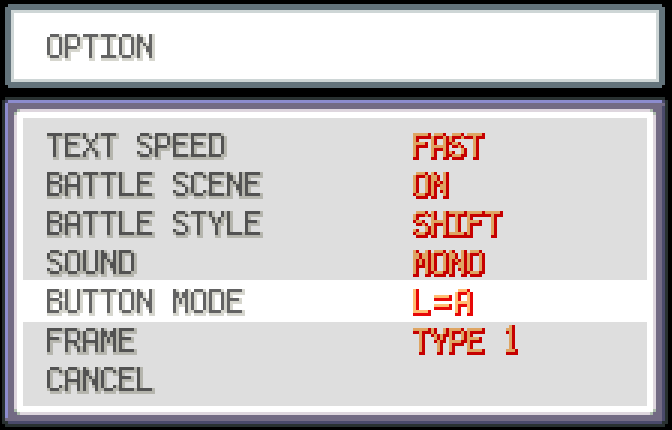
Open the settings in-game, and change Sound and Button Mode to match these settings in the tool.
Make sure to SAVE after confirming these settings!
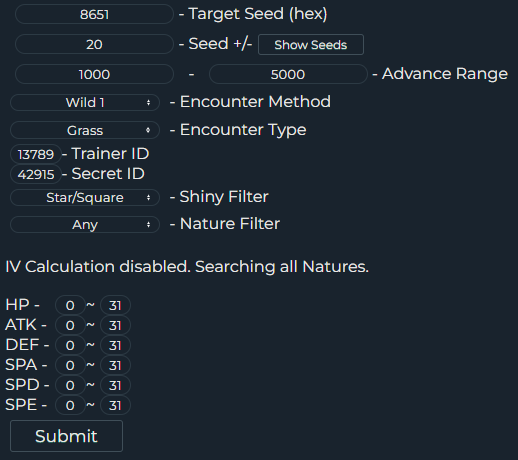
Leave the default Target Seed (hex) and Seed +\-.
Set Advance Range to 1000 to 5000. This means your maximum wait time will be ~2 minutes.
Enter your Trainer ID and Secret ID.
Set Method to Wild 1.
Set Category to Grass if the target is found in grass/cave. Surfing if the target is in water.
Select your Location and the target Pokemon.
Select Star/Square from the Shiny Filter. This will filter to all possible Shiny targets.
Square Shiny is only relevant if sending to Sword/Shield, but the option is there.
Set Nature Filter to Any. (OPTIONAL: Select a desired Nature)
Once these settings are correct, click Submit to search for all the potential Shiny Pokemon you could attempt to RNG.
NOTE: Your Browser might freeze momentarily while calculating, just wait. If anything pops up click "Wait" or "Continue".

When the search is complete, there should be a table of potential Shiny Seeds and Advances.
The Slot column in the results will show potential Shiny targets for all available Pokemon in the selected location. You can check the Filter box to only show the target species.
Our target will be Mankey on Route 4.

There might not be any Shiny results that match target Pokemon
you're searching for, especially for the rare encounters on the route.
| Encounter Slot | Rarity | Encounter Slot | Rarity |
|---|---|---|---|
| Slot 0 | 20% | Slot 6 | 5% |
| Slot 1 | 20% | Slot 7 | 5% |
| Slot 2 | 10% | Slot 8 | 4% |
| Slot 3 | 10% | Slot 9 | 4% |
| Slot 4 | 10% | Slot 10 | 1% |
| Slot 5 | 10% | Slot 11 | 1% |
In this case, increase maximum wait time on the Title Screen) OR alter the settings above to a different SOUND or BUTTON MODE, and Submit the search again**. Remember to update those settings in-game as well!**
NOTE: Changing 'A Button' or 'Held Button' in G3 Calibration
For general purposes, changing only SOUND or BUTTON MODE should provide a sufficient variety of Shiny targets. However, if using particularly strict Nature or IV filters and receiving no results, you can change "A Button" and "Held Button" to check even more seeds.
"A Button" refers to the final A press on the Title Screen. This can be
changed to either START or L (L=A).
START would mean pressing and holding START on the Title Screen
instead of the A Button.
L (L=A) only works when BUTTON MODE is L=A, and means pressing and
holding L on the Title Screen.
"Held Button" refers to optional buttons that can be held during the
boot-up sequence and intro cutscene.
For beginners, STARTUP SELECT is the only option that requires no
special timing.
START UP A and the BLACKOUT Held Buttons will be covered in an
ADVANCED guide.
STARTUP SELECT means holding SELECT before booting the game, and
holding it until the File Load screen appears. You must continue holding
it, even while doing your final button press & hold on the Title
Screen.
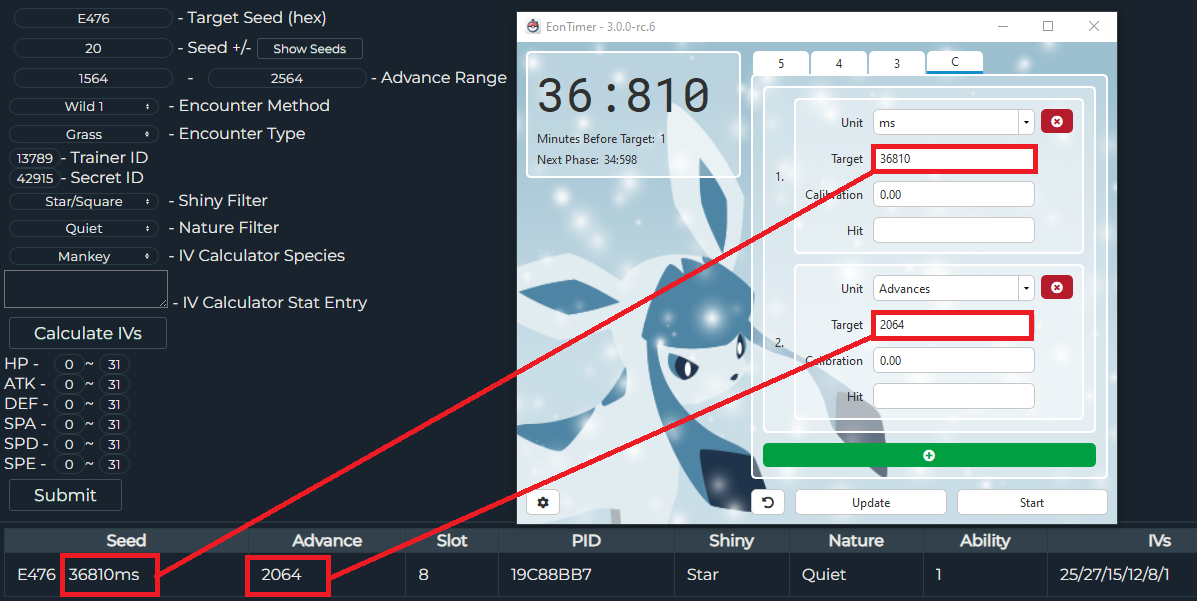
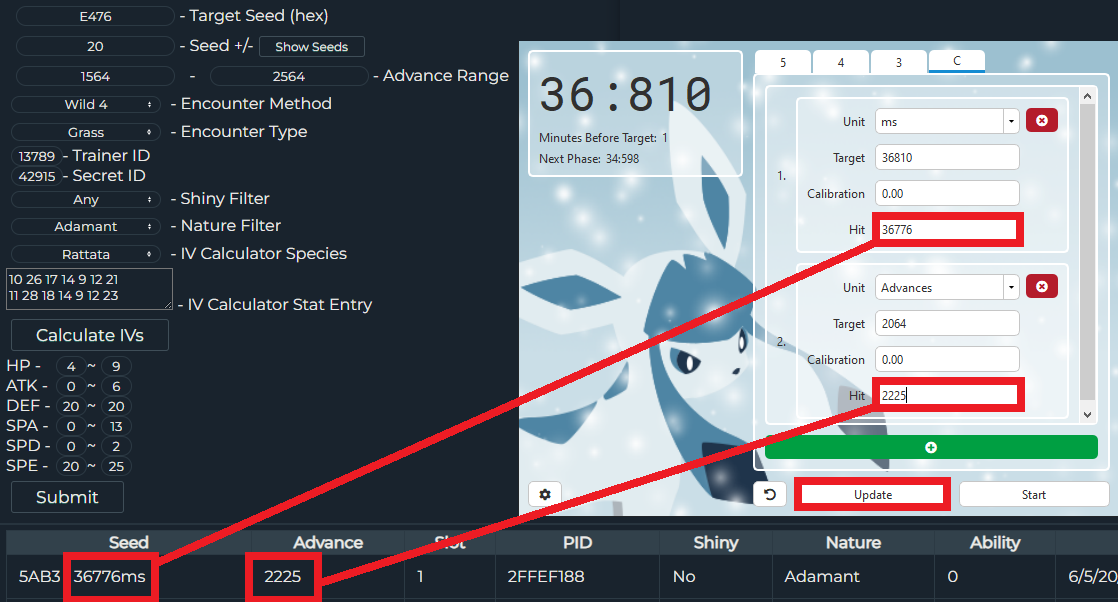
Once you've chosen your desired target Shiny, change the Target Seed (hex) to match the Seed, and update the Advance Range to 500 advances above and below your target.
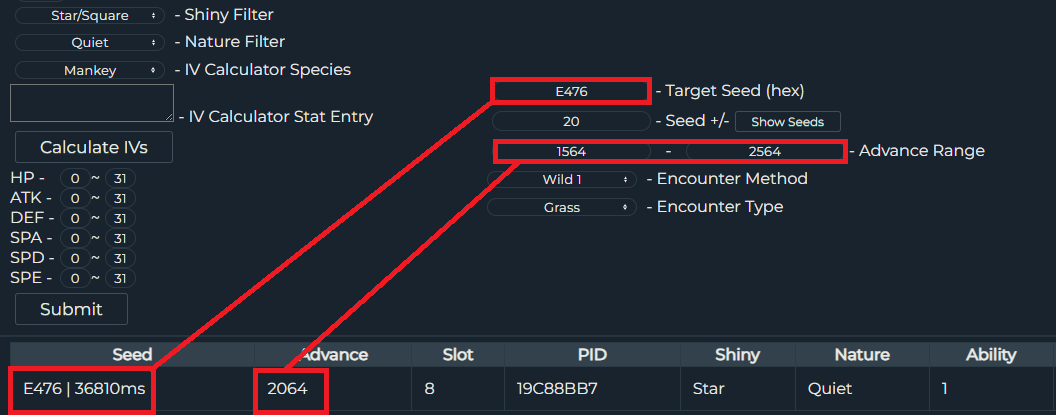
In our example, Mankey is Encounter Slot 8 or 10 and a Quiet Shiny was found on seed E476 and Advance 2064. Which means the Advance Range becomes 1564 to 2564.
Now we update EonTimer for this target as well.
Timer Setup
Open EonTimer 3.0.0-RC6, and switch over to the Custom Tab (C).
Click the (+) button at the bottom, and add two timer sections.
Make the Unit of the first timer ms, and the second timer Advances.
Enter the ms value from the Seed into the first Target box.
Enter the Advances value of the Shiny into the second Target box.
Then click the gear icon in the bottom left, and make sure your
console setting is correct.
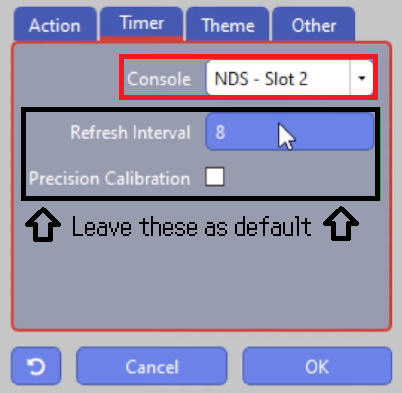
GBA and NDS-GBA have slightly different frame rates.
GBA: 59.7275 fps
NDS-GBA: 59.6555 fps
Having it set incorrectly will make longer timers inconsistent relative to the actual game.
If playing on 3DS using open_agb_firm, you would also select NDS - Slot 2.
The tools are now set up for...
The First Attempt
In-game get your character to the correct position so you can immediately use Sweet Scent to start the Wild encounter.
Open your in-game settings and double check that they match the SOUND and BUTTON MODE settings for the target Seed at the top of G3 Calibration.
Save your game, and then Power Off the system.
The startup sequence is slightly different depending on the console being used.
Reference the following Boot method for your system of choice.
Boot Methods
NDS: Press A on "Start GBA Game" from the DS Home Screen
OFFICIAL GAMEBOY PLAYER: Press the "Change Game Pak" button, and
confirm to Hard Reset
3DS OPEN_AGB_FIRM: Press A to boot the Fire Red/Leaf Green ROM file
GAMEBOY INTERFACE (GBI): Hold and Release the RESET button, or use
Hard Reset Button Combo
(Note: GBI boot times and frame-rate are identical to real GBA, so use
GBA in the system selector)
GBA: Flick the Power Switch
GBA users might find this difficult. In this case, you can add a 3rd
section to EonTimer's Custom tab at the top, and set it to 5000ms. This
creates what we call a pre-timer that will count down 5 seconds,
ending in 6 beeps before the actual seed timer starts. Using a pre-timer
allows you to time your power-switch flip with the 6th beep, removing
the need to coordinate a switch-flip and button press.
The general flow of each attempt is as follows:
1. Boot the game and click Start on EonTimer at the same time.
2. Wait for the ENTIRE Introduction to play, DO NOT PRESS ANY BUTTONS or SKIP. Your first timer should be long enough to make it to the Title Screen.
3. When the timer is close to completion, you will hear the 1st of 6 beeps.
4. ON THE 6TH BEEP, PRESS and HOLD the A Button.
5. Once the File Load screen appears, you can release all buttons and press A to load your save.
6. Mash B to skip past any "Previously on..." screens.
7a. Press START to open the menu, go into POKEMON, and then hover over SWEET SCENT
8. When the second timer is close to completion, you will hear the 1st of 6 beeps.
9. ON THE 6TH BEEP PRESS A to use SWEET SCENT.
Note: How do seeds work?
Seeds in FireRed and LeafGreen are determined by an ultra-fast timer in the GBA's CPU called Timer1.
Traditional soft resetting using A + B + START + SELECT does not work,
because the starting value of Timer1 is only consistent from a hard boot
of the game-- which is identified by the presence of the GAMEBOY BIOS
screen.
Every input the user makes during the boot up sequence, as well as
the Sound and Button Mode settings in the save file, have an effect on
Timer1 and therefore, the initial seeding process.
For this reason, it's important to not press any buttons or skip the
intro cutscene, until the final button press at the Title Screen. The
seed is set while the game transitions from the Title Screen to the File
Load screen.
Reducing this process to only providing a single input after a specific
amount of time, bypasses all the potential interference with Timer1 and
allows the player to consistently hit the same seeds.
This is possible because even though Timer1 is MUCH faster than 60fps,
the game only checks for button inputs every frame. The seeds were
tested and recorded using an automated bot that performs the button
input frame perfectly, after a set number of milliseconds.
Clicking the "Show Seeds" button will display a list of all the Seeds
the program is currently using for its search. The "Target Seed" should
appear in the middle of the list, and the seeds around it are in
sequential order based on the millisecond value the bot was programmed
to use.
The final ms value shown for each seed in the search results, is
automatically adjusted for the selected system based on hard coded
boot-time offsets, and the frame-rate of the chosen system.
Initial Calibration
If possible, it's generally a good idea to use a Master Ball for calibration purposes. This makes each attempt faster, by instantly acquiring the Pokemon to calculate stats. You will be resetting, so you'll always have the Master Ball for later. On final capture, use your PokeBall of choice.
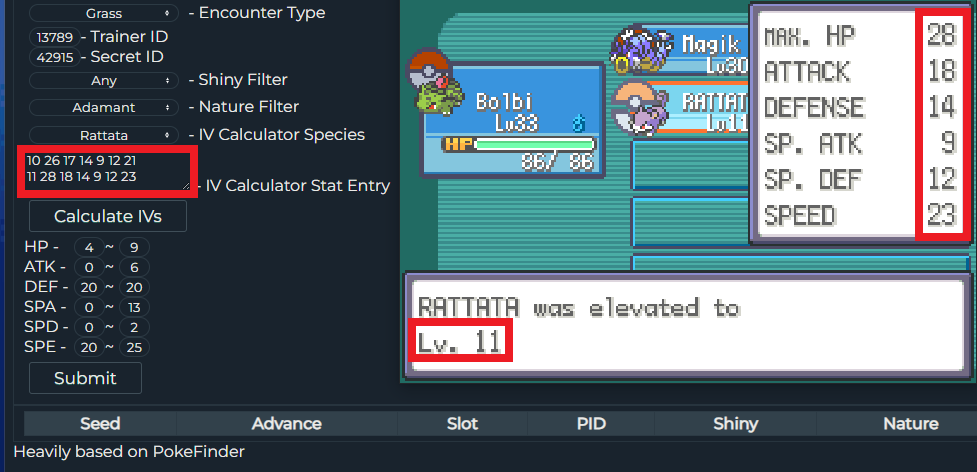
After catching, open the Pokemon's summary and look at the Nature and Stats.
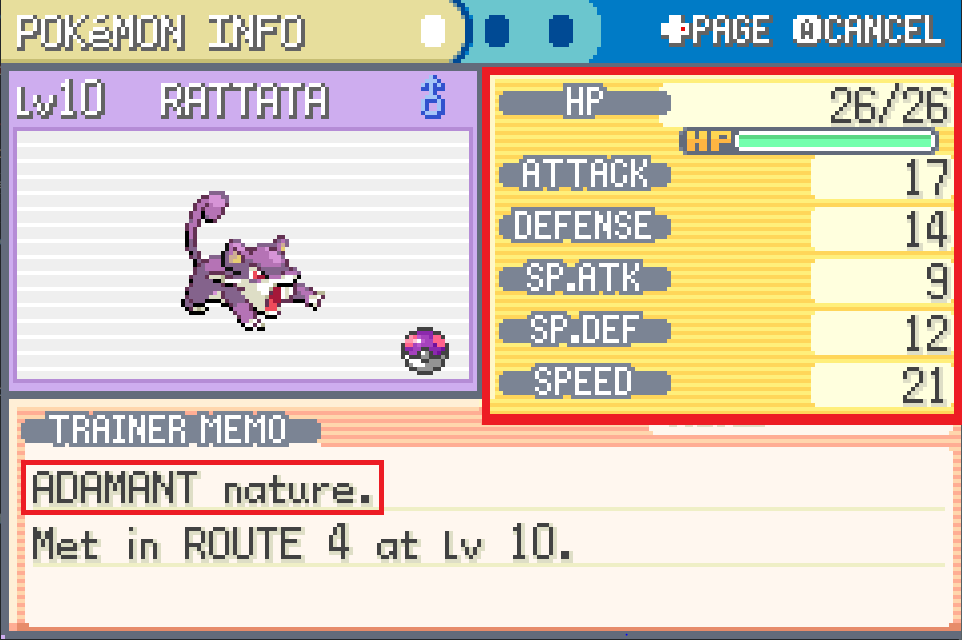
Open the Calibration tool, set Shiny back to Any,
select your caught Species, select the Nature and then enter Stats into
the IV Calculator in the following order: LEVEL HP ATK DEF SPA SPD
SPE

This should automatically populate the Stat ranges with the best guess
possible given the inputted data.
Clicking Submit will search for all the potential Pokemon this could be, and if the Pokemon is a low level you'll likely get many results.
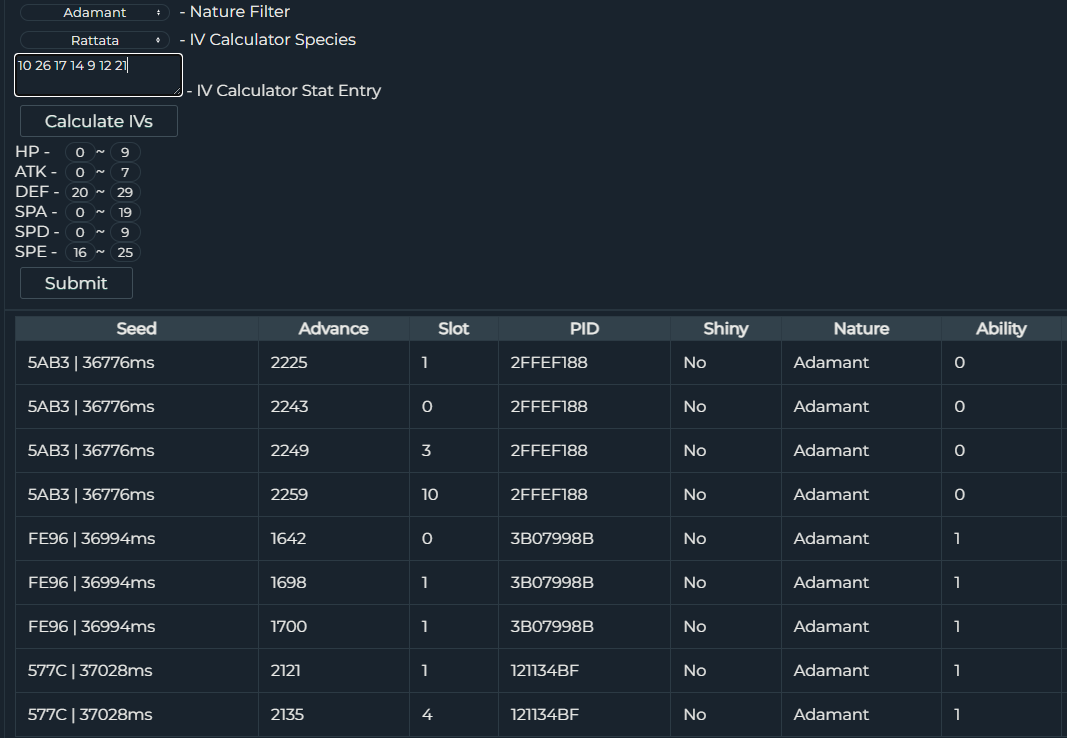
If there are too many results, we have to narrow down which Pokemon we
actually hit. In this case, using Rare Candy to level up and provide
more stats for the calculator to use can reduce the results.
In our case, this actually caused the search to yield no results.
However, this is expected sometimes, because Wild Pokemon in FireRed and
LeafGreen can be generated using different Encounter Methods.
Note: What are Methods?
Methods result in different sets of IVs for a Pokemon, from the same RNG Advance. However, they have the same PID, which means they will still be Shiny and have the same Nature.
Which Method you get on a Wild Pokemon is out of the player's control
in FireRed and LeafGreen. Method 1 is the most common, but it's
possible to hit Method 2 or Method 4 instead-- so it's
important to check all three for Wild RNG manipulation.
This setting can be changed in the Encounter Method dropdown in the tool. Every time we search for which Pokemon we hit, it's important to check All Wild Methods.
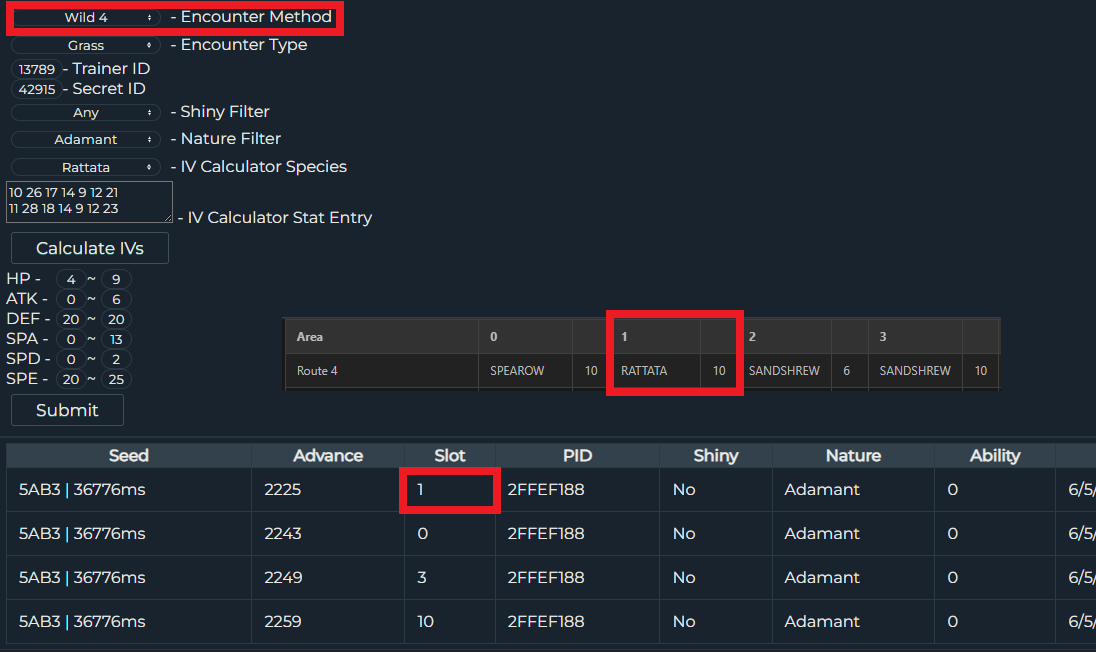
This allows us to find our Level 10 Rattata on Encounter Method Wild 4.
If you get NO results on ANY METHOD, then increase Advance Range to 1000 advances above and below target, and increase Seed +/- to 50. Increase levels with Rare Candy as necessary. If this still yields no results, there was an error in the attempt and you must check all your settings and try again. Double check in-game settings match the settings in the Calibration tool, and that the timers match your target seed/advance.
Now that Rattata has been confirmed, we can enter the millisecond and Advance values from the result that matches our Encounter Slot into EonTimer and then click Update.
The values in Calibration should update accordingly, and you can now
turn off your game and begin a second attempt.
Attempts & Adjustment
Repeat the same steps of:
-
Performing the startup sequence with EonTimer
-
Capturing the Pokemon
-
Entering Stats, Checking Methods, and Leveling Up as needed to reach a single search result
-
Inputting the Seed ms, and Advance into EonTimer and clicking Update
My next attempt was this Level 6 Sandshrew.
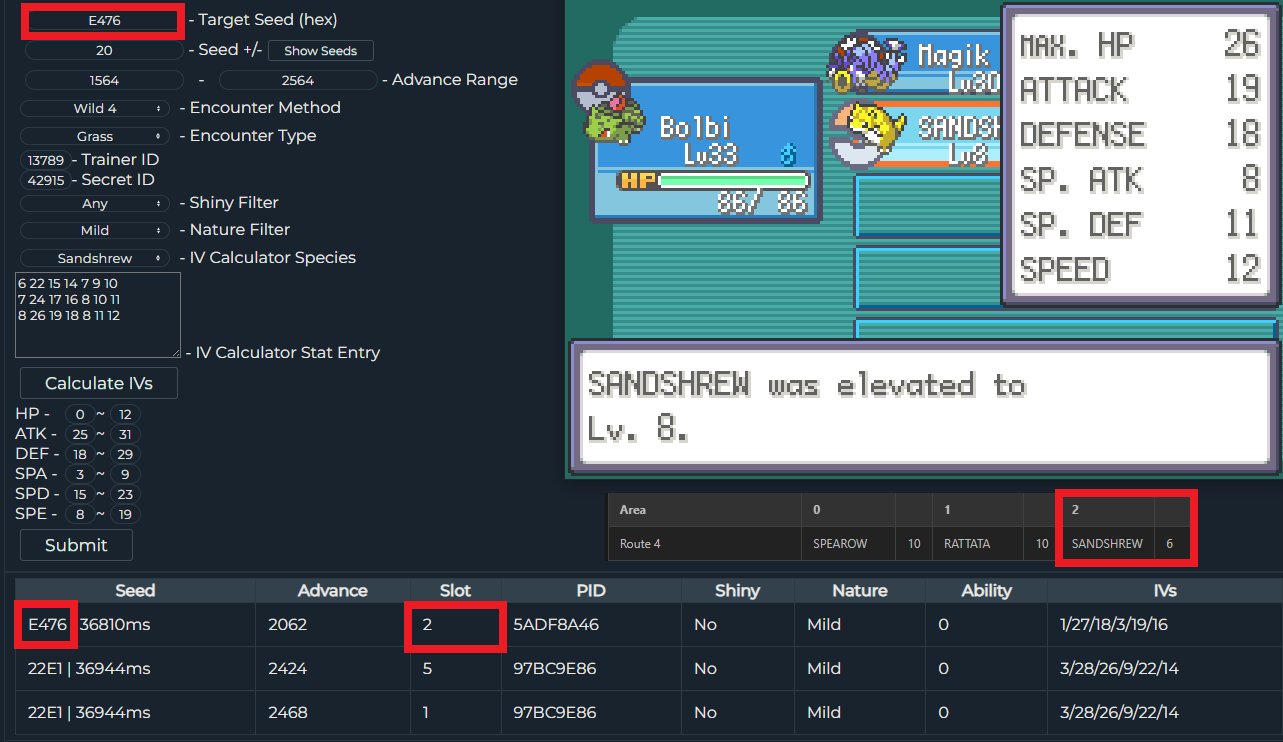
This was my second attempt, and I hit my target seed of E476 and was only 2
advances early.
Once your calibration is within the range of +/- 50ms for the Seed, and +/- 3 for Advances you can confidently narrow the search range in Calibration to speed up attempts.
Lower Seed +/- to 10 and Advance Range to 20 advances below and above your target.

With this smaller search range, you should be able to get a single result after only inputting the stats of the Pokemon. If you still get two or more results, use Rare Candy and Encounter Slots to narrow it down again.
At this point, you must repeat attempts until you successfully hit your Target Seed and Advance.
This requires two frame perfect inputs, so it can be difficult.
Only Update the calibration of EonTimer, if you notice you are consistently hitting early or late over multiple attempts. The optimal Calibration will have you landing sometimes early, sometimes late.
Now it's a matter of overcoming human error to succeed.
Eventually, you will hit your Shiny!

One of the nicest things about successfully doing a Wild RNG manipulation, is that other Routes will have the same Shiny Advances as your current calibration. This means, you can keep EonTimer setup exactly as it was for your first Wild RNG, but use Sweet Scent in different locations. You'll get the same Shiny but with whatever species lines up with your target Encounter Slot for the route!
Next Steps...
Congratulations! You've finished all the Beginner RNG Manips for Fire Red & Leaf Green! At this point, I reccomend continuing onto some more advanced Manips in the Intermediate or Advanced sections.
Intermediate will contain a lot of familiar techniques showcased here, but with various different challenges. Things like Roamer, Fishing, and The Safari Zone are all more challenging than these manips, while still being "Press A at Right Moment". It's other things that complicate them.
Advanced will contain extremely challenging manips, for those who want to go the extra mile to gain Perfect IV Shiny Pokemon / Very Rare Pokemon.
Get the Pokemon you wanted? Consider supporting us on Ko-fi & keep us ad free!