FR/LG Perfect IV Static Manip
Overview
This guide will fully explain the process for RNG manipulating a competitive static Pokemon in FireRed and LeafGreen. This means controlling for a specific Nature, at least 5 perfect IVs, and Hidden Power with a specific Type and the maximum Power of 70.
In Beginner and Intermediate, the focus was only on finding easy-to-hit Shiny Pokemon without concern of competitive stats or natures, but controlling for those variables requires Advanced usage of the tools and techniques covered up to this point.
It's assumed you already understand the basic principles of RNG manipulation in these games, and we'll be covering a variety of tools and techniques that expand the possibilities dramatically.
By the end, you'll have a complete understanding of how FireRed and LeafGreen seeding works, how we can leverage different inputs to change seeds, and how to to find and hit seeds that yield competitive Pokemon
It should be noted that whether or not a specific competitive target is Shiny, depends entirely on your own Trainer ID and Secret ID. Because of Gen 3's surprisingly limited selection of PID and IV combinations, it's entirely possible your Save File doesn't have ANY Shiny 5IV or 6IV Pokemon available via Static or Wild RNG.
In this case, glitches can be used to change your Secret ID to make any PID Shiny, but that's a topic for another guide. Obviously, obtaining a new Trainer ID and Secret ID via starting a new game or save-editing would be viable alternatives as well.
Ultimately, learning everything in this guide is the key to unlocking the full potential of RNG manipulation in FireRed and LeafGreen. With these tools and techniques at your disposal, it's possible to hit any Pokemon out of the 4.294 billion potential RNG states the game can generate.
Recommended Setup
Hardware Requirements:
-
Pokemon Fire Red/Leaf Green (any language)
-
GameBoy Advance, Nintendo DS or DS Lite, Nintendo 3DS w/ open_agb_firm
-
Windows / Mac OS / Ubuntu PC
In-Game Requirements
-
Empty Space in Party
-
Access to Celadon City
-
5500 Game Corner Coins OR In-Game Gift Eevee (optional)
-
Rare Candies if Gift Target is Low Level
-
Spore/False Swipe Pokemon and Balls for Capture Targets
-
Master Ball for Capture Targets (optional)
Tools Used
Video Examples
- N/A
The Guide
Finding a Target Seed
The first step in finding a viable competitive target is to identify its 32-bit RNG seed, which is represented as 8 hexadecimal digits. (ex. 1A2BCDEF)
Note: What's the difference between an Initial Seed and any other Seed
Up until now, we've only focused on 16-bit initial seeds, which are the 4-digit hex numbers the game grabs from the CPU timer1 and uses as a starting point for all future RNG states.
All initial seeds are just 32-bit RNG states with four leading zeroes.
For example, the initial seed BC75, is more accurately represented as
RNG State 0000BC75. You can pass over multiple initial seeds during the
course of normal gameplay, because all 65,536 16-bit seeds are points
contained within a number line starting from Advance 0 up to Advance
4,294,967,295-- which is the maximum 32-bit value ( 2³² ).
if you left your game running for 4.294 billion frames (which takes
just over 828.5 days at 60 frames-per-second) you'd loop back around to
the exact RNG state used for the initial seed.
The best tool for this purpose is the Searcher tab of Lincoln's Ten Lines web tool
It can search all 4.294 Billion RNG States for specific IV Ranges, Natures, Hidden Power Types, and get the 32-bit RNG seed which generates that Pokemon.
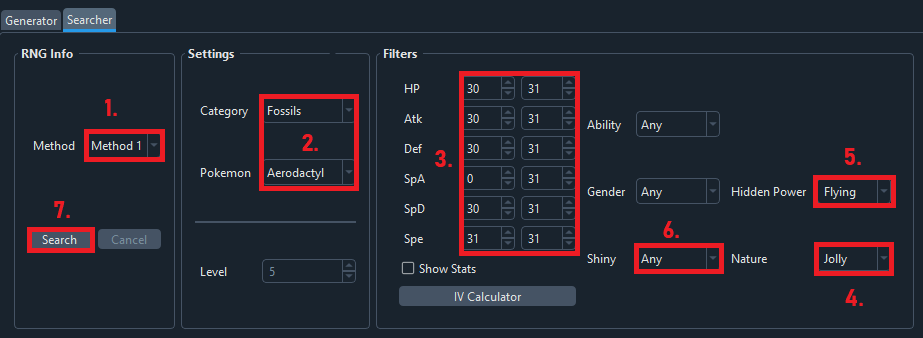
We'll be searching for a Jolly Aerodactyl with the best possible IVs for Hidden Power Flying.
(which is its best option for Flying STAB damage in Gen 3 OU)
1. Open the tool here.
You'll want to be on the Searcher tab.
2. Select your Game.
Optional: Enter your Trainer ID and Secret ID to search for Shiny targets, but as mentioned, its very unlikely to find a Shiny Competitive spread for your randomly generated TID/SID.
3. Set the Method to Static 1.
4. Set your Category and Pokemon to match the Target.
5. Set the Nature to fit your desired Target.
6. Set the Hidden Power Type to match your target.
7. Set each of the required stats in Filters to 30 - 31.
You can ignore either Atk or SpA if your target only uses Physical/Special.
Set Speed to 31 - 31 if you want to ensure maximum speed.
However, note that Hidden Power Fire/Fighting/Psychic/Rock cannot have 31 Speed without sacrificing another stat from being perfect.
8. Click SUBMIT to generate results.
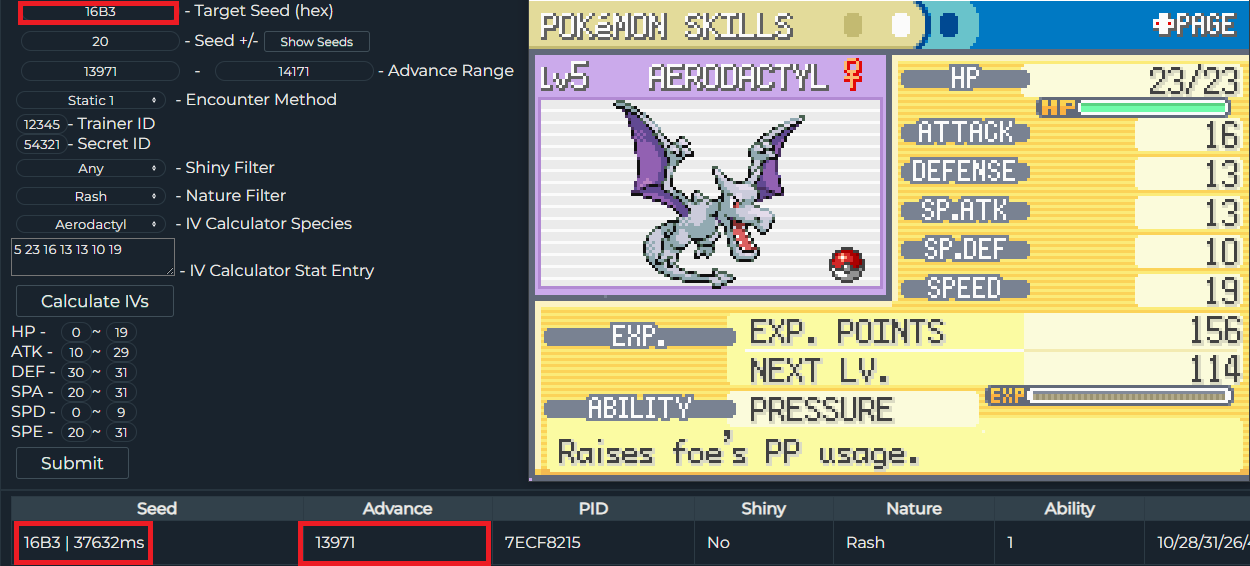
After clicking SEARCH Ten Lines will output a table of results,
with the potential Pokemon that match your desired filters.
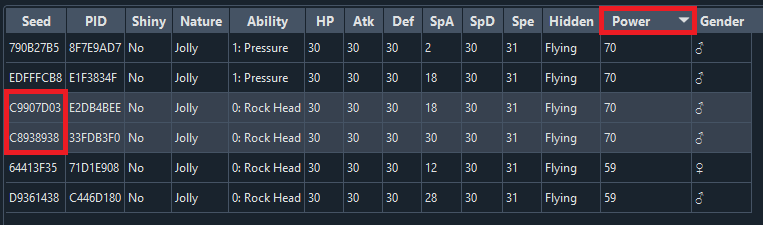
Of these results only two have my desired ability of Rock Head, which is the preferred ability, as it allows Aerodactyl to use Double Edge without taking Recoil damage.
Next, we'll compare these two potential Targets, and see which has the shortest wait time in terms of Initial Seed and Advances.
For that we'll need to cover...
Using Ten Lines Initial Seed
Ten Lines Initial Seed uses an optimized search function to take any 32-bit RNG state and locate the nearest known 16-bit initial seed and the number of RNG advances necessary to reach the target.
It provides the estimated millisecond waiting time for that seed, the total time for each attempt, and the required in-game settings and held buttons that must be used.
All that's needed is to click the Initial Seed button next to your potential targets from Searcher and it will automatically switch tabs and auto-populate the relevant settings.
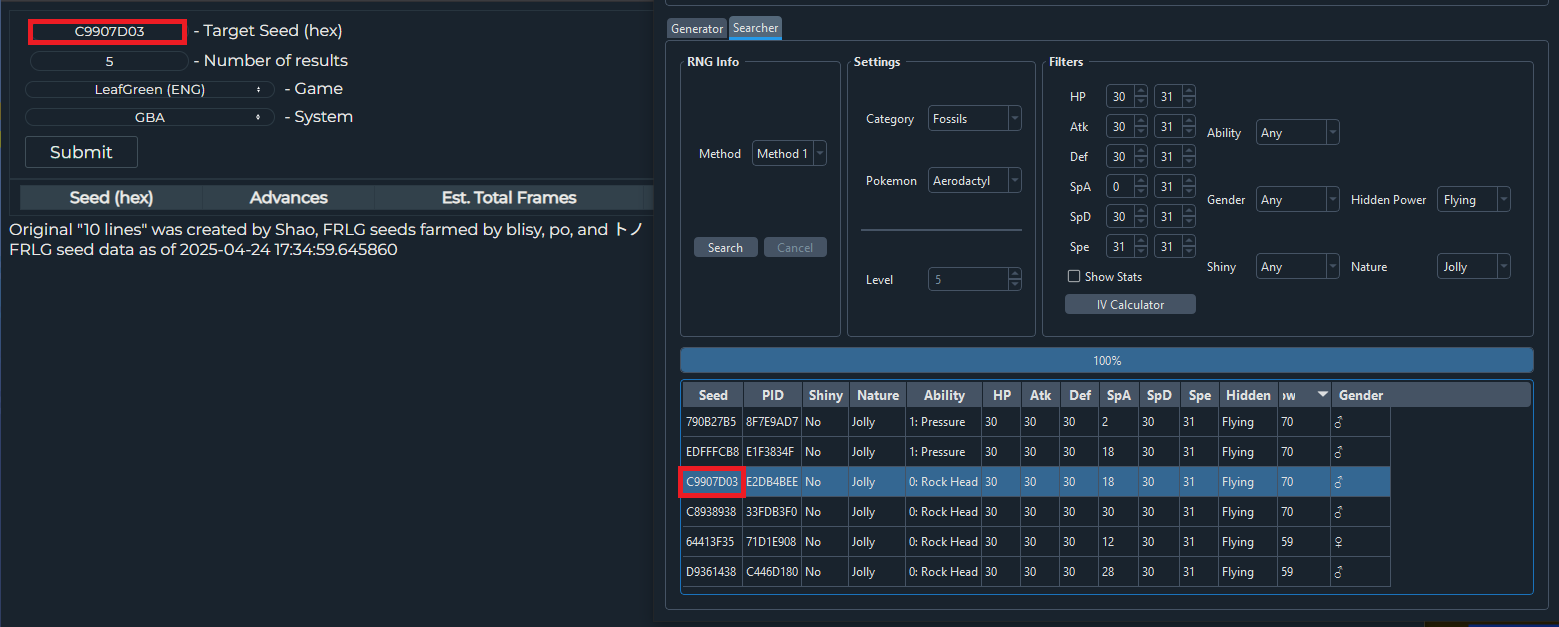
\Click Submit to get the 10 nearest known 16-bit initial seeds that can generate your target Pokemon.
If you'd like to see more results, you can increase Number of Results, but generally these will be longer attempts.
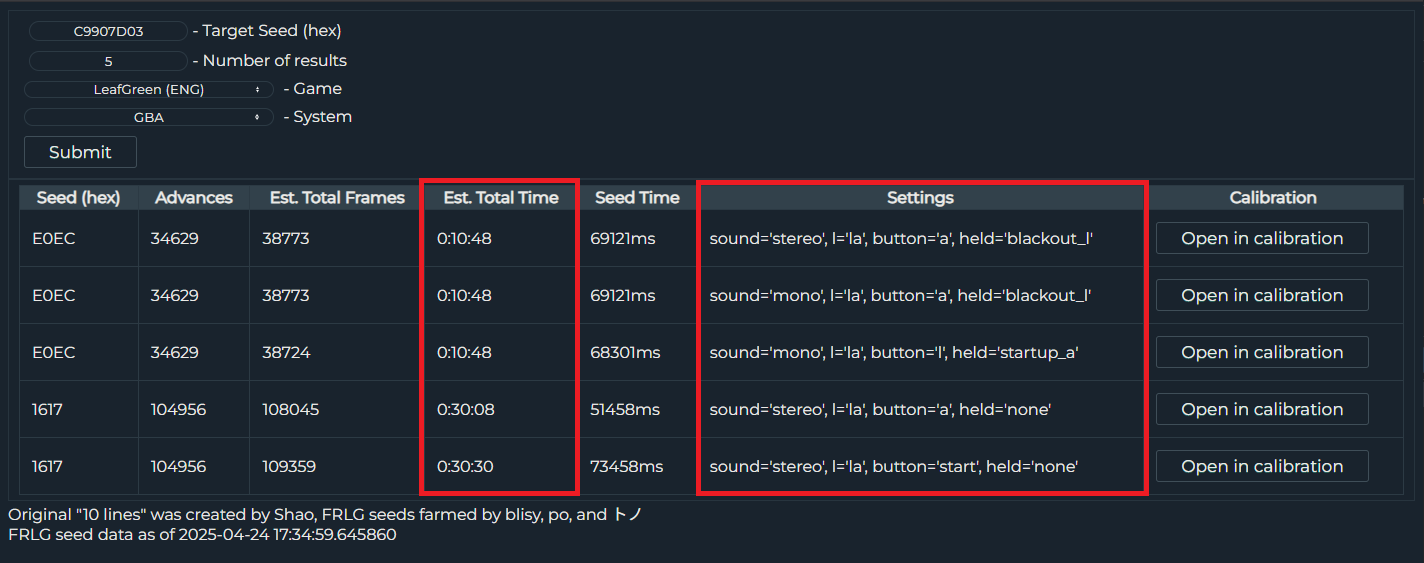
The most important pieces of information in this output are the Est. Total Time and Settings columns.
10 minutes 48 seconds per attempt is the shortest available RNG manip we could do for this particular Aerodactyl.
The settings for those attempts also have blackout_L and startup_A which are advanced held button combos that are needed to modify the initial seed. These add an extra element of variability to each attempt, and will be covered in the next section.
If you were limited to only one 32-bit seed for your target, you'd have to select one of these and proceed. Since we have two potential 32-bit Seeds for our target, it's generally good practice to compare the two.
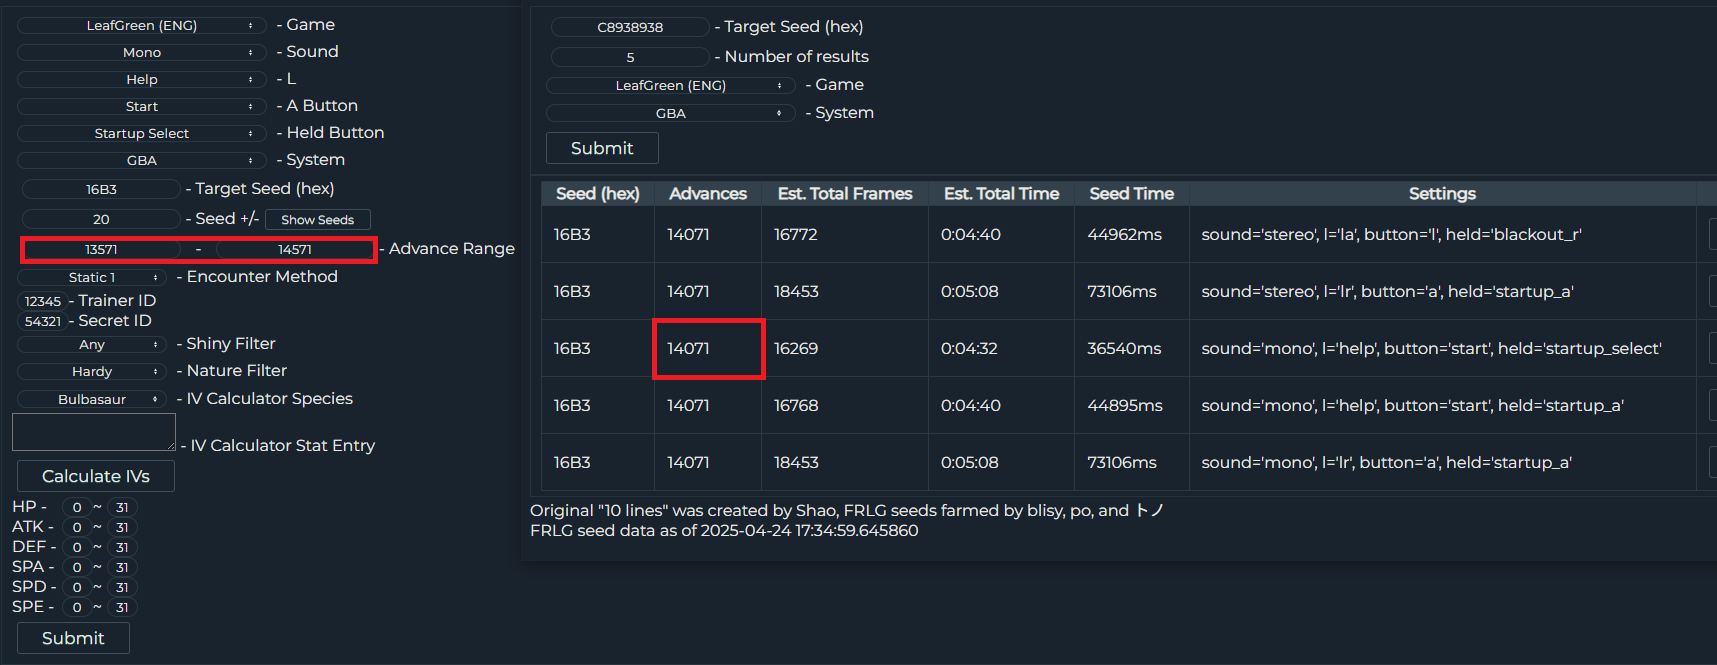
So swap back to the Searcher tab and click the Initial Seed button for a different potential Target. In this case, its 32-bit seed C8938938.
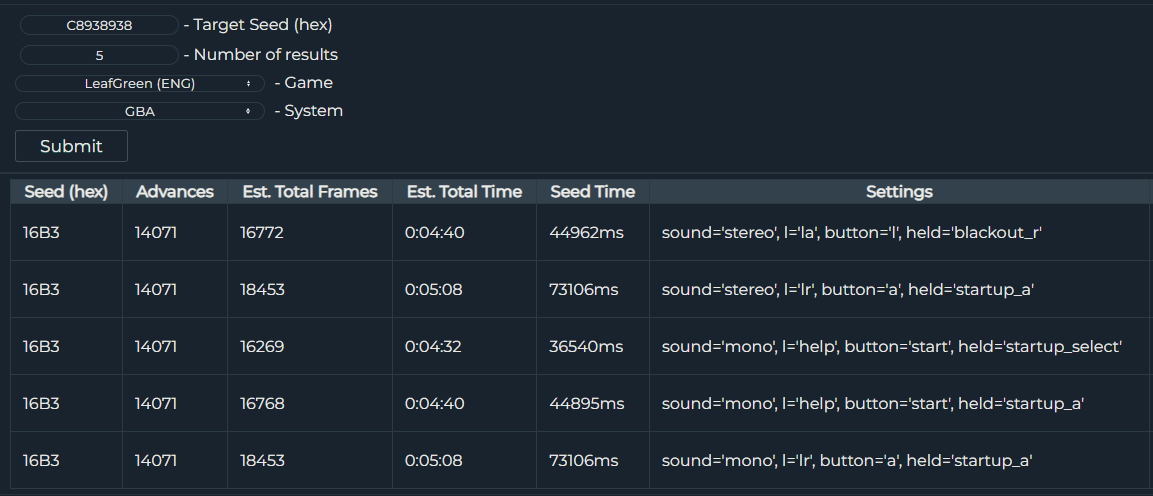
The results for this second seed are highly preferable, as the Est.
Total Times are all around 5 minutes.
However, they also all require various different held= options. In the next section, we'll cover each of these different options and how to properly use EonTimer and Calibration to hit them.
Pre-Calibrating Seed Timer
Because every attempt at our target Aerodactyl will take approximately 5 minutes, we can use a technique known as pre-calibration to confirm our Seed(ms) in EonTimer more quickly.
This involves doing the shortest possible attempts on a repeatable target like the Gift Eevee or a Game Corner Pokemon, ignoring our Target Advances and focusing only on hitting our Target Seed.
This isn't strictly necessary but it has two main benefits:
-
Using Held Buttons introduces a new potential avenue for making mistakes. Spending 5 (or more) minutes waiting, only to get no results can be frustrating. Even worse, calibrating to a false positive result can lead to utter confusion. Pre-Calibration attempts take around 1 minute each, and let you practice and lock-in your Seed(ms) with confidence.
-
Our Aerodactyl is only Level 5 on redemption, whereas these Gift Pokemon are Level 24-25. Using higher level Pokemon for calibration reduces the chance of false positives, and gives us the option to do Manual Seed Lookup using Gen 3 Seed Assistant (if necessary).
If your seed is held=none, your Est. Total Time is under 2 minutes, and your Target Pokemon is above Level 25, then it's reasonable to do your first attempt on the actual target instead of pre-calibrating.
I'll be using the Lv. 24 Dratini from the Game Corner in Leaf Green for pre-calibration, which costs 4600 Coins. The Fire Red equivalent would be the Lv. 25 Scyther for 5500 coins.
(If the Lv. 25 Eevee Gift is still available in Celadon City, this is by far the fastest and best option.)
Make sure to have an empty slot in your party!

If your Target Seed has a held=none option, then nothing changes from basic Static RNG Manipulation.
Reference the following tabs for each of the alternate Held options, and the inputs needed to hit those seeds successfully:
This is the easiest of the held button modifiers to do correctly.
If your target seed has Held: Startup Select in Ten Lines then the process is as follows...

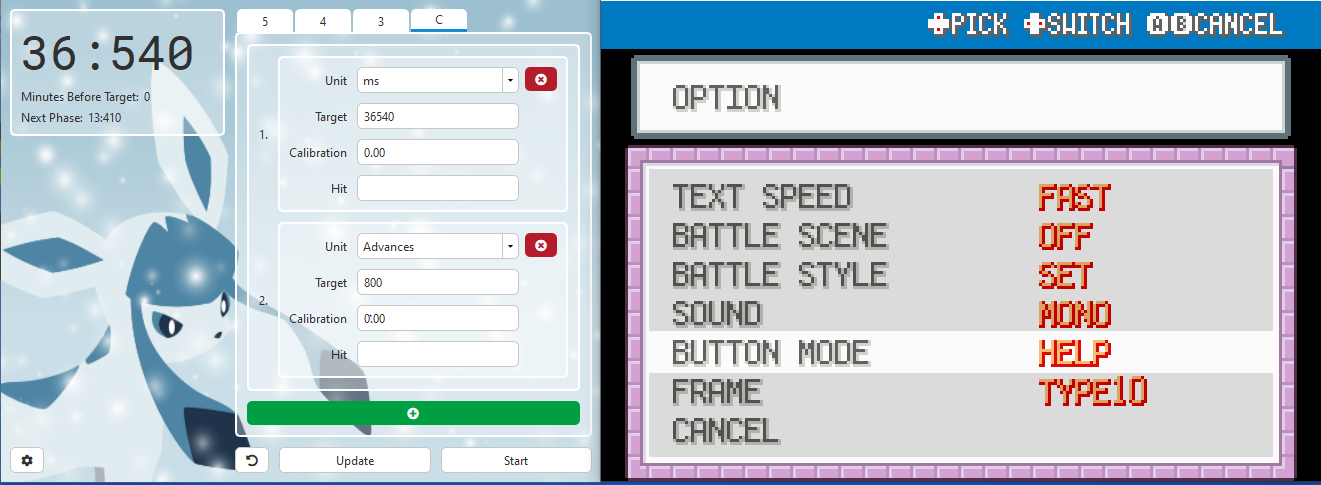
First, get into position in front of the Game Corner attendant, open your in-game settings and set SOUND and BUTTON MODE to match the target from The Ten Lines, then Save and Power Off.
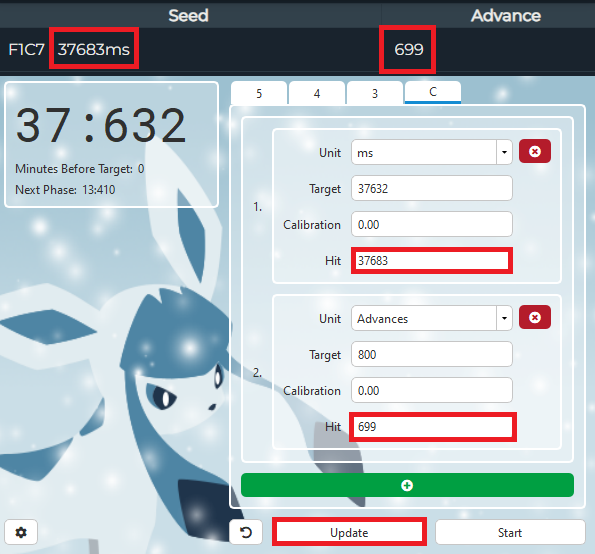
Then, open EonTimer, and go to the Custom Tab (C).
Set Seed(ms) to your Seed Time from The Ten Lines.
Set Advances to 800 (which should be just enough time to redeem your Game Corner prize.)
You're now set-up to do the Pre-Calibration run.
1. Begin holding SELECT before booting the game.
2. Start EonTimer, Boot the game and continue to hold SELECT through the entire intro cutscene
3. Press and hold your Button: input at the 6th beep on the Title Screen, without releasing SELECT
4. Release your Button: input and the SELECT button once you see the File Load screen.
5. Load your game and redeem your Gift Pokemon on the final beep.
This input requires an additional modification, as the Button: input can also be A.
However, if Button: L or Button: Start the inputs are the same.

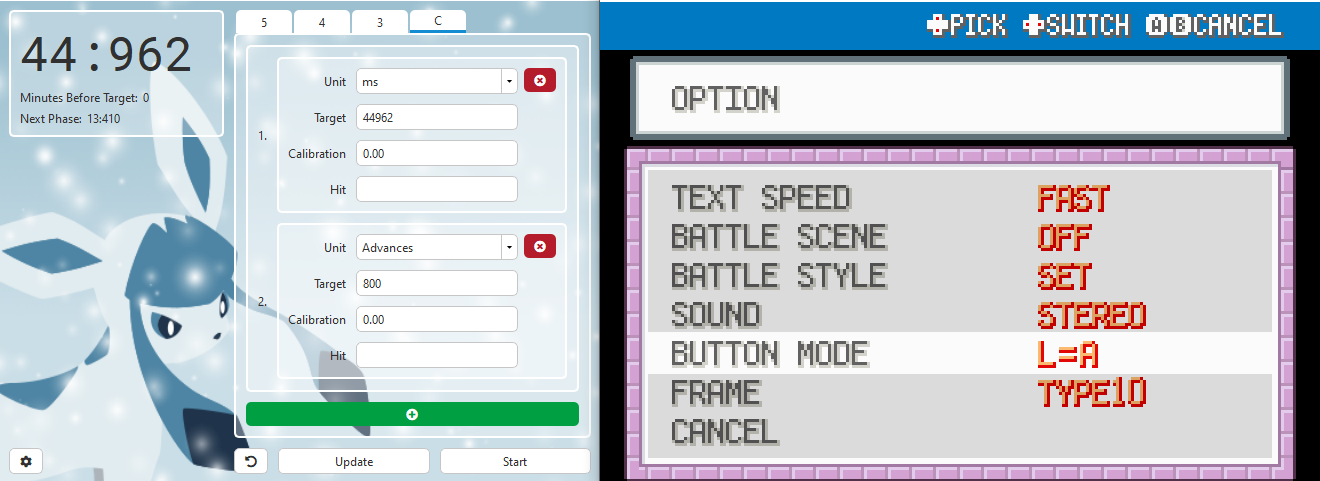
First, get into position in front of the Game Corner attendant, open your in-game settings and set SOUND and BUTTON MODE to match the target from The Ten Lines, then Save and Power Off.
Then, open EonTimer, and go to the Custom Tab (C).
Set Seed(ms) to your Seed Time from The Ten Lines.
Set Advances to 800 (which should be just enough time to redeem your Game Corner prize.)

You're now set-up to do the Pre-Calibration run.
On GBA, begin holding A before flicking the power switch to boot the game.
On DS or 3DS, press-and-hold A when booting the game.
1. Start EonTimer, Boot the game, and continue to hold A through the entire intro cutscene
2. Release A when you see the leaves or flames on the Title Screen (see below image)
3. Press and hold your Button: input at the 6th beep on the Title Screen, until File Load screen appears.
4. Release your Button: input, load your game and redeem your Gift Pokemon on the final beep.
Held Button Release Window

This covers Blackout L, Blackout R, Blackout A, and Blackout AL (which is A + L held together.)

These inputs take advantage of a special window during the FireRed & LeafGreen startup sequence where the input reading function isn't active. They require moderately strict timing, but are well within human capability.
First, get into position in front of the Game Corner attendant, open your in-game settings and set SOUND and BUTTON MODE to match the target from The Ten Lines, then Save and Power Off.
Then, open EonTimer, and go to the Custom Tab (C).
Set Seed(ms) to your Seed Time from The Ten Lines.
Set Advances to 800 (which should be just enough time to redeem your Game Corner prize.)
You're now set-up to do the Pre-Calibration run, but be prepared to press-and-hold your Blackout Buttons. The window happens during the black screen between the copyright text and the GameFreak logo.
Blackout Holding Window

The process is as follows:
1. Start EonTimer and Boot the game as normal, without any held buttons.
2. Start holding your Blackout button(s) during the window (see above image)
3. Release your Blackout input when you see the leaves or flames at the Title Screen (see below image)
4. Press and hold your Button: input at the 6th beep on the Title Screen, until File Load screen appears.
5. Release your Button: input, load your game and redeem your Gift Pokemon on the final beep.
Held Button Release Window
Confirming Pre-Calibration
Now we'll use the Stats and Nature to confirm the Seed Hit using Calibration.
Click the Open in Calibration button to the right of your desired seed in the Initial Seed search results.
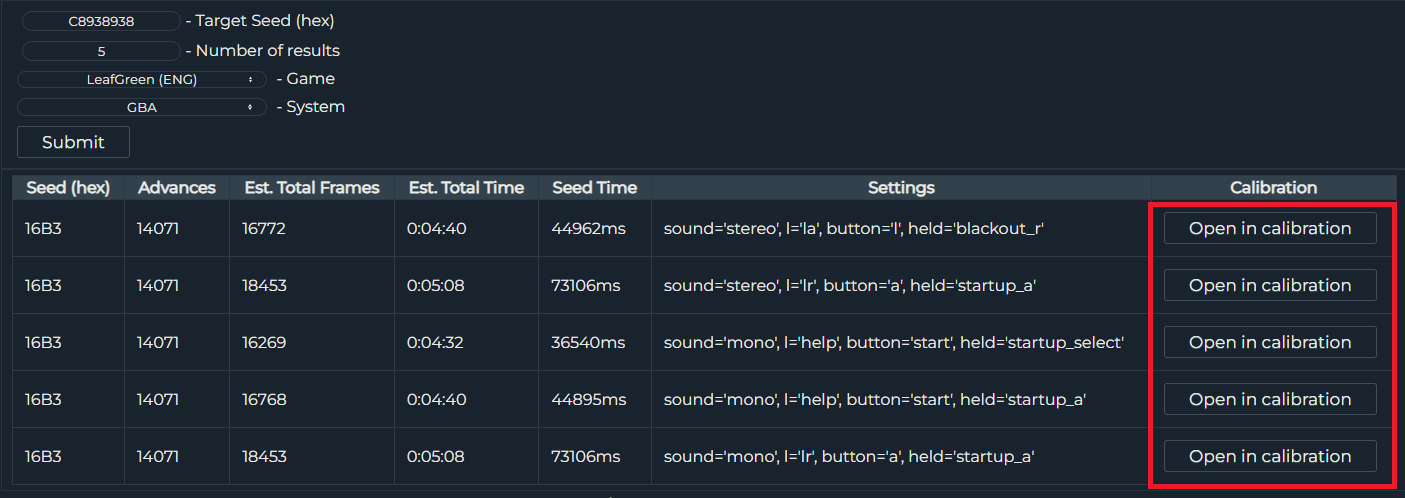
This will open the Calibration tab, pre-populated with the settings needed for your chosen seed.
You'll only need to update the Advance Range, which should be set from 600 to 1000.
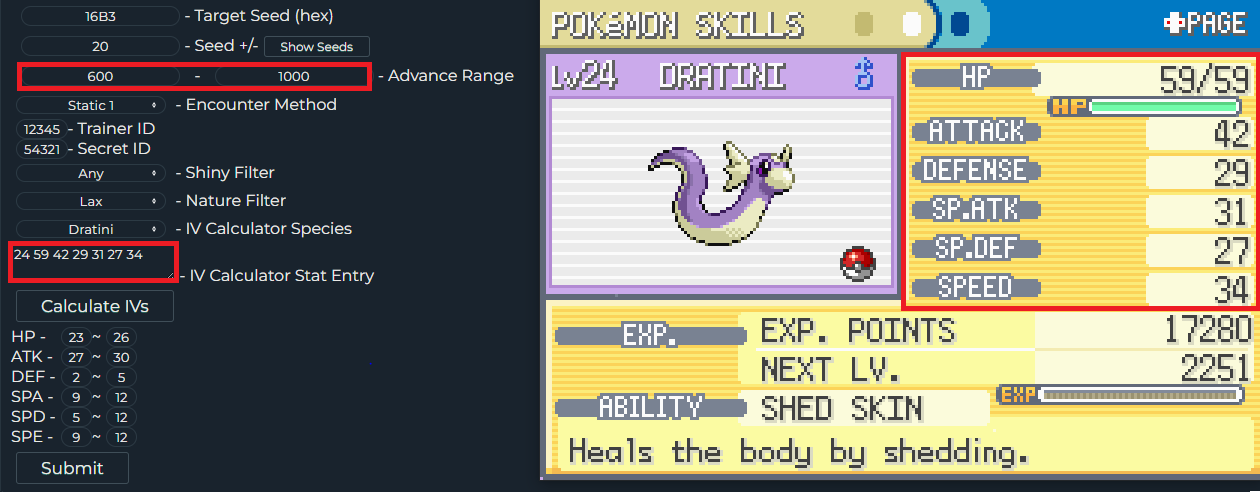
Then enter the Level, Nature, and Stats of the Gift Pokemon and hit Submit.
If you get no results, double check your in-game settings, EonTimer settings, and G3 Calibration Settings all match The Ten Lines for your seed, then try again. It could have just been a mistake with the button input, or an input error in one of the tools.
If you get a result, that means you successfully hit a seed with your held= input.
Enter ms and Advance values into EonTimer and click update.
After this Calibration Update, make one more run to confirm you're
hitting Target Seed.
It's also reasonable to consider it "close enough" once within 16-33ms of your Target Seed, as long as you're getting consistent results each time.
The First Attempt
Now that we've successfully hit our seed, EonTimer's Seed(ms) has been calibrated, and we can start making attempts on our actual target Aerodactyl.
First, we'll need to update the Advance Range in Calibration, which can easily be done by going back to the Initial Seed tab and clicking the Calibration button once again.
It should automatically update Minimum Advances to 1000 early, and Maximum Advances 1000 late.
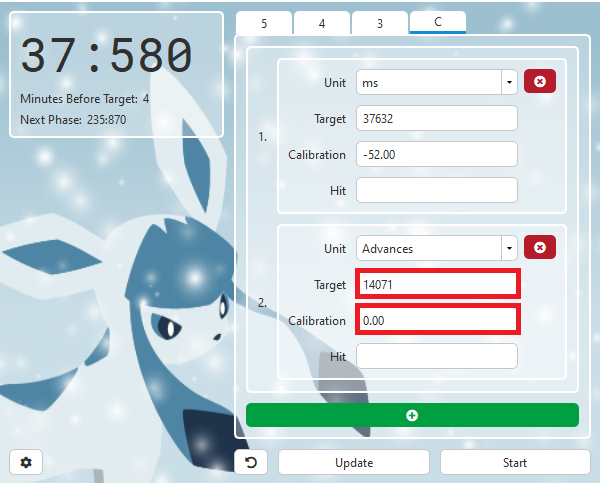
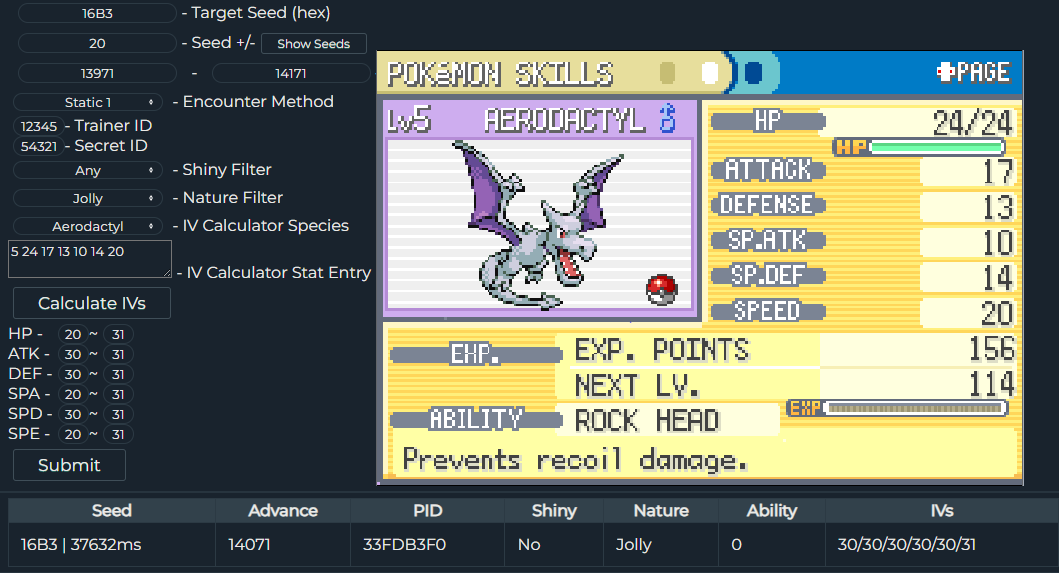
In our example, the Aerodactyl appears on Advance 14071, so our
Advance Range is 13071 to 14071.
This is quite a large range, but different types of encounters/gifts will have different offsets than the Game Corner Prize, so we want to leave room for that variance.
Make sure you're also doing the correct Final A Press as noted below.
List: Final A Press for all possible targets
It is not always clear what button to press and when to press it to encounter the Pokémon on your final timer beep. If a Pokémon just says "Press X in front of it", it means there is no dialogue box & the encounter will start right away. Otherwise, the final text box is described.
Gift Pokemon
-
Bulbasaur: This POKéMON is really quite energetic!
-
Charmander: This POKéMON is really quite energetic!
-
Squirtle: This POKéMON is really quite energetic!
-
Magikarp: So, you'll buy it, am I right? YES/NO
-
Omanyte: Your fossil is back to life! It was OMANYTE like I think!
-
Kabuto: Your fossil is back to life! It was KABUTO like I think!
-
Aerodactyl: Your fossil is back to life! It was AERODACTYL like I think!
-
Eevee: Press A in front of it
-
Abra: (Game Corner) So, you want the ABRA? YES/NO
-
Clefairy: (Game Corner) So, you want the CLEFAIRY? YES/NO
-
Dratini: (Game Corner) So, you want the DRATINI? YES/NO
-
Porygon: (Game Corner) So, you want the PORYGON? YES/NO
-
Pinsir: (Game Corner) So, you want the PINSIR? YES/NO
-
Scyther: (Game Corner) So, you want the SCYTHER? YES/NO
-
Hitmonlee: You want the hard-kicking HITMONLEE? YES/NO
-
Hitmonchan: You want the piston-punching HITMONCHAN? YES/NO
-
Lapras: I want you to have this POKéMON for saving us.
-
Togepi: (Egg) Please, I'd like you to have this.
Stationary Pokemon
-
Snorlax: It attacked in a grumpy rage!
-
Electrode: (Power Plant) Press A in front of it
-
Hypno: (Berry Forest) Waaaaaaah! I want my daddy!
-
Mewtwo: Mew!
-
Lugia: Press A in front of it
-
Ho-oh: Press UP while facing up. Stand on the floor tile 1-step before Ho-oh descends.
-
Deoxys: Press A in front of the Red Triangle
Legendary Birds: The birds are a bit unusual, as they have a dialogue box AFTER you press A. So you Press A, the bird is generated, then dialogue shows up.
-
Articuno: Press A in front of it
-
Zapdos: Press A in front of it
-
Moltres: Press A in front of it
If your target is Level 30 or above, then you can safely make this Advance Range even larger.
Lugia, Ho-oh, and Deoxys specifically have rather long cutscenes in between the Final Press and the actual encounter being generated. So expect your first attempt to be off by hundreds of Advances.
Use Rare Candies to your advantage on Low Level targets for this first attempt, if you get multiple results. Once you've confirmed you're hitting close to your Target Advance you can shrink the Advance Range in Calibration down to limit duplicate results or false positives.
Make sure to update the Advances in EonTimer to the new Target Advance as well, and manually set the Calibration for Advances to 0.00. We want to preserve the Calibration for Seed(ms) but start fresh on the Advances.
Using this EonTimer, make your first attempt, making sure to follow
the correct Held inputs as covered earlier. After my first attempt
on Aerodactyl, I hit my Target Seed and was exactly 100
Advances early.
Personally, I only adjust Advances when I actually hit my Target Seed. This prevents drifting too far away from the Target Advance due to human-introduced error.
Every frame of error on Seed translates to one fewer/extra frame passing between the Title Screen and the Target.
From this point, there's no difference between Competitive Static RNG and Beginner Static RNG in terms of process.
As per usual, enter the Seed(ms) and Advance into the Hit inputs in EonTimer and click update to lock-in your Calibration. Then, make another attempt.
Once you start hitting within 16-50ms of the Target Seed, and 1-3 Advances of the Target Advance, you should only adjust if you start to consistently hit early or late.
Optimal Calibration is sometimes early, sometimes late on both Seed and Advance. It can also be useful to adjust only Seed(ms) if you start missing your Target Seed by a consistent amount.
It's normal for inputs to drift over time as a result of human error and fatigue.
Be patient and don't give up! From this point on, it's just a matter of trial-and-error and input accuracy.
Once you understand how to find the 32-bit seeds of Competitive Pokemon using PokeFinder, and using The Ten Lines to lookup the Timings, Settings, and Inputs needed to hit specific seeds-- you're fully equipped to RNG manipulate perfect competitive Pokemon like this!
Next Steps...
Competitive Wild RNG and more Advanced Guides Coming Soon!
Get the Pokemon you wanted? Consider supporting us on Ko-fi & keep us ad free!