Emerald Starter Manip
Overview
The first step of learning to manipulate the RNG of Pokémon Emerald begins with the Starter.
Once successful, you'll have both a Shiny Starter Pokémon and know your Secret ID for manipulating future Shiny Pokémon. It should be noted that you cannot control your TID or SID with this method, but instead are using your TID and a Shiny Starter to deduce your Secret ID.
Recommended Setup
- Pokémon Emerald (any language)
- GameBoy Advance, Nintendo DS or DS Lite
- Windows 10/11 PC
Tools Used
Video Examples
- Pokémon Trainer Choppy
- im a blisy ._.
- Dislcaimer: These video examples showcase the same process, but with different tools
The Guide
New Game Timer
The first step to getting a shiny starter is to start a New Game, and get to the Name Entry screen.
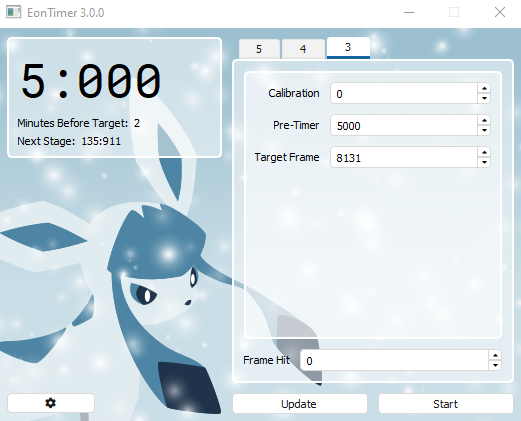
After entering your desired name, open EonTimer, click the Gen 3 tab,
make sure Calibration is 0 and Timer is set to 950 frames.
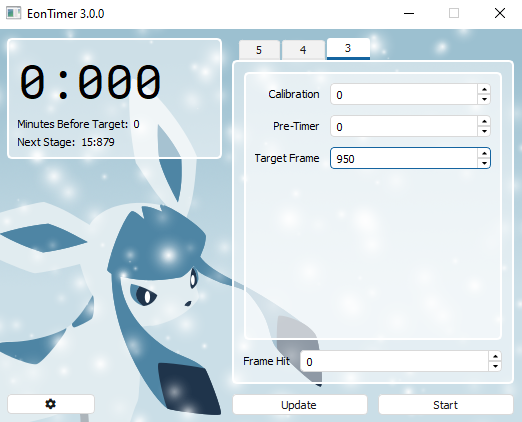
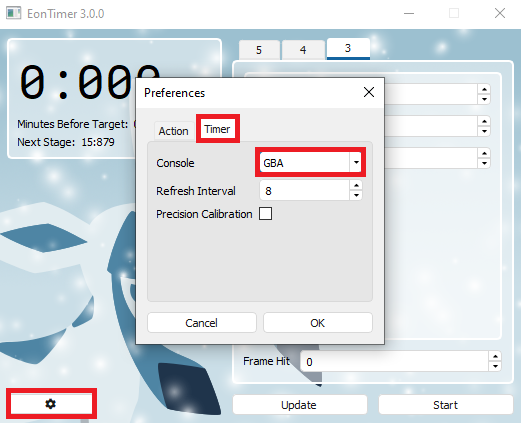
You should also click the gear icon, and make sure your console setting is correct. regular GBA and GBA Games on the DS have slightly different frame rates.
GBA: 59.7275 fps
NDS - Slot 2: 59.6555 fps
Having it set incorrectly will make longer timers inconsistent relative to the actual game. If you’re playing on unofficial hardware or emulator, stick with GBA as this is usually the default.
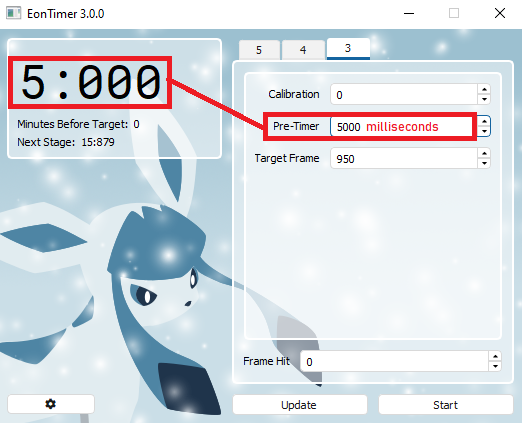
Pretimer is optional.
When set to 0, clicking Start on EonTimer will immediately start the 950
frame timer.
Setting this to 5000 will create a 5 second countdown allowing you to
time the A-press to leave the naming screen.
Once everything is set up correctly, advance to the next screen and start EonTimer at the same time.
The goal is to press A with the 6th beep on this text box:
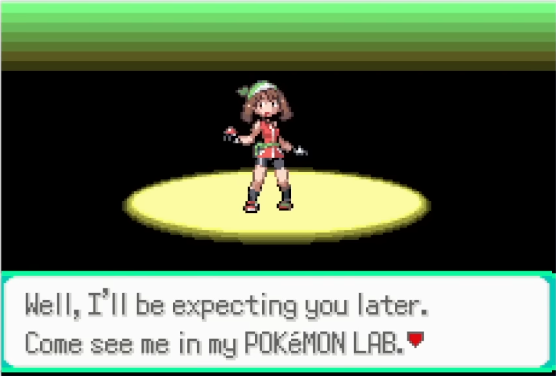
This will cause the game to advance to the Inside of the Truck, at which point, you can open your Trainer Card and check your Trainer ID.
Finding Potential SIDs
The Trainer ID was set immediately upon leaving the Naming Screen.
Emerald used this Trainer ID to seed the RNG, which then determines your
Secret ID.
Upon pressing A at the final text box of the intro cutscene, the Secret
ID is locked in 50 RNG advances later.
Note: Frames Vs Advances
Frames and Advances are often used interchangeably across RNG documentation, guides, and tools.
Frames is a commonly used term to describe game-state intervals in Speedrunning and Fighting Games. Updating video game logic every visual frame is a common practice, and this is generally how it works Generation 3, but not always
However, in later games this isn’t always the case. The frames you visually see might be completely separate from the game’s logic. RNG Advances accurately describes what’s happening, no matter the situation.
By setting EonTimer's Target Frame to 950, we hope to land on the
Secret ID exactly 1000 Frames after the TID was set.
We can view all of these potential SIDs using the IDs section in
JS-Finder.
In order to view Secret ID results you must match the following settings.
Your TID is used as your Initial Seed, which must be input in Hexadecimal.
For example, a Trainer ID of 16804 becomes 41A4 in Hexadecimal.
To get your Initial Seed, type your Trainer ID into the box below and hit convert. It will switch it to a Hexadecimal Representation.
Input your Initial Seed you just converted into the Initial Seed box.
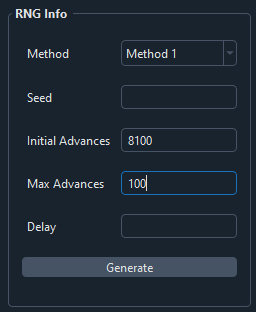
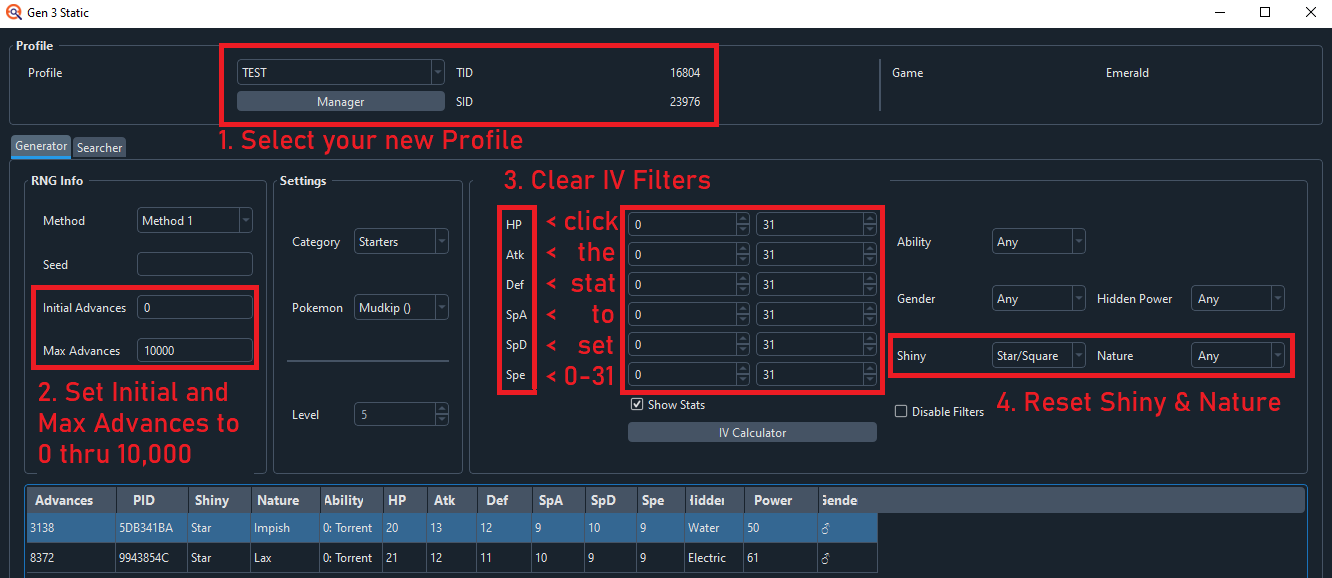
Then, set Initial Advances to 990, and Max Advances to 10,000.
Now, hit Generate.
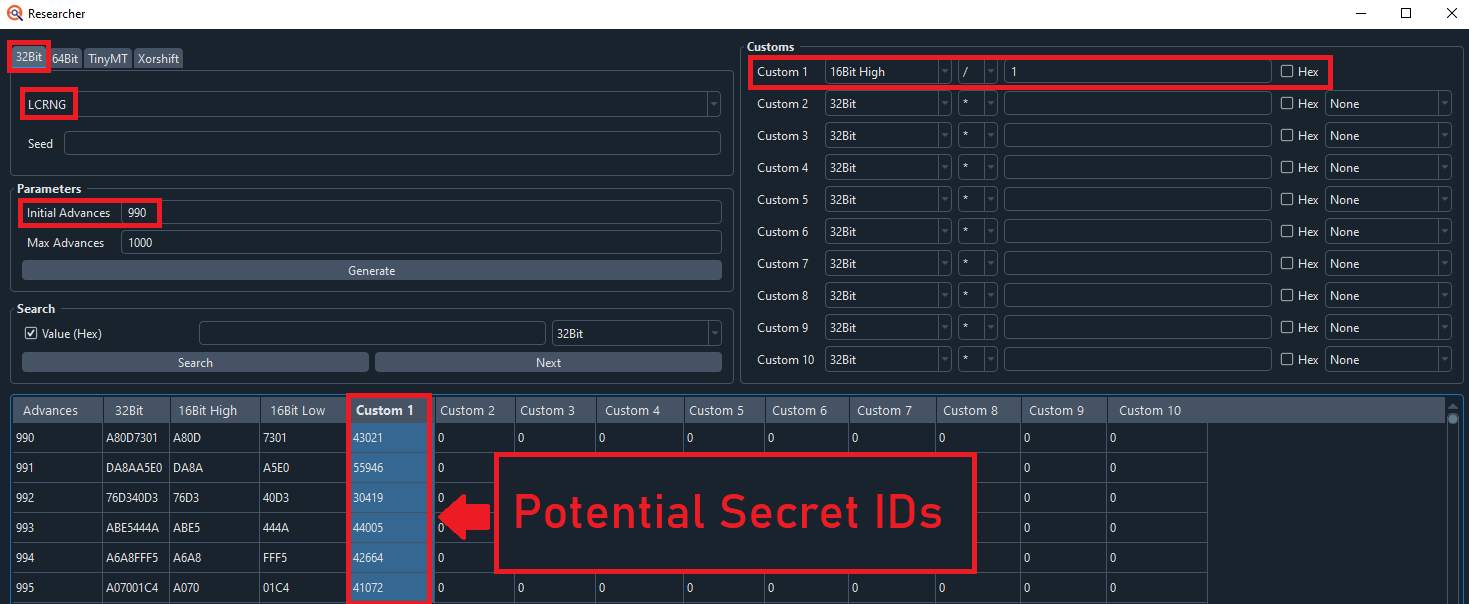
The given settings will generate all of the potential Secret IDs in the "SID" column from Advance 990 onward.
Anything in the TID Column should be IGNORED. It's okay that they do not match YOUR TID.
Advance 1000 was our target so, assuming your last A-press on the intro sequence was frame perfect, this would be your Secret ID.
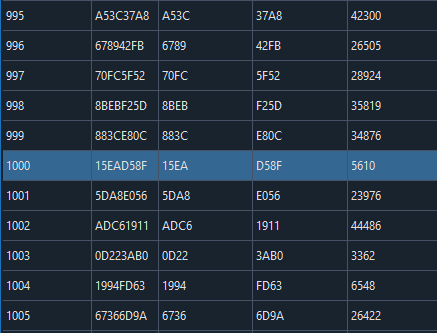
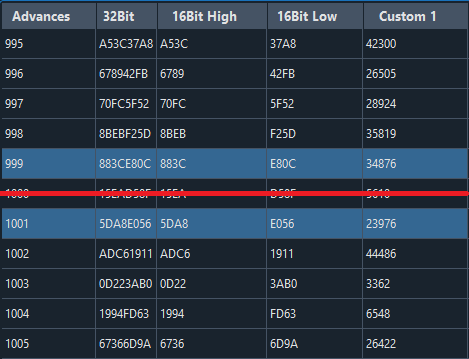
Do not exit this window, it's a list of Secret IDs from 995 to 1005. In the event you didn't hit the Secret ID on Advance 1000, then you can check the others.
In our example, Advance 1000 would be SID 05610. The next step is attempting to RNG a Shiny Starter Pokémon, assuming this Secret ID is correct.
Starter Timer
Now that we know our first potential Trainer ID and Secret ID, we'll be using Ten Lines and EonTimer together.
Open the Ten Lines website, and click the Calibration tab.

We now need to find the closest Shiny Starter available using our TID & our first potential SID.
To do this, we need to set up the Calibration tab appropriately.
Game should be set to Emerald Painting Seed. Painting refers to a more complex technique that will be covered in our Advanced Section, but I will cover how to use this website without doing that.
Console is whatever you're playing on. For this guide, I was using a Nintendo DS.
Target Seed should be set to 0000. This is because
Emerald's RNG is coded incorrectly.
During the New Game process, our Trainer ID was also the RNG seed.
However, after resetting, it always defaults back to seed 0000.
Unlike Ruby & Sapphire, this has nothing to do with the cartridge's
battery, it is a coding error.
Seed+/- is 0. This is used to see adjacent seeds to our target. We currently will only be able to hit 1 seed, though, so we want to see nothing adjacent to our target.
Minimum Advances is set to 0, but getting past the title screen and
loading into the game will always take at least 10 seconds. This means
any Shiny below 600 is likely impossible to hit.
Maximum Advances is set to 10,000, which takes 166.67 seconds or just
under 3 minutes of waiting. You can increase this number if you get no
results.
Offset should be set to 0.
Method should be left at Static 1.
Category should be starters, and then for Pokemon select the starter you want to manip.
Shiny is set to Star/Square, which will show every potential Shiny. Star vs. Square doesn't matter in any game other than Sword & Shield, but Pokémon transferred from Gen 3 up to those games will retain their Star/Square Shiny status.

Once you've matched these settings in the calibration tab, click Submit.

For our example TID\SID, the nearest Shiny starter is 8131 RNG advances
after the game starts, and so we can set Target Frame in EonTimer to
8131.
First Attempt
We're now ready to progress the story in-game, up until the point where
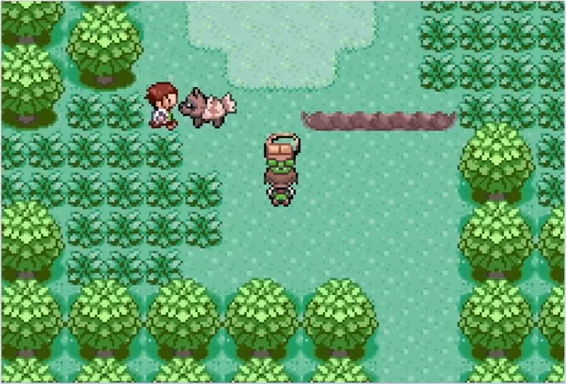
your character is standing in front of the Starter bag.
Save the game right here in this spot, and then use A+B+START+SELECT to Soft Reset and Start EonTimer. (If using PreTimer, then you'll do the Soft Reset after the 5 second countdown.)
Skip past all of the intro cutscenes as fast as possible, and then wait
on this screen for your desired starter Pokémon.
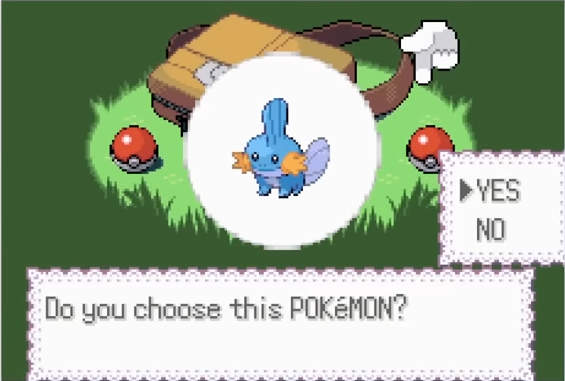
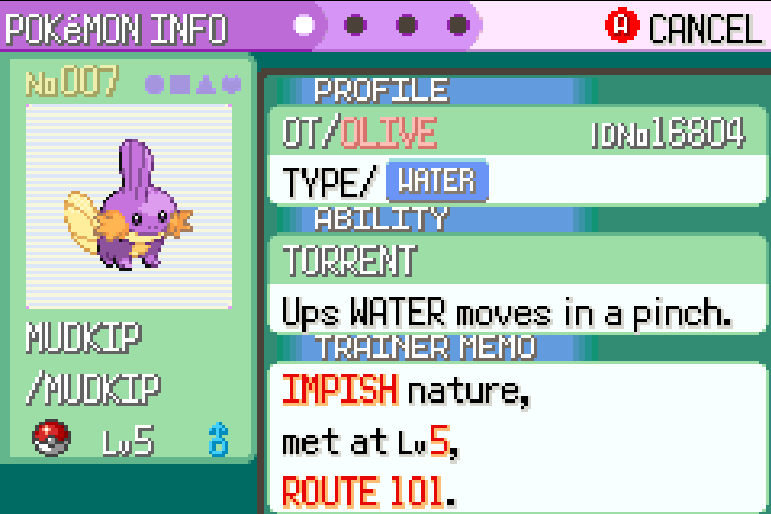
The final A-press is on YES. Wait until the 6th Beep in EonTimer, press A, and then go to POKéMON in battle to open the Summary of your Pokémon and check the Stats and Nature.
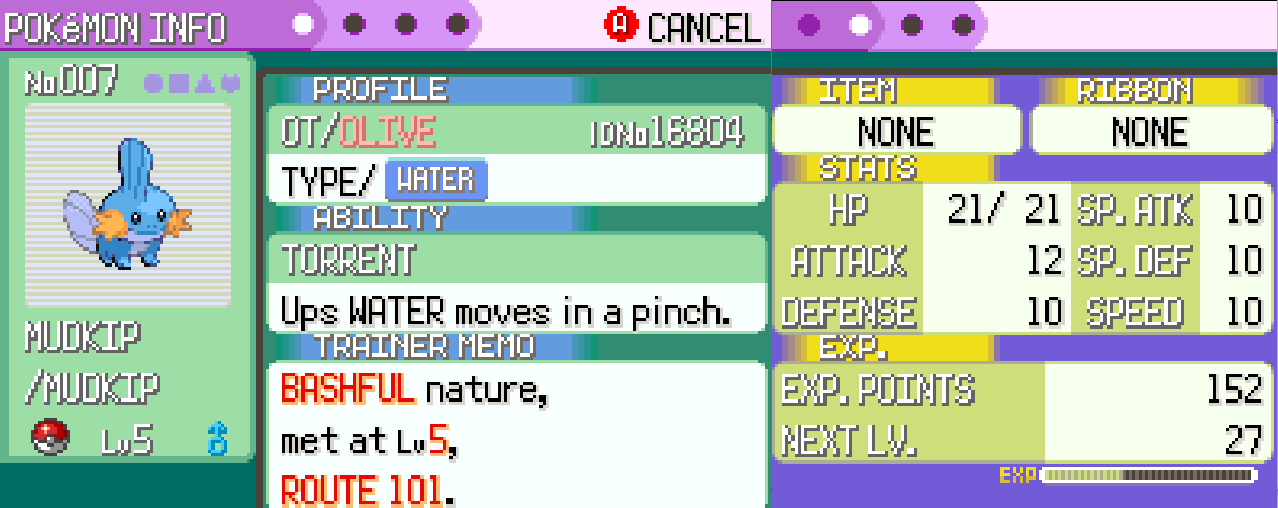
The next step is to plug these stats into the Ten Lines and determine how close the attempt was to the target RNG Advance of 8131.
Adjustment
Before we calculate our stats, we want to change some settings in Calibration so we can search effectively.
We want to change Initial Advances to be about 50 before our target, and Maximum Advances to about 50 after.
In the example, I was aiming for 8131 and set Initial Advances to 8100. And I set Maximum Advances to 8200.
This ensures that you don't get too many matches, and are only searching
for Pokémon near your target. Since the Starter is only Level 5,
searching too large of a range will result in false positives that
aren't actually the Pokémon you hit.
Input the Nature of the Pokémon, and then set the Shiny dropdown to Any.
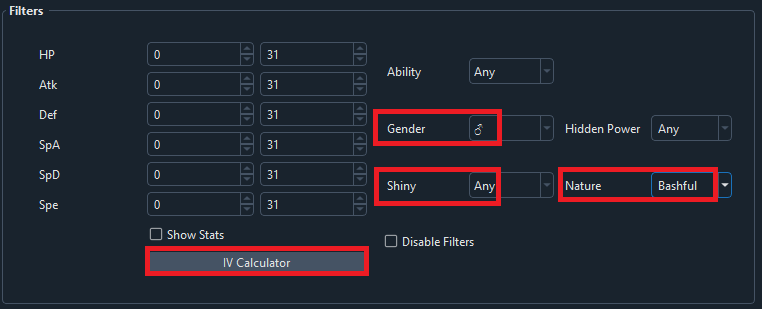
When you do that, the IV Calculator will appear.
In it, input your Pokémons Level & Stats. If the bar where you enter them turns red, that means you made a typo or forgot to enter something.
Once the settings are correct, click Submit to check for matches.
If you don't get any matches, then gradually expand the range by
lowering Initial Advances, and increasing Maximum Advances.

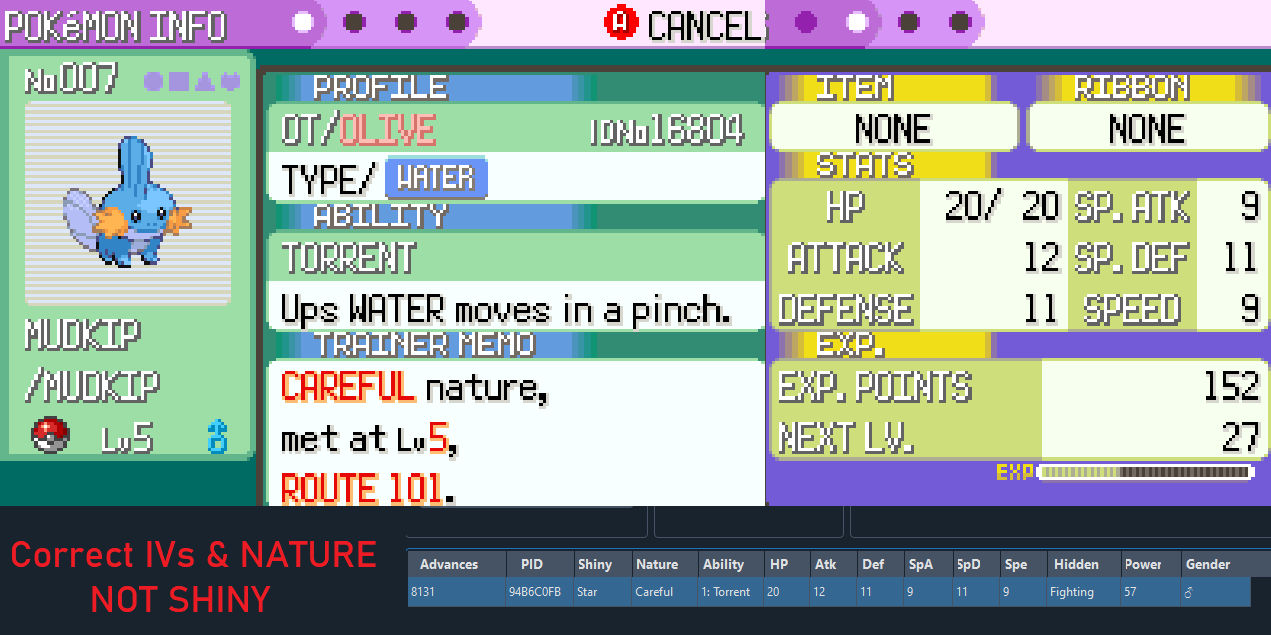
The Bashful Mudkip received on the first attempt was 8129, which is
2 advances early compared to the target of 8131. EonTimer's
Calibration function allows us to automatically adjust the timer for
this difference.
Enter 8129 into the Frame Hit box, and click Update.
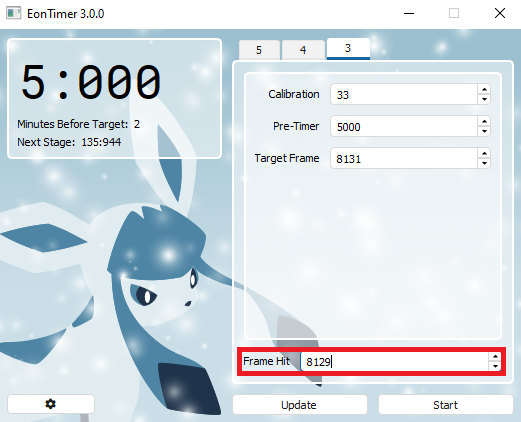
Calibration will update with a number of milliseconds equal to the difference between your Target Frame and the Frame Hit. In the example, Calibration becomes 33 after clicking update, because we were 2 frames early. At 60 frames per second, each frame lasts 16.66667 milliseconds.
From here, the goal is to try again using this timer, until you've hit the Starter on your Target Frame.
As a rule of thumb, once you start being off by 1 advance either above-or-below the target you can stop adjusting EonTimer. 16.666 milliseconds is a very small amount of time, and well within the margins of human error.
Eventually, you'll hit the Target Frame and the IVs and Nature will match, but it will not be Shiny.
This means that you were not frame perfect on your Secret ID A-Press
when exiting the Intro Cutscene earlier, and that's okay! In our
example, this means our Secret ID was not 05610.
This is why it's recommended to save the list of potential Secret IDs that are near 1000.
Rather than starting a New Game and trying to hit Advance 1000 again, you can instead change Secret ID in the Ten Lines to one of the nearby ones. In this example, I moved to Advance 1001, which is Secret ID 23976.
The process for checking this Secret ID is the same as the first. You'll
want to reset the Calibration Tab back to how it was when searching
for the nearest Shiny Advance in Starter Timer
With the new Secret ID of 23976 in place, the next potential Shiny
Starter is on Advance 3138.
Repeat the cycle of:
- Change SID in Calibration
- Search for Nearest Shiny Starter
- Make Attempt and Calculate Stats
- Adjust EonTimer
- Repeat Attempts Until Stats \ Nature Match
- If not Shiny, return to Step 1...
Until...
Failure Conditions
It's absolutely possible to get your Shiny Starter after checking only 1
or 2 SIDs. However, it entirely depends on how accurately the timer was
hit during the intro cutscene, and whether or not errors were made.
It's fairly common for first timers to check 5 or more SIDs without
seeing a Shiny. It can be frustrating, but DON'T GIVE UP.
However, as a general rule, I don't recommend checking beyond the
range of 995 to 1005. If the Intro portion is done correctly, it's very
unlikely to be more than 5 advances off.
In the event you've verified your Secret ID is definitely not between
995 to 1005, it's a good idea to start a New Game and try hitting
Advance 1000 on a new Trainer ID.
It's a bit of a gamble either way. You could be one extra SID check away
from your Shiny, or you might have made a mistake in the Intro Sequence
and wind up checking 20 SIDs with no Shiny.
Whatever you choose to do, once you see a Shiny Starter and your Secret
ID is confirmed, RNG manipulating the rest of the game is now available
to you.
Next Steps...
With the Starter & TID/SID Manip out of the way, you're ready to move on to the next steps! Either Static or Wild Manips will do, although, Wild is slightly more challenging. Hope to see you there!
Get the Pokemon you wanted? Consider supporting us on Ko-fi & keep us ad free!